INSTALLING ECLIPSE IDE ON WINDOWS
FOR JAVA AND C/C++ DEVELOPERS
This detailed walkthrough for Java and C/C++ developers explains how to install Eclipse IDE on Microsoft Windows. Installation of Cygwin required for C/C++ development is also described. Using Eclipse to create simple test programs is illustrated.
Revision 20190205
© Copyright 2019 Alexander Murashkin
Introduction
As you are aware, websites and software are frequently updated. When you follow these instructions, you may see some differences between the actual installation process and the process described in the instructions.
Unless otherwise stated, Windows, Java, Eclipse, and Cygwin components are assumed to be 64-bit. Look in Appendix 15 – Using 32-bit Software if you are interested in 32-bit versions.
Eclipse requires Java Platform, Standard Edition (Java SE) to run. The main text of this document describes how to install Java SE 11, specifically Oracle OpenJDK 11. If you need to install a different Java version or variant, look in Appendix 8 – Installing Oracle JDK for Java SE 11 (Long Term Support) and Appendix 9 – Installing Legacy Versions of Java SE.
Eclipse, Java, and Cygwin components
To use Eclipse for Java and/or C/C++ development, you shall install all or some of the following software components
Java Development Kit (JDK) for Java Platform, Standard Edition 11 (Java SE 11), one of the following
Oracle OpenJDK – free, open source license
Oracle JDK – if commercial license is required
Eclipse, one of the following
Eclipse IDE for Java Developers
Eclipse IDE for Java EE Developers (includes IDE for Java Developers)
Eclipse IDE for C/C++ Developers (includes CDT below)
Eclipse C/C++ Development Tooling (CDT) if both Java and C/C++ programs are to be developed.
Cygwin (Devel package) if C/C++ programs are to be developed.
Enabling Programming Languages
Enabling all programming languages
To enable everything - Java, Java (Jakarta) Enterprise, and C/C++ development - install the following combination
Java SE Development Kit (JDK)
Eclipse IDE for Java EE Developers (includes IDE for Java Developers)
Eclipse C/C++ Development Tooling (CDT)
Cygwin (Devel package)
Total disk space that is required to install all mentioned above software is approximately 11 GiB.
Enabling Java SE programming language only
To enable only Java SE - install the following combination
Java SE Development Kit (JDK)
Eclipse IDE for Java Developers
Total disk space that is required to install all mentioned above software is approximately 0.5 GiB.
Enabling C/C++ programming languages only
To enable C/C++ development only - install the following combination
Java SE Development Kit (JDK)
Eclipse IDE for C/C++ Developers (includes CDT below)
Cygwin (Devel package)
Total disk space that is required to install all mentioned above software is approximately 11 GiB.
Specific programming languages requirements
You may save your time and disk space if you install only necessary software components.
Here is a table that describes minimum software requirements depending on programming languages that are used for development. Select the column corresponding to the languages and install all components marked with Yes.
| Disk Space (GiB) | Setup Space (GiB) | C and C++ | Java | Java and Java Enterprise2 | C, C++, and Java | C, C++, Java, and Java Enterprise2 | |
|---|---|---|---|---|---|---|---|
| Java Development Kit (JDK) | 0.3 | 0.2 | Yes | Yes | Yes | Yes | Yes |
| Eclipse IDE for Java Developers | 0.2 | 0.2 | Yes | Yes | |||
| Eclipse IDE for Java EE Developers * includes IDE for Java Developers | 0.4 | 0.4 | Yes | Yes | |||
| C/C++ Development Toolkit (CDT)1 | 0.06 | - | Yes1 | Yes1 | |||
| Eclipse IDE for C/C++ Developers * includes C/C++ Development Toolkit | 0.3 | 0.2 | Yes | ||||
| Cygwin (Devel package) | 10 | 2 | Yes | Yes | Yes | ||
| Installation Disk Space (GiB) | 10.7 | 0.5 | 0.7 | 10.6 | 10.8 | ||
| Temporary Setup Space (GiB) | 2.4 | 0.4 | 0.6 | 2.4 | 2.7 |
The temporary setup space mentioned above includes disk space needed to store setup files (the downloaded ZIP archives, packages, and setup programs). Unless you remove the setup files after each step, you will need disk space equal to the sum of the installation and temporary space.
Note 1 - C/C++ Development Tooling (CDT) is an add-on to Eclipse. If a mixed C/C++ and Java development is required, install Eclipse IDE for Java (or Java EE) first and CDT add-on second.
Note 2 - To run Java Enterprise programs an appropriate Java Enterprise Application Server is required (that is out of this document scope).
Java Standard Edition (Java SE)
Introduction
Java Platform, Standard Edition (Java SE)🌐 is a software platform that lets you develop and deploy Java applications. Eclipse IDE is written mostly in Java, for this reason, it requires Java SE to run.
If you are developing Java programs, you will also need Java SE to be installed. In many cases, the same Java SE installation can be used to run Eclipse IDE itself and to develop and run Java programs via Eclipse IDE. It is also possible to install multiple versions and variants of Java SE and to use some of them to run Eclipse and some of them for development.
Requirements
It is recommended to install Java SE 11 64-bit Development Kit (JDK). Free (open source) JDK variant is called Oracle OpenJDK, its installation is described below. If you prefer a commercial variant, see Appendix 8 – Installing Oracle JDK for Java SE 11 (Long Term Support).
You will need approximately the following free disk space before installing Java SE 11
| Java SE 11 64-bit Folder Size after Installation | Size of Downloaded ZIP or Setup File | Temporary Total Size | |
|---|---|---|---|
| Oracle OpenJDK (free) | 286 MiB | 179 MiB | 465 MiB |
| Oracle JDK (commercial) | 278 MiB | 151 MiB | 429 MiB |
Abovementioned temporary disk space is required to store downloaded OpenJDK ZIP archive file or JDK setup program file. You can remove these files after completing the installation.
Using Legacy Versions of Java
You may install Java SE 10 or Java SE 8 instead of Java SE 11 if so needed. When running legacy Java SE setup program, the setup screens are very similar to the example screenshots below, the main difference is the Java banner color.
See Java Standard Edition 10 (64-bit) and Java Standard Edition 8 (32-bit and 64-bit) in Appendix 9 – Installing Legacy Versions of Java SE for more details.
Note - Java SE 8 does not have public updates after January 2019. Java SE 9 has reached end of support. Users of Java SE 8 and 9 should switch to Java SE 11 or 10.
Downloading Oracle OpenJDK
To download Oracle OpenJDK for Java Standard Edition 11, in your browser, go to JDK 11 General-Availability Release🌐 webpage.
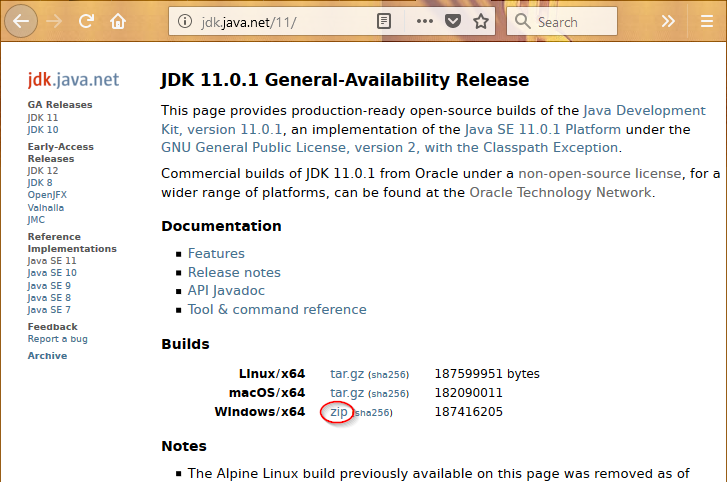
In the Builds section find Windows/x64 line and click on zip🌐 link.
Depending on your browser, you will get a download prompt. Download and save the ZIP file. See Appendix 11 – Downloading and Running files from the Internet if you need help with it.
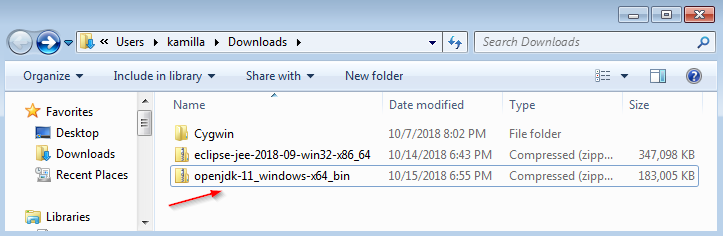
Open the folder containing the saved file. For example
OpenJDK Parent Installation Folder
Decide where you want OpenJDK to be installed to (the installation folder). You have two choices
If you are going to use OpenJDK and nobody else – install it in your data directory, for example, under C:\Users\Richard\OpenJDK. You will not need an administrator access to install OpenJDK in this case.
If other users are going to use Eclipse – install it in the program directory, for example, under C:\Program Files\OpenJDK. You will need an administrator access to install OpenJDK in this case.
The table below describes the parent folder selection. Substitute your actual username for username.
| If you are going to use OpenJDK and nobody else | If other users are going to use it | |
|---|---|---|
| Windows 64-bit & OpenJDK 64-bit | C:\Users\username\OpenJDK | C:\Program Files\OpenJDK |
Note - It is not recommended to install OpenJDK under C:\Program Files\Java folder as this folder is used by Oracle JDK (commercially supported version).
Extracting OpenJDK Files
Create the OpenJDK parent installation folder and extract files from the downloaded ZIP archive there. If you need help with the ZIP files extraction, see an example in Appendix 12 – Extracting Eclipse Files to the Destination Folder.
Open the OpenJDK parent installation folder.
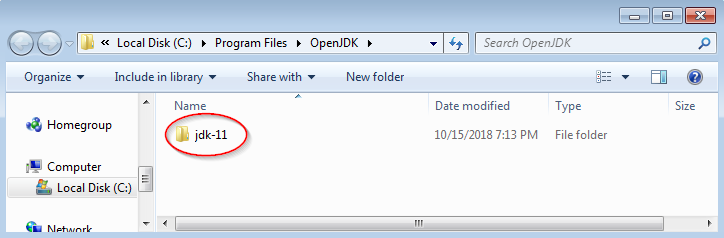
When the ZIP archive is extracted, it creates subfolder matching the OpenJDK version (jdk-11 in the screenshot). Click on the subfolder to view it content.
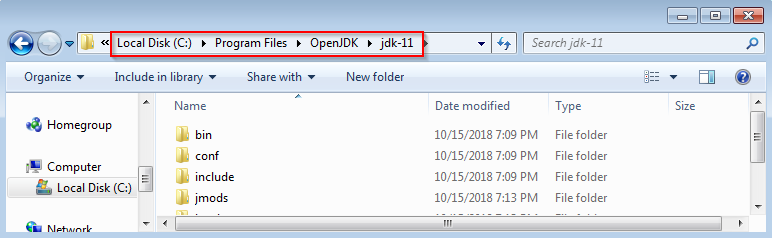
In this example, the complete path to OpenJDK 11 is C:\Program Files\OpenJDK\jdk-11.
Note – The created subfolder name contains JDK version, so you can install multiple versions of OpenJDK in the same parent installation folder. For instance, if you install OpenJDK 12, the subfolder will be jdk-12.
Enabling Eclipse Launching via OpenJDK
To be able to run Eclipse, Eclipse launcher has to know OpenJDK installation folder path. One way is to make OpenJDK default – to add OpenJDK bin subfolder to Windows PATH environment variable as described below.
If you do not want to use OpenJDK as default Java virtual machine, you can use one of the following approaches
After Eclipse is installed, add appropriate -vm option to eclipse.ini file (see Appendix 11 – Downloading and Running files from the Internet).
Add appropriate -vm option to an Eclipse shortcut (see section Using Shortcut Command Line to Specify Java Virtual Machine in Appendix 6 – Making Eclipse Shortcut).
Write your own batch script that adds OpenJDK bin subfolder to PATH variable and calls Eclipse (out of scope of this document).
Write your own batch script that calls Eclipse with appropriate -vm option (out of scope of this document).
Adding OpenJDK to Windows Path
After the OpenJDK files are extracted to an installation folder, consider adding its bin subfolder to Windows system or user PATH environment variable. Add OpenJDK to the system PATH if you want all users to be able to use it. Add it to the user PATH otherwise.
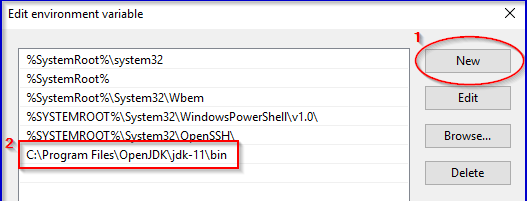
For example, add C:\Program Files\OpenJDK\jdk-11\bin to the system PATH variable. In the case of Windows 10, the Edit environment variable window will look like this

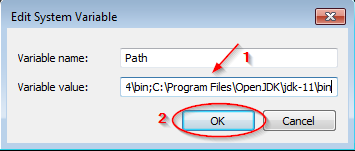
In the case of legacy Windows, the Edit System Variable window will look like this
If you need a detailed walkthrough, see Appendix 1 – Modifying Windows Environment Variables.
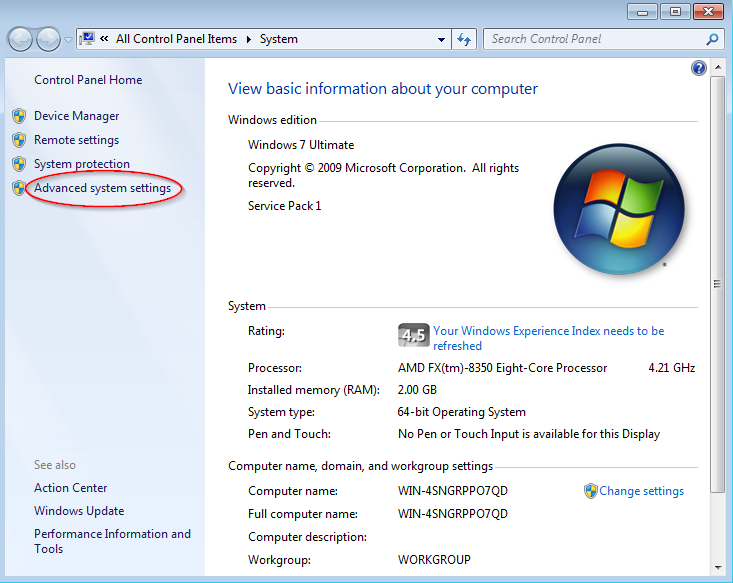
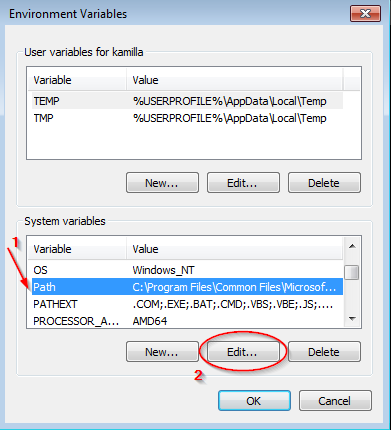
Access Environment Variables window, for example, by going to Windows Search -> “environment” -> Edit the system environment variables -> System Properties -> Advanced -> Environment Variables.
In the Environment Variables window, find existing system (or user) PATH variable or create new user PATH variable. Add the OpenJDK bin folders to the path variable.
Note - The user path is appended to the system path. In most cases, you need Cygwin to be added either to the system or to the user path variable.
Verifying OpenJDK in Windows Path
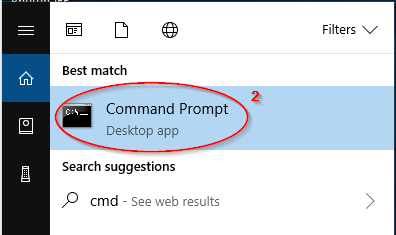
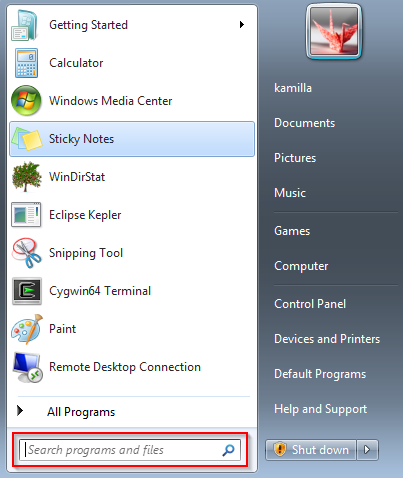
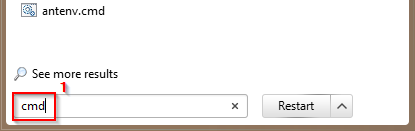
To verify Windows path, launch a command line window. For example, find or open the Windows search box and click inside it, then search for cmd program.
| Windows 10 | Legacy Windows |
|---|---|
|
|
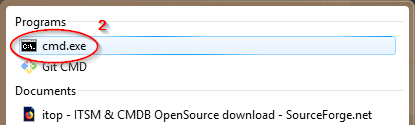
Enter word cmd ① in the search field. Click on cmd ② in the list of found programs.
You will see Windows shell (command line) window.
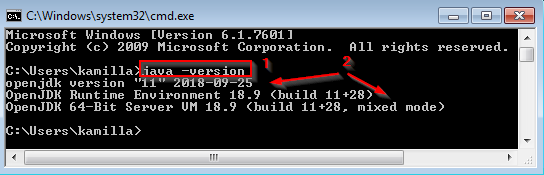
At the shell prompt, enter java -version command ① and press Enter key. You are supposed to see OpenJDK version information ②.
Note - there is a space between java and -version and one dash in the -version.
Installing Eclipse IDE
Eclipse IDE🌐 is an integrated development environment that can be used to develop programs in a variety of programming languages, including Java and C/C++. For a good summary, check Wikipedia’s Eclipse (software)🌐 webpage.
These instructions were prepared when the current Eclipse version was called “Photon”. If you download more recent Eclipse version, you may see some differences between the actual installation process and the process described in these instructions.
Selecting Eclipse Package
Depending on your needs, select what Eclipse packages to install. In this document, the following packages and components are covered
| Languages Packages | Disk Space (MiB) | ZIP Size (MiB) | C and C++ | Java | Java and Java2 Enterprise | C, C++, and Java | C, C++, Java, and Java2 Enterprise |
|---|---|---|---|---|---|---|---|
| Eclipse IDE for Java Developers | 230 | 190 | Yes | Yes | |||
| Eclipse IDE for Java EE Developers * includes IDE for Java Developers | 418 | 339 | Yes | Yes | |||
| C/C++ Development Toolkit (CDT)1 | 58 | - | Yes1 | Yes1 | |||
| Eclipse IDE for C/C++ Developers * includes C/C++ Development Toolkit | 331 | 223 | Yes | ||||
| Total Disk space (MiB) | 331 | 230 | 418 | 288 | 476 |
The total disk space mentioned above does not include space needed to store the downloaded Eclipse ZIP archives. Also note that you can install multiple packages at the same time as long as each package is installed in a separate folder.
You can see more information about available Eclipse packages on Compare Eclipse Packages🌐 webpage. Eclipse packages consist of dozens of smaller components that can be combined and mixed. Such components can be called Eclipse add-ons, plugin, or just software items. If you decide to install additional Eclipse components, Installing CDT Add-on section and Appendix 4 – Managing Eclipse Software provide some examples.
For instance, you can install Eclipse IDE for Java Developers first and then add C/C++ Development Tooling to it (see Installing CDT Add-on section). Or you can install Eclipse IDE for C/C++ Developers first and then add Java Development Tooling to it (out of this document scope). In both cases, you will get Eclipse IDE capable of Java and C/C++ development.
Note 1 - C/C++ Development Tooling (CDT) is an add-on to Eclipse. If a mixed C/C++ and Java development is required, install Eclipse IDE for Java (or Java EE) first and CDT add-on second.
Note 2 - To run Java Enterprise programs an appropriate Java Enterprise Application Server is required (that is out of this document scope).
Eclipse Installation Folder
Decide where you want Eclipse to be installed to (the installation folder). You have two choices
If you are going to use Eclipse and nobody else – install it in your data directory, for example,
C:\Users\Richard\Eclipse\java-2018-09. You will not need an administrator access to manage Eclipse in this case.If other users are going to use Eclipse – install it in the program folder or some other shared folder, for example, C:\Program Files\Eclipse\cpp-2018-09. In this case, some Eclipse management will have to be performed using administrator access, specifically, (a) editing eclipse.ini file, (b) initializing Eclipse data, (c) installing Eclipse software, and (d) updating Eclipse.
The table below describes the destination folder selection. Substitute your actual username for username and appropriate installation name for java-2018-09.
| If you are going to use Eclipse and nobody else | If other users are going to use it | |
|---|---|---|
| Windows 64-bit & Eclipse 64-bit | C:\Users\username\eclipse\installation | C:\Program Files\Eclipse\installation |
You can have multiple Eclipse packages and their versions installed, just use unique installation names.
For example, you can have java-2018-09 and java-photon. If you want to keep Java and C/C++ Eclipse installations separate, you can have java-2018-09 and cpp-2018-09. Or you can have common installation eclipse-2018-09.
Note – Usually the installation folder has exactly one eclipse subfolder that contains all Eclipse files. For example, C:\Users\Richard\Eclipse\java-2018-09\eclipse. Sometimes, in Eclipse documentation, this subfolder is called “root folder”, it may be also called “installation folder”.
It may be confusing, but from the context it shall be easy to distinguish if “installation folder” refers to C:\Users\Richard\Eclipse\java-2018-09 or C:\Users\Richard\Eclipse\java-2018-09\eclipse.
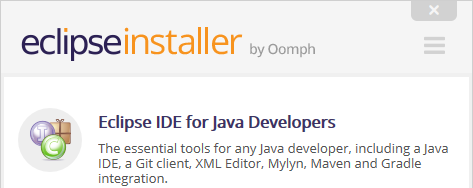
Eclipse Oomph Installer
Using Eclipse Oomph Installer🌐 is the recommended way to install Eclipse. The installer makes it easier to select Eclipse software, download it, install it, adjusts some settings, etc.
Another option is to download and unpack Eclipse ZIP archive. If you are interested in it, see Appendix 16 – Installing Eclipse via ZIP Archive.
Downloading Eclipse Oomph Installer
In your browser open www.eclipse.org🌐
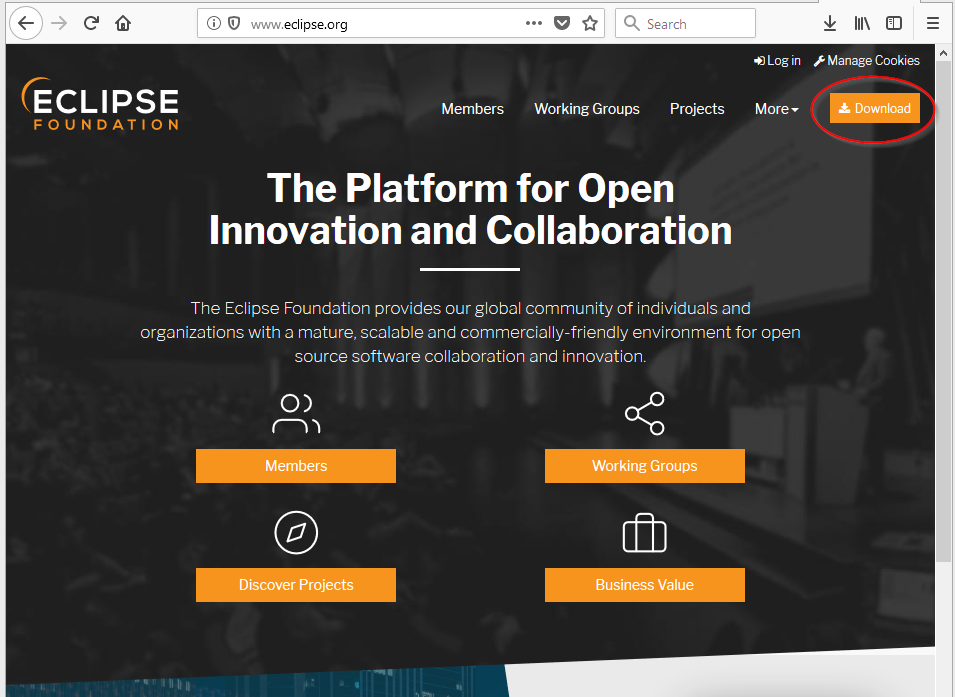
| Click on orange |  | download button. |
You will see Download Eclipse Technology🌐 page
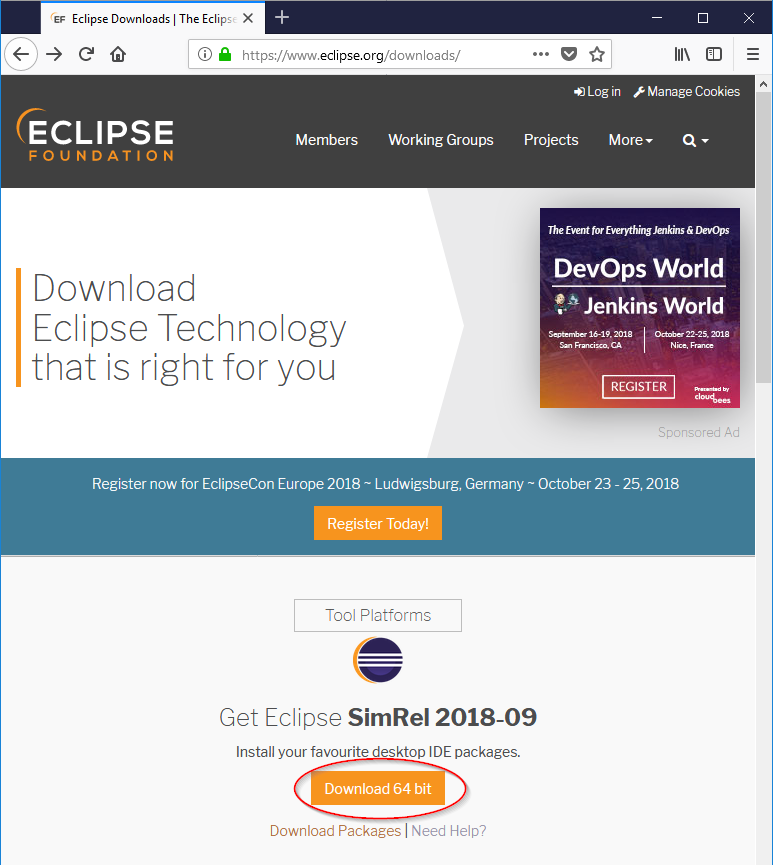
| Click on orange |  | download button. |
You will see Eclipse Installer 2018-09 Download🌐 page (or similar page)
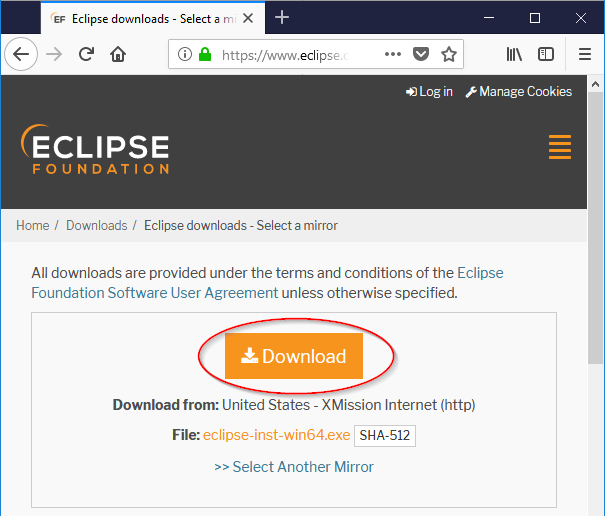
| Click on orange |  | download button. |
Depending on your browser, you will get a download prompt. Download and run the file. See Appendix 11 – Downloading and Running files from the Internet if you need help with the file downloading.
Simple vs Advanced Mode
When Eclipse Oomph Installer is started the first time, it runs in so called simple mode. If needed, the installer can be restarted in advanced mode.
Here is a summary of differences between the simple and advanced modes.
| Feature | Simple | Advanced |
|---|---|---|
| Eclipse shall be used only by the user that installs it | ✓ | |
| Create Eclipse desktop shortcut | ⊕ | |
| Create Eclipse menu entry | ⊕ | |
| Select Eclipse installation folder | ⊕ | ⊕ |
| Select Eclipse product | ⊕ | ⊕ |
| Eclipse installation can be shared between users | ⊕ | |
| Select Eclipse product version | ⊕ | |
| Select Eclipse bitness (63-bit or 32-bit) | ⊕ | |
| Install Eclipse projects | ⊕ | |
| Select Java virtual machine to run Eclipse | ⊕ | |
| Select bundle pool (shared Eclipse files) | ⊕ | |
| Configure network proxy settings | ⊕ | |
| Configure SSH settings | ⊕ | |
| Review and adjust proposed configuration changes | ⊕ | |
| Installation messages log | ⊕ | |
| In some cases, the installer has to be run as Administrator | ✓ |
The simple mode is illustrated in Eclipse Installer in Simple Mode section, the advanced mode explained in Appendix 7 – Eclipse Installer in Advanced Mode.
Running Eclipse Installer the First Time
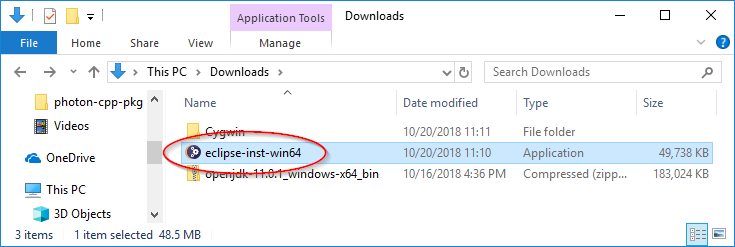
If you did not ask the browser to run the downloaded file, find Eclipse Oomph Installer executable (eclipse-inst-win64.exe) in the file explorer and run it.
If you see the following pop-up window,
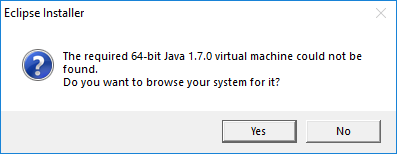
it means that Java SE bin subfolder is not in the Windows PATH environment variable. You have two choices
Press No button. Add Java SE bin subfolder to the Windows PATH environment variable as described in section Adding OpenJDK to Windows Path. Start Eclipse Oomph Installer again.
Press Yes button. It will open a file browser window that you can use to locate appropriate Java SE virtual machine (specifically javaw.exe file in Java SE bin subfolder). The installer will use this virtual machine to run itself and to configure Eclipse eclipse.ini file, so Eclipse will use it also. See Appendix 2 – Configuring Eclipse Lunch Properties (eclipse.ini) for more information.
You will see the following splash window

If you are running the installer the first time, you will be asked to accept its license
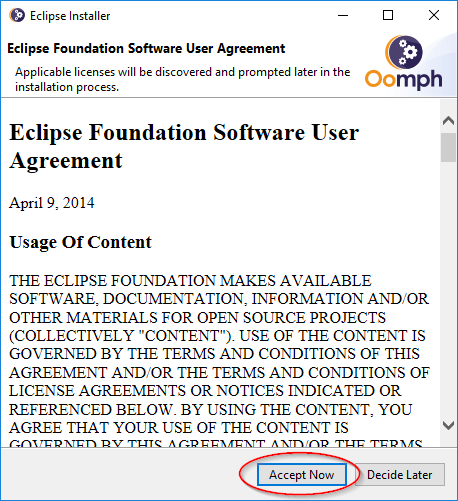
Review the license and press Accept Now button if you want to continue.
Eclipse Installer in Simple Mode
When you run Eclipse installer in the simple mode, you will see a window similar to one below
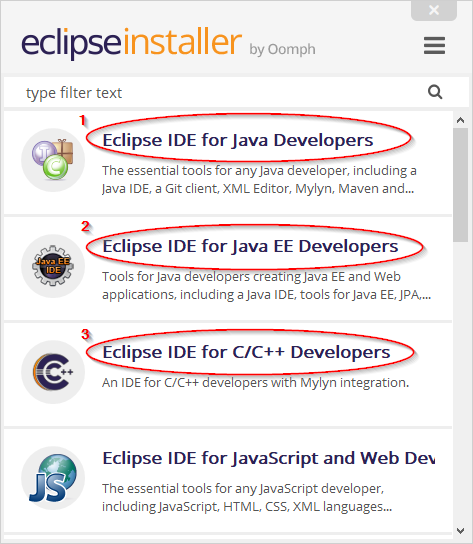
Select Eclipse package that you want to download and click on correspondent Windows 64-bit link.
If you want to use Eclipse for C/C++ development only, select “Eclipse IDE for C/C++ Developers”
If you want to use Eclipse for Java standalone program development and, possibly, C/C++ development, select “Eclipse IDE for Java Developers”
If you want to use Eclipse for Java Enterprise development, possibly, for Java standalone program development, and, possibly, C/C++ development, select “Eclipse IDE for Java EE Developers”
Below it is assumed that “Eclipse IDE for Java Developers” is selected.
You will see the following page
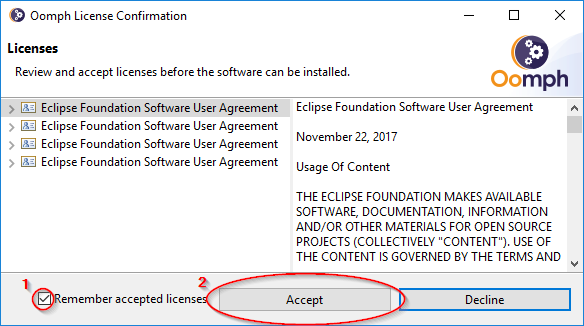
Review the licenses. Check Remember accepted licenses box ①. Click Accept button ② to continue.
You will see the following window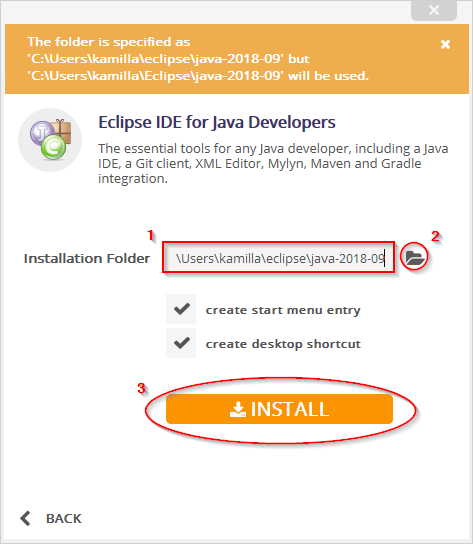
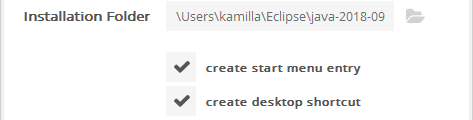
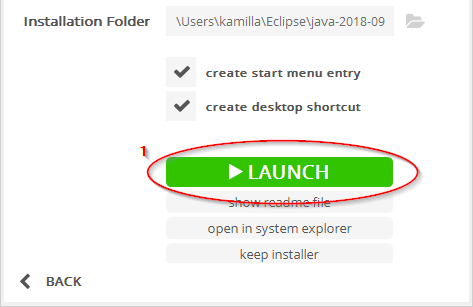
Review the installation folder ①. If needed, enter a different name of or browse to a different folder ②.
If you do not want the desktop shortcut or the menu entry created, uncheck the appropriate boxes.
Press Install button ③ to continue.
You will see the installation progress window


While installing Eclipse CDT, the installer may prompt for Eclipse code signing certificate confirmation. You will have to accept the certificate to continue.
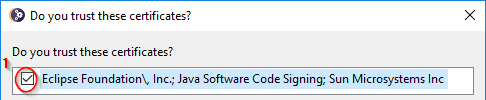

Review the certificate list (select a certificate and use Details button to see the certificate information). If you trust the certificate(s), check appropriate box(es) ① and press Accept selected button ②.
See Do you trust these certificates? in Appendix 13 – Eclipse Pop-ups and Prompts for more details.
After the installation is completed, you will see the following window
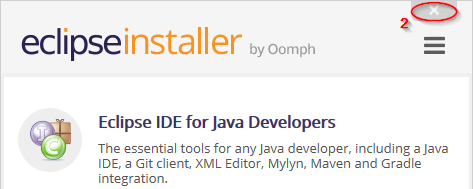
Close the window ②. How to launch Eclipse will be explained in further sections.
Note – if you are sure that Eclipse can find Java virtual machine, you may press Launch button ①.
Switching to Advanced Mode
To switch to advanced mode, start Eclipse installer in simple mode.
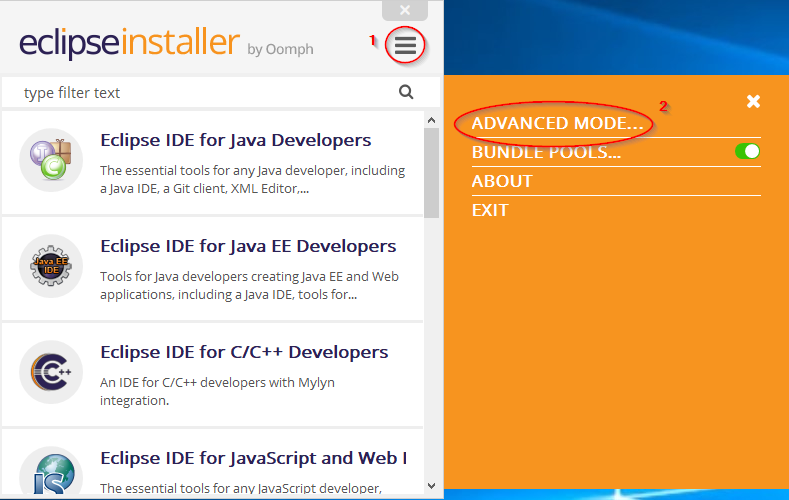
Click on “hamburger” icon ① to open the installer menu. Click on Advanced Mode… ②.
See Appendix 7 – Eclipse Installer in Advanced Mode for a detailed walkthrough.
Setting Up Eclipse Shortcut
Having an Eclipse desktop shortcut (or a menu entry) makes launching Eclipse easier. By default, Eclipse installer in simple mode creates the shortcut (and the menu entry) automatically.
If you uncheck the shortcut option in the installer, or if you run the installer in advanced mode, the installer does not create the shortcut.
In such a case, you can create the shortcut manually. To do so, open the Eclipse installation directory in Windows Explorer, and go inside eclipse subfolder.
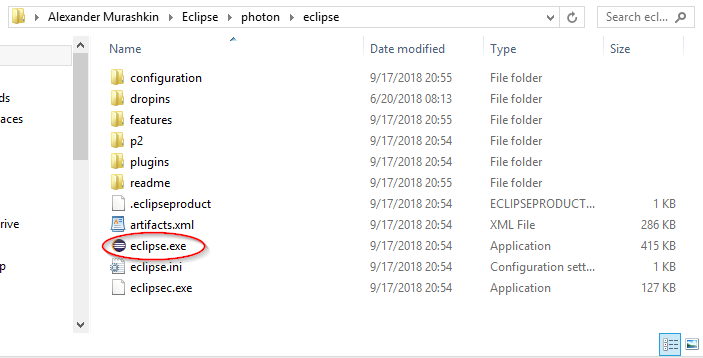
Move the mouse pointer over eclipse.exe  icon and click the right mouse button to open a context menu. Depending on you File Explorer settings, you may see eclipse.exe or just eclipse right to it.
Select Copy from the menu. Find some empty space on your desktop, move the mouse pointer there, and click the right mouse button to open a context menu. Select Paste Shortcut from the menu. You will see a new shortcut eclipse icon with “eclipse.exe – Shortcut” (or just “eclipse.exe”) underneath.
Change the shortcut name to Eclipse Photon (or something else). Move the mouse pointer over the new shortcut icon and click the right mouse button to open a context menu. Select Rename from the menu. Enter the shortcut name in the highlighted box end press Enter key.
If you need more help, see section Creating Eclipse Desktop Shortcut in Appendix 6 – Making Eclipse Shortcut.
➤ The created shortcut will be added to the current user desktop. If you want the shortcut to be available for all users, move it to an appropriate folder, for example, to C:\Users\Public\Desktop.
Running Eclipse IDE the First Time
How Eclipse Launcher Locates Java Virtual Machine
Usually, to start Eclipse people run so called Eclipse launcher (eclipse.exe) via a shortcut, a script, Windows explorer, or a command line. The launcher determines what Java virtual machine to use and then starts the Eclipse application itself running in the machine.
If you followed Enabling Eclipse Launching via OpenJDK section, you can skip to the next section. Otherwise read this section and enable one of the options described in the table.
The Eclipse launcher searches Java virtual machines in the following locations, in the following order, starting at step 1.
| Step | Location Option | How to enable | Comment |
|---|---|---|---|
| 1 | -vm argument to eclipse.exe program | add -vm argument to the command line, for example, in Eclipse desktop shortcut | see Using Shortcut Command Line to Specify Java Virtual Machine |
| 2 | -vm argument in eclipse.ini file | edit eclipse.ini file | see Appendix 2 – Configuring Eclipse Lunch Properties |
| 3 | Eclipse installation’s jre subfolder | create jre subfolder and copy Java SE files to it | this subfolder is not a part of usual Eclipse installation |
| 4 | Windows search path | add Java bin subfolder to PATH variable | see PATH Environment Variable |
If you use one of the options and later decide to switch to another one, pay attention to the order in which locations are searched. For example, if you have a -vm argument in an eclipse.ini file, added manually or automatically (by Eclipse Oomph installer), and you want to use PATH variable, the -vm argument has to be removed from the eclipse.ini file. Otherwise, the -vm specified Java virtual machine will be used, not the machine found in the Windows path.
Note 1 – The Eclipse launcher does not use JAVA_HOME environment variable.
Note 2 – See Eclipse Launcher🌐 for more details.
✔ Before trying Eclipse launch, be sure to enable one of the options described in the table.
✔ Pay attention to the order in which locations are searched, especially, if more than one is enabled.
Configuring Eclipse Lunch Properties
Eclipse launcher uses properties configured in eclipse.ini file that resides inside Eclipse installation folder. Sometimes, it might be necessary to change the properties, for example, to specify what Java virtual machine to use or how much memory to use.
➤ If you modify eclipse.ini file while Eclipse is running, the Eclipse has to be restarted for the changes to take effect.
If you use Eclipse Oomph installer, it may add Java SE bin subfolder pathname to the eclipse.ini file, as in the example below.
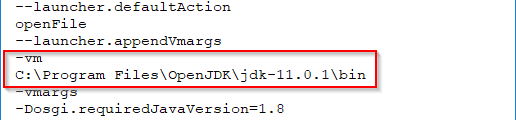
If you want Eclipse to run under a different Java SE virtual machine, exit Eclipse, if running, and edit this file - change the pathname, as described in Appendix 2 – Configuring Eclipse Lunch Properties (eclipse.ini), or remove these two lines completely. Additional details are provided in How Eclipse Launcher Locates Java Virtual Machine section later in this document.
Running Eclipse as Regular User vs Administrator
Running Eclipse as Regular User
If Eclipse is installed in a folder the user can write to (such as your user data folder) or if you are using Windows XP
✔ You can run Eclipse as regular user to install, update, and maintain Eclipse software. You may skip to Launching Eclipse section in such a case.
Running Eclipse as Administrator
If you are using Windows other than Windows XP and Eclipse is installed in a folder that the user cannot write to, for example, C:\Program Files
✔ You shall run Eclipse the first time as Administrator (to initialize it, see below)
✔ You have to run Eclipse as Administrator in order to be able to install and update Eclipse software.
✔ You shall use dedicated administrative workspace while running Eclipse.
✔ After Eclipse software is installed/updated, exit the Eclipse and start it again regular way.
See When to Run Eclipse as Administrator in Appendix 4 – Managing Eclipse Software for a walkthrough.
Initializing Shared Eclipse Installation as Administrator
To improve Eclipse performance, if Eclipse is installed in a folder that the user cannot write to, for example C:\Program Files\Eclipse\Photon, it is recommended to initialize Eclipse configuration data (such as caches).
If Eclipse is installed in a folder the user can write to, such as your user data folder, there is no need to initialize the configuration data (though it is safe to do so).
To initialize the data, it is enough to start Eclipse as Administrator, as described in the next section. While running Eclipse as Administrator, do software updates (if needed), fix Java SE 11 issues (if needed), install CDT Add-on (if needed). After it, exit Eclipse and then start it again as regular user.
Note – You can also initialize the data if you run eclipse.exe with -initialize option as Administrator. If you are interested in this option, see Initializing Shared Eclipse Installation via Command Line in Appendix 4 – Managing Eclipse Software.
Launching Eclipse
If Eclipse Launcher is already Running
You have to exit the launcher if it is running as regular user but you need it to run as Administrator, and vice versa. To exit the launcher, press Cancel button.
If Eclipse Launcher is not yet Running
If you are going to run Eclipse as regular user,
✔ If you have an Eclipse desktop shortcut, the Eclipse launcher can be started by double clicking on the shortcut. Or use Windows Explorer to find Eclipse launcher eclipse.exe file and double click it. You can also open a command line window (cmd), change to the Eclipse installation directory, and call eclipse.exe from there.
If you are going to run Eclipse as Administrator,
✔ If you have an Eclipse desktop shortcut, the Eclipse launcher can be started by selecting Run as Administrator option from the context menu. Or use Windows Explorer to find Eclipse launcher eclipse.exe file and select Run as Administrator option from the context menu. You can also open a command line window (cmd) as Administrator, change to the Eclipse installation directory, and call eclipse.exe from there.
Launcher Process
The launcher will figure out what Java virtual machine to use if you added Java bin subfolder to Windows path or enabled one of the options explained in Enabling Eclipse Launching via OpenJDK and How Eclipse Launcher Locates Java Virtual Machine sections.
Then the launcher will start the Eclipse application using the found Java virtual machine.
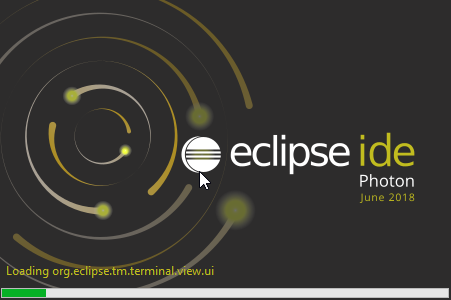
When the launcher is running, you will see a splash window.

After the splash window you will see Eclipse IDE Launcher window.
You can use the suggested workspace folder path. If you do not like it, enter whatever workspace folder path you prefer. The workspace folder contains all files related to your development projects (source code, data files, binary files, etc.). You can have multiple workspaces (for example, all java projects in one workspace, and C++ projects in another workspace). Each workspace has own set of preferences, so you can customize the workspaces to your needs.
Selecting Workspace when Run as Regular User

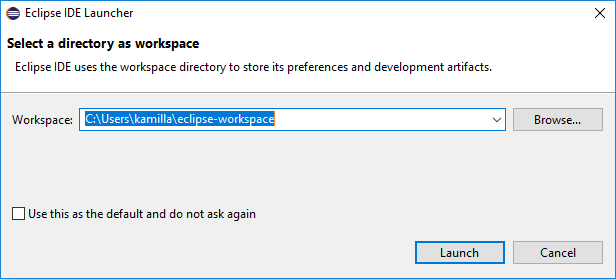
Enter the workspace folder name in Workspace field ①. For example, add \Java to the pathname. Use Browse button ② to select the folder, if needed.
Press Launch button ③ to start the Eclipse. Press Cancel button ④ if you want to exit the Eclipse.
Selecting Workspace when Run as Administrator
If the Eclipse is run as Administrator, we recommend creating a dedicated administrative workspace.
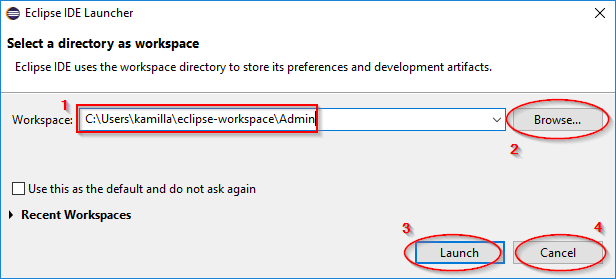
Enter the administrative workspace folder name in Workspace field ①. For example, add \Admin to the pathname. Use Browse button ② to select the folder, if needed.
Press Launch button ③ to start the Eclipse. Press Cancel button ④ if you want to exit the Eclipse.
Note – The workspace folder will be owned by Administrators. It shall be used for Eclipse software management and for testing. Some Eclipse functionality might not work if the workspace is used by a regular user. See When to Run Eclipse as Administrator section in Appendix 4 – Managing Eclipse Software.
Starting Eclipse Application
After Eclipse launcher figures out what Java virtual machine to use and what workspace to open, it starts the Eclipse application itself.
You will see Eclipse application splash window.
After few seconds you will see a welcome window. The specific window depends on the installed Eclipse variant – Eclipse IDE for Java, Java EE, or C/C++ Developers.
➤ If you already have some instance of Eclipse installed and you are installing a different instance of Eclipse, you may be prompted to reinstall previously installed plugins when you run the new instance for the first time. In such a case, see Importing and Reinstalling Previously Installed Eclipse Plugins in Appendix 4 – Managing Eclipse Software. Return here after you deal with the plugins reinstall.
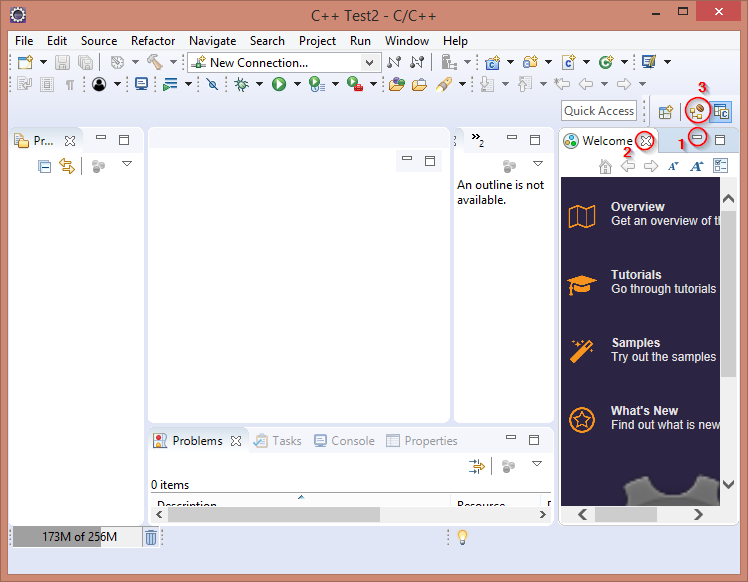
When the Eclipse is finally started, you will see a Welcome (also called overview) pane similar to one below
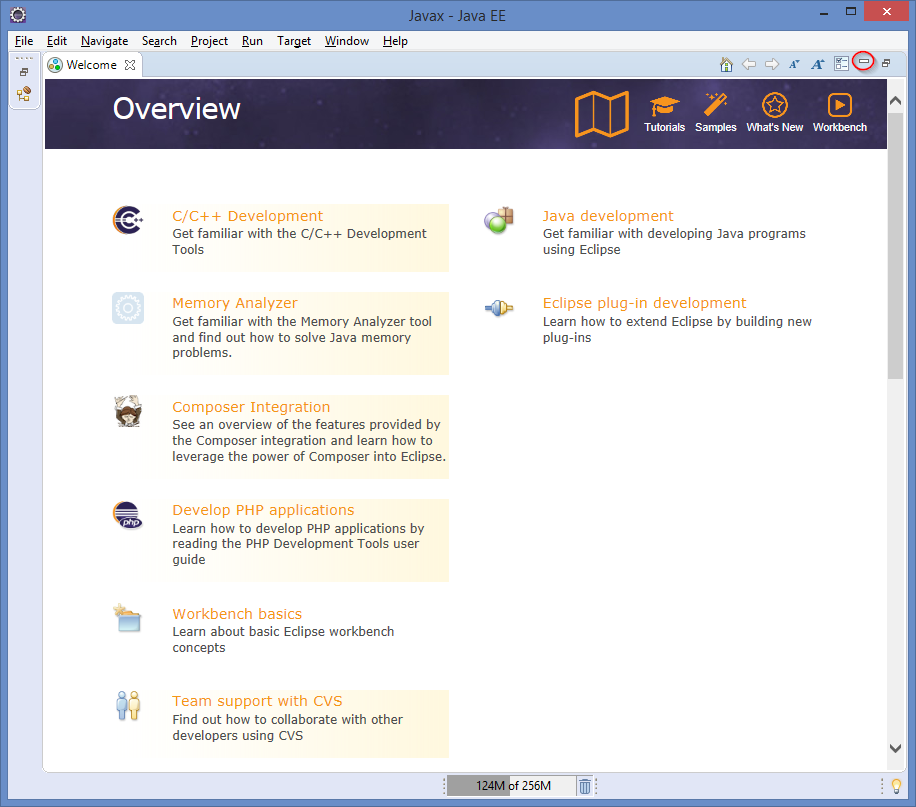
In this screenshot, the overview contains a mix of C/C++, Java, and PHP information because I installed C/C++ and PHP plugins in addition to basic Java Enterprise Eclipse variant.
What you see in the Welcome pane depends on the Eclipse variant and additionally installed Eclipse software.
Click on “Minimize” icon  inside Eclipse window to minimize the Welcome pane. As a side effect other, previously minimized, elements of Eclipse interface will become visible.
Sometimes, after the start, everything is minimized as in the example below
In such a case, click on “Restore” icon  inside Eclipse window to restore (unminimize) it.
First Software Update
If you used Eclipse Oomph Installer, there is no need to update the software at this point (the installer does it automatically). Skip to the next section in such a case.
If you used ZIP archive to install Eclipse, after Eclipse is installed and run the first time, it is recommended to update the Eclipse software. See Updating Eclipse Software (in Appendix 4 – Managing Eclipse Software) for the detailed walkthrough.
✔ If you are using Windows other than Windows XP and Eclipse is installed in a folder that the user cannot write to (for example, inside C:\Program Files), you have to run Eclipse as Administrator in order to be able to install and update Eclipse software. See When to Run Eclipse as Administrator (in Appendix 4 – Managing Eclipse Software) for more details.
✔ To be able to install and update software, Eclipse requires an Internet access. By default, Eclipse uses the same settings as Edge and Internet Explorer browsers, so, if you can browse the Internet via these browsers, you, very probably, will be able to use install and update features in Eclipse. See Appendix 3 – Configuring Eclipse for Internet Access if you are having Internet connectivity problems in Eclipse.
If needed, close Eclipse, start it again as Administrator, and select administrative workspace.
Open Help menu and select Check for updates. If the updates are found, Eclipse will display Available Updates window.
Be sure that all desired updates are selected and press Next button. Review the list of updates one more time, press Next button again to continue. Review the licenses, check I accept the terms of the license agreements, and press Finish button to continue.
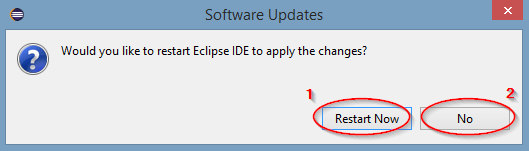
Finally, after the software is updated, you will see a prompt asking to restart Eclipse. Press Restart Now button and wait until the Eclipse is restarted.
If Eclipse is running as Administrator and you do not intend to install any additional Eclipse software - press No button instead, exit Eclipse, and start Eclipse again in regular way, if needed.
Java SE 11 Issues
If Java SE 11 is used to run Eclipse IDE for Java Developers, you may experience issues mentioned in this section. It is also possible that the issues are resolved in the Eclipse version that you use.
How to check and fix the issues is described below.
Note - If you used ZIP archive to install Eclipse, try first to update Eclipse software as described in the previous section.
‘Features may not work as expected’ Issue
If Java SE 11 is used to run Eclipse IDE for Java Developers, you may see warning message “You selected a JRE that this version of Eclipse JDT does not yet support fully. Some of the features may not work as expected.”
You can disregard this message if you are not going to use Java SE 11 new features in your source code. See Java 11 Support in Eclipse🌐 for more information about the features. If you want to use them, install Eclipse software items as detailed in Installing Java SE 11 Support Patch section.
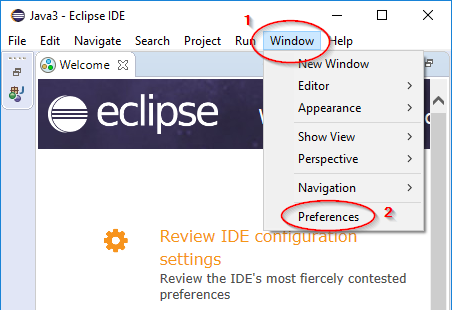
To check if you have this issue, in Eclipse, open Window menu and select Preferences option.
You will see Eclipse preferences window.
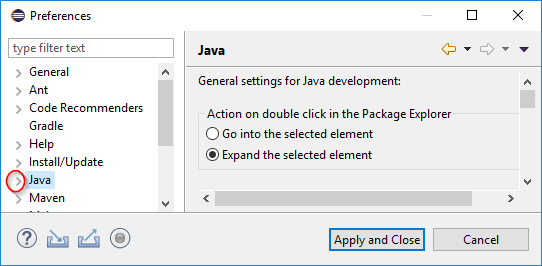
Click on a small white triangle (or angle
  ) left to “Java” to open Java preferences. If you do not see the (tri)angles, move the mouse pointer to the left (white) panel and the (tri)angles will appear.
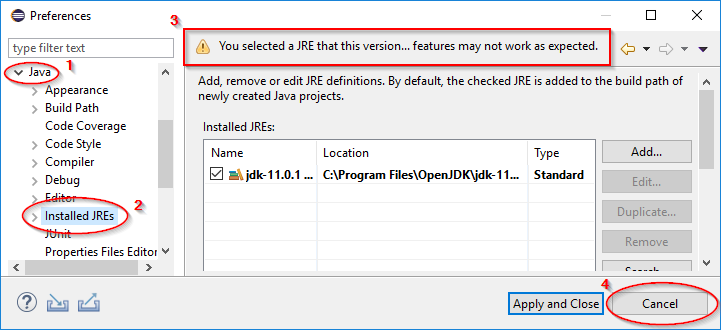
In the Java preferences ①, select Installed JREs ②.
You have the issue if you see the warning ③ “You selected a JRE that this version of Eclipse JDT does not yet support fully. Some of the features may not work as expected”.
Press Cancel button ④ to close the preferences.
Installing Java SE 11 Support Patch
✔ If you are using Windows other than Windows XP and Eclipse is installed in a folder that the user cannot write to (for example, inside C:\Program Files), you have to run Eclipse as Administrator in order to be able to install and update Eclipse software. See When to Run Eclipse as Administrator (in Appendix 4 – Managing Eclipse Software) for more details.
✔ To be able to install and update software, Eclipse requires an Internet access. By default, Eclipse uses the same settings as Edge and Internet Explorer browsers, so, if you can browse the Internet via these browsers, you, very probably, will be able to use install and update features in Eclipse. See Appendix 3 – Configuring Eclipse for Internet Access if you are having Internet connectivity problems in Eclipse.
If needed, close Eclipse (open File menu and select Exit option), start it again as Administrator, and select administrative workspace.
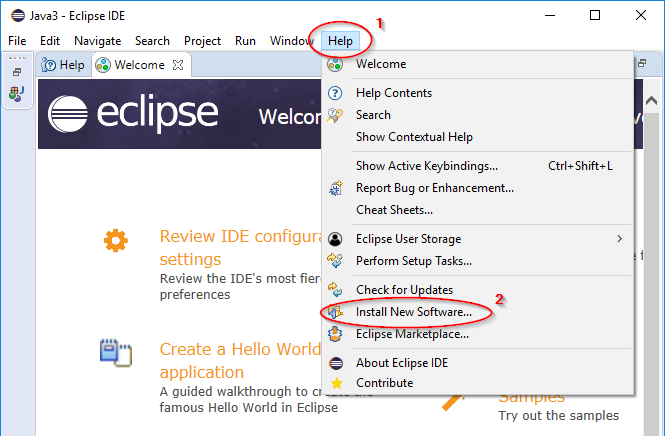
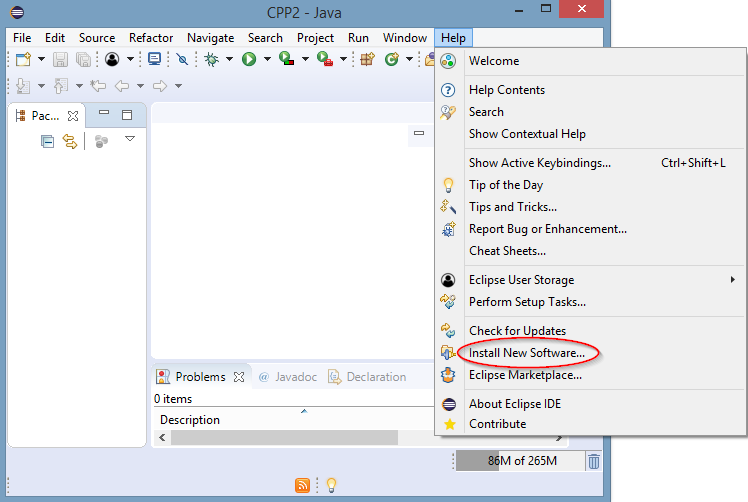
Open Help menu ① and select Install Additional Software option ②.
You will see Available Software window
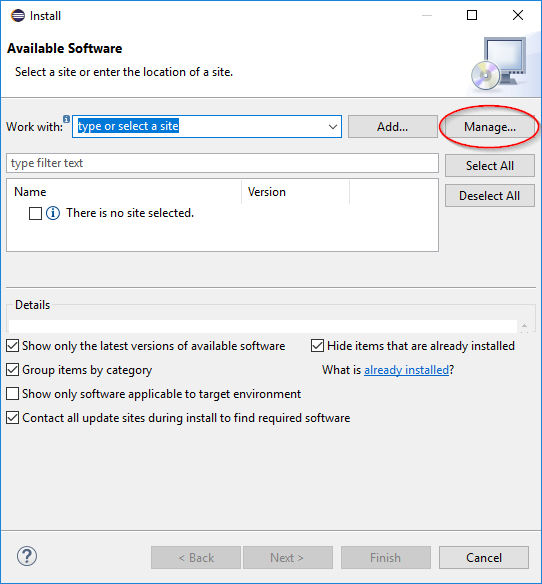
On the Available Software page, press Manage button.
You will see Available Software Sites preferences.
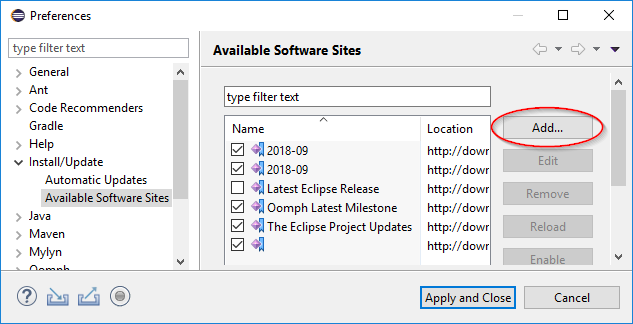
Press Add button to add a new software site. It will open Edit Site pop-up window.
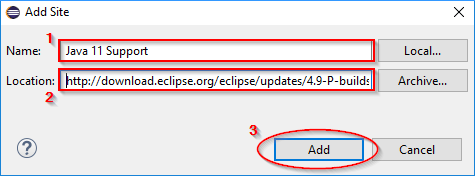
In the Name field ① enter
Java 11 Support
In the Location field ② enter
http://download.eclipse.org/eclipse/updates/4.9-P-builds
Press Add button ③ to add the site and to close the pop-up window.
You will see an updated list of software sites.
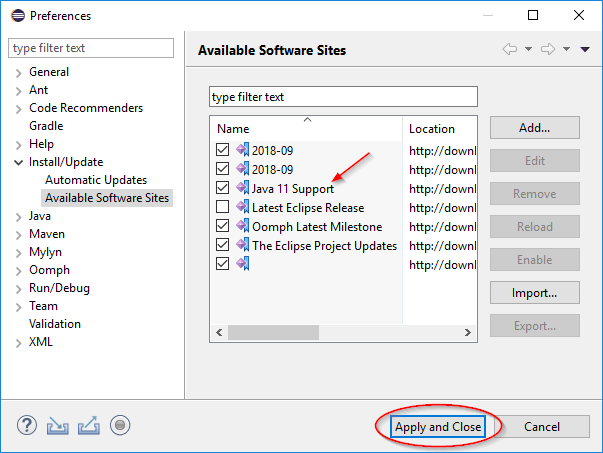
Press Apply and Close button to save and close the preferences.
You will be returned to the Available Software window.
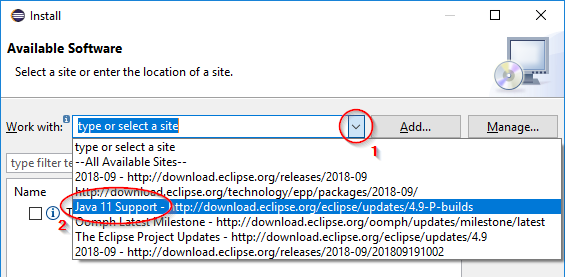
Open ① the drop-down list of software sites. Select Java 11 Support site ②.
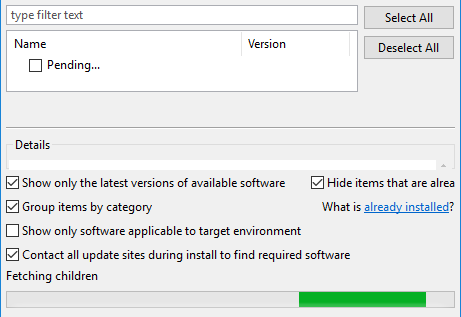
Wait until the software list is processed.
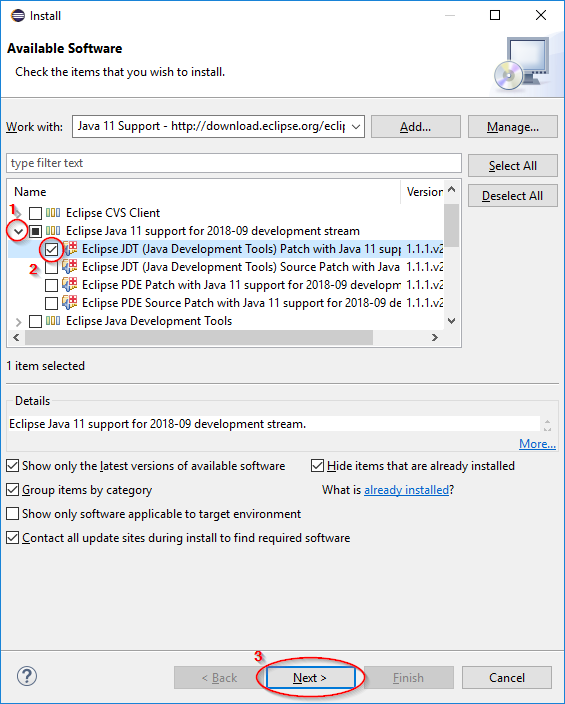
Click on white triangle  (or angle ) left to Eclipse Java 11 support… ① to open a list of software items in the group.
Check Eclipse JDT (Java Development Tools) Patch with Java 11 support… item ②. Press Next button ③ to continue.
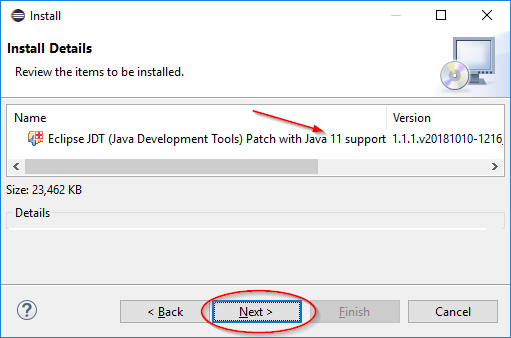
Press Next button (if there is no Next button but there is Finish button, press Finish button).
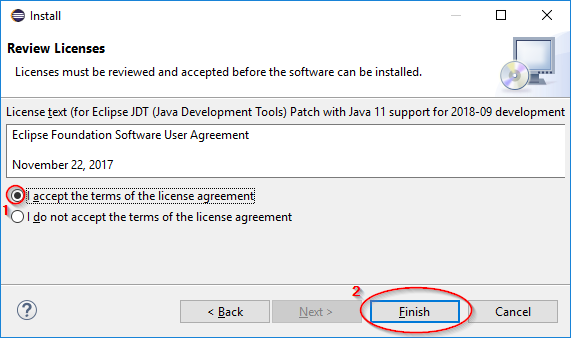
Review the license and select option I accept… ①. Press Finish button to proceed. The installation progress status will be displayed at the Eclipse main window bottom.

Wait until the software is installed.
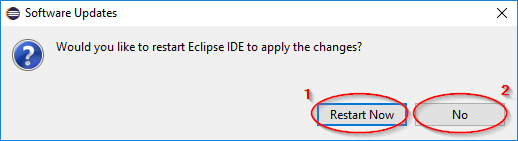
Press Restart Now button ① and wait until the Eclipse is restarted if
Eclipse is running as regular user and the current workspace is to be used for Java development
Or Eclipse is running as administrator and you intend to do more Eclipse software management as administrator
Otherwise press No button ② instead, exit Eclipse, and start Eclipse again (and create Java dedicated workspace, if so desired).
Note – As long as Java 11 Support site is enabled in Available Software Sites preferences, the Java 11 patch will be shown in the list of available updates every time, does not matter that it is already installed. It is annoying but harmless. To remove the patch from the list, disable (uncheck) Java 11 Support site in the preferences.
Eclipse is (Almost) Done
I you installed Eclipse for Java (or Java EE), at this point, the Eclipse is (almost) ready for Java (and, possibly, Java EE) development but not for C/C++ development.
If you want to develop C/C++ programs, C/C++ Development Tool kit (CDT) add-on has to be installed proceed to Installing Eclipse C/C++ Development Tooling (CDT) section below.
Otherwise proceed to Eclipse IDE Basics section.
If you installed Eclipse IDE for C/C++ Developers, at this point, the Eclipse is (almost) ready for C/C++ development but not for Java development.
You still need to install Cygwin (or another build system) to be able to compile, link, run, and debug C/C++ applications. Proceed to Installing Cygwin section.
If you want to develop Java programs, Java Development Tool kit (JDT) add-on has to be installed. The installation of JDT add-on is out of scope of this document. It, though, is very similar to installation of CDT add-on described below in Installing Eclipse C/C++ Development Tooling (CDT) section.
Installing Eclipse C/C++ Development Tooling (CDT)
Eclipse C/C++ Development Tooling (CDT)🌐 is an add-on to Eclipse IDE. It is a part of Eclipse IDE for C/C++ Developers, so you do not need to install CDT if Eclipse IDE for C/C++ Developers is installed.
If you have Eclipse IDE variant other than Eclipse IDE for C/C++ Developers and want to do C/C++ development, you will have to install CDT add-on.
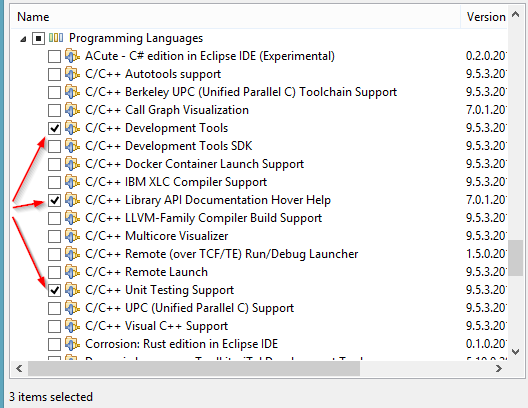
CDT add-on consists of multiple Eclipse plugins, the recommended minimum is listed below (It will take approximately 58 MiB of disk space).
“C/C++ Development Tools”
“C/C++ Library API Documentation Hover Help”
“C/C++ Unit Testing Support”
“TM Terminal”
“Mylyn Context Connector: C/C++ Development”
For a complete list of software items in CDT add-on, see Appendix 10 – List of Software Items included in Eclipse CDT. Review them and install as needed.
✔ If you are using Windows other than Windows XP and Eclipse is installed in a folder that the user cannot write to (for example, inside C:\Program Files), you have to run Eclipse as Administrator in order to be able to install and update Eclipse software. See When to Run Eclipse as Administrator (in Appendix 4 – Managing Eclipse Software) for more details.
✔ To be able to install and update software, Eclipse requires an Internet access. By default, Eclipse uses the same settings as Edge and Internet Explorer browsers, so, if you can browse the Internet via these browsers, you, very probably, will be able to use install and update features in Eclipse. See Appendix 3 – Configuring Eclipse for Internet Access if you are having Internet connectivity problems in Eclipse.
Installing CDT Add-on
If needed, close Eclipse (open File menu and select Exit option), start it again as Administrator, and select administrative workspace.
In the Eclipse window, open Help menu, select Install New Software option.
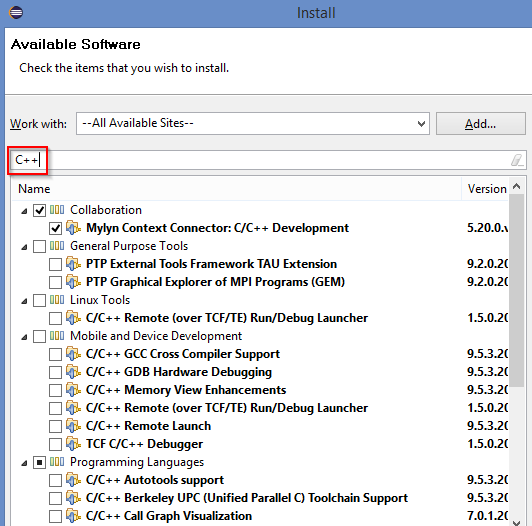
You will see Available Software window
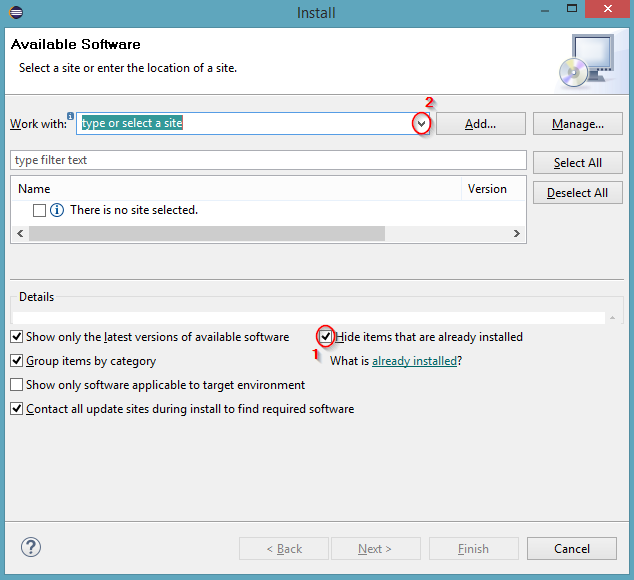
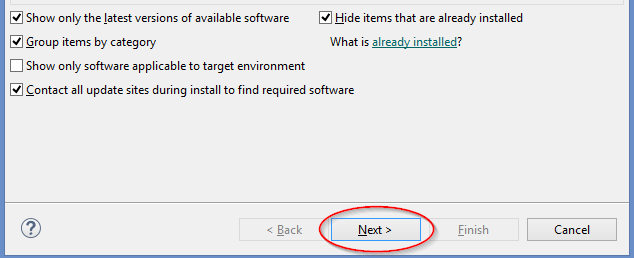
Check Hide items that are already installed ① if it is not checked already. Click small (tri)angle left to Add button ② to open a menu of software “sites”.
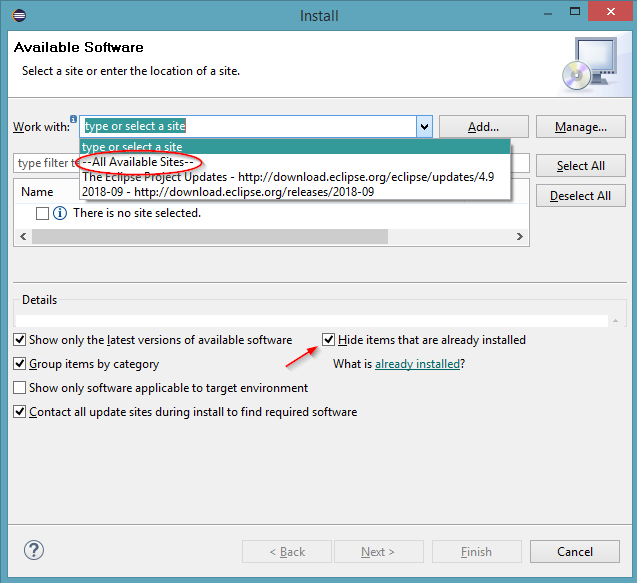
Select All Available Sites option and wait. It may take few minutes for Eclipse to process required data.
Selecting Software Items to Install
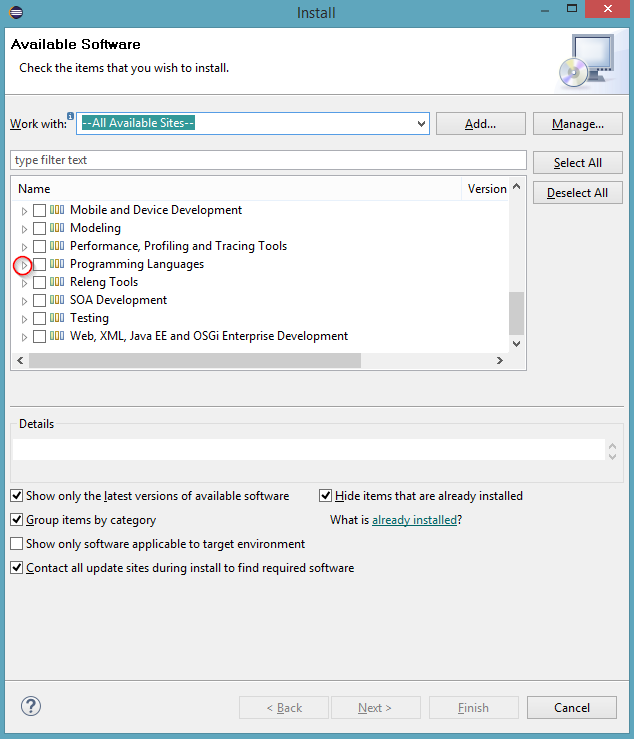
Scroll down until you see Programming Languages group. Click on white triangle (or angle ) left to “Programming Languages” to open a list of software items in the group.
If you are installing Eclipse Photon (or Juno, or any later version) check items listed below
“C/C++ Development Tools”
“C/C++ Library API Documentation Hover Help”
“C/C++ Unit Testing Support”
If you are installing Eclipse Indigo check items listed below
“C/C++ Development Tools”
“C/C++ Library API Documentation Hover Help”
If some item is mentioned twice, select one that has newer version.
Scroll up until you see General Purpose Tools group. Click on white triangle (or angle ) left to it to open a list of general software.
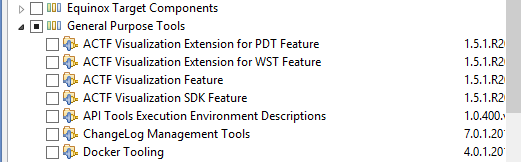

Check “TM Terminal” item if you see it. By default, already installed items are not shown. So, if you cannot “TM Terminal” item, it is already installed.
Scroll up until you see Collaboration group. Click on white triangle left (or angle ) to it to open a list of collaboration software.
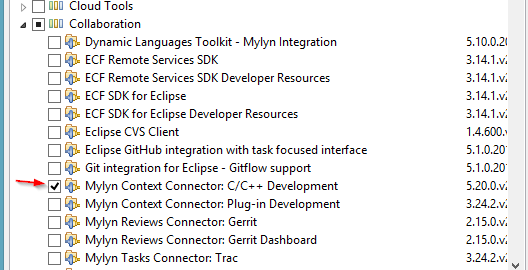
Check “Mylyn Context Connector: C/C++ Development” item.
You can also search for software. For example, if you enter C++ in the search field, after some delay, Eclipse will display C++ related items (can be slow).
Select additional items, as desired.
Finishing CDT Installation
When all needed items are selected, press Next button to proceed with the installation.
It is possible that some of the selected software items cannot be installed (for example, C/C++ Call Graph Visualization is not available for Windows). In such a case, you will get “Install Remediation Page” as below (otherwise just skip to the next page).
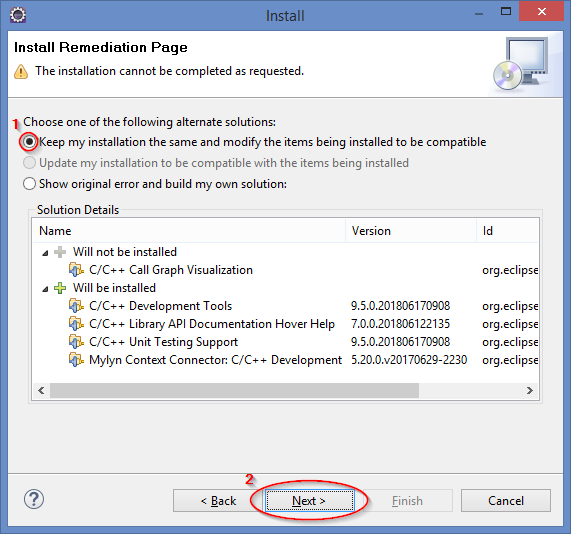
If you select option “Keep …” ① and press Next button ②, the wizard will install items that it can. You can also press Back button to return to the previous wizard page and change the list of items there.
Selecting other option but “Keep…” ① is outside of this document scope.
You will see Install Details window.
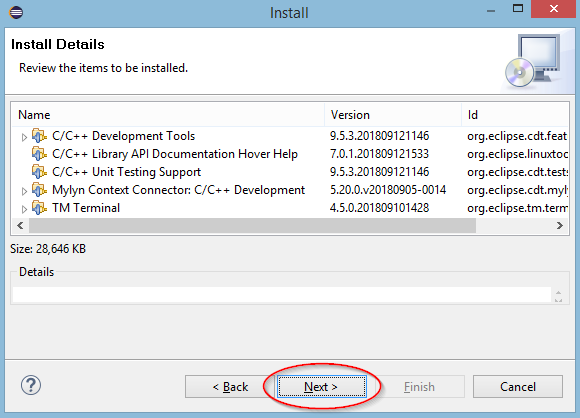
Inspect the list one more time and press Next button to continue (or Cancel button to stop the installation).
You will see Review Licenses window.
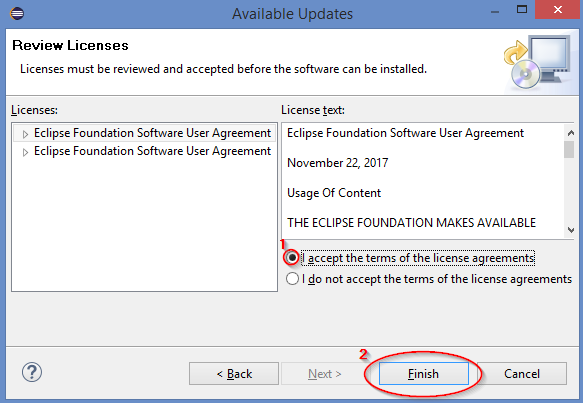
Review the licenses. Check I accept the terms of the license agreements ① and press Finish button ② to continue (or press Cancel button to stop the installation).
At the bottom of the main Eclipse window, you will see progress message “Installing Software …”
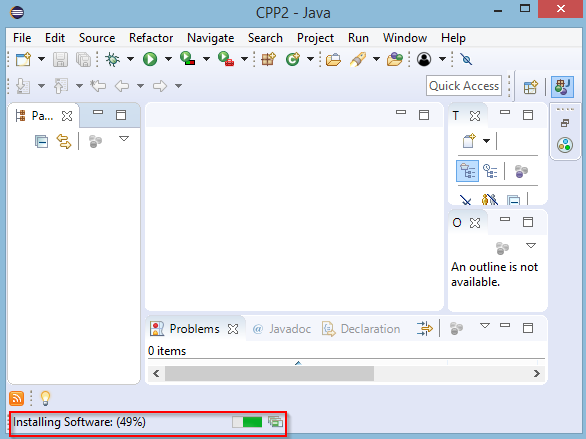
Wait until the installation is completed.
If some software is unsigned (by its developers), you may see various security prompts. See Appendix 13 – Eclipse Pop-ups and Prompts for more details.
Finally, after the plugins are installed, you will see a prompt asking to restart Eclipse.
Press Restart Now button ① and wait until the Eclipse is restarted if
Eclipse is running as regular user and the current workspace is to be used for Java development
Or Eclipse is running as administrator and you intend to do more Eclipse software management as administrator
Otherwise press No button ② instead, exit Eclipse, and start Eclipse again (and create Java dedicated workspace, if so desired).
➤ You may be prompted to reinstall previously installed plugins when you start Eclipse. In such a case, see Importing and Reinstalling Previously Installed Eclipse Plugins in Appendix 4 – Managing Eclipse Software. Return here after you deal with the plugins reinstall.
Wait until the main Eclipse window appears. If everything is minimized, click on “Restore” icon inside Eclipse window to restore (unminimize) it.
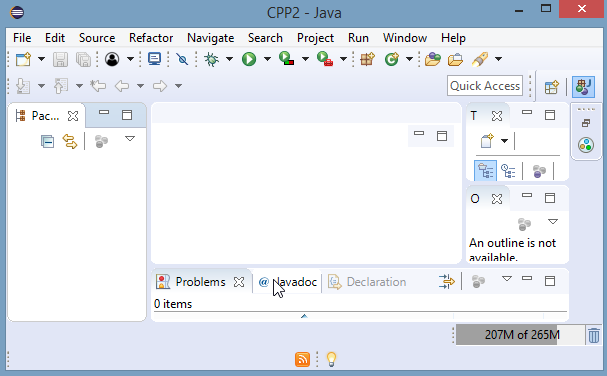
Eclipse CDT is installed, but you need to configure it before using.
In this screenshot, you can see that the Eclipse window title is “CPP2 – Java”. It is just an example. In the title, CPP2 is the workspace name and Java is the perspective name. When you do C/C++ development, you will, probably use C/C++ perspective (as described later in section Opening C/C++ Perspective).
Installing Cygwin
Cygwin development packages are required in order to be able to compile, link, build, run, and debug C/C++ programs. You will need approximately 10 GiB of disk space to install all Cygwin development packages (you can reduce the disk space by not installing unnecessary development packages). You also will need around 1.9 GiB of temporary disk space to store downloaded Cygwin packages.
Downloading Cygwin Setup Program
In a browser, open www.cygwin.com🌐 website.
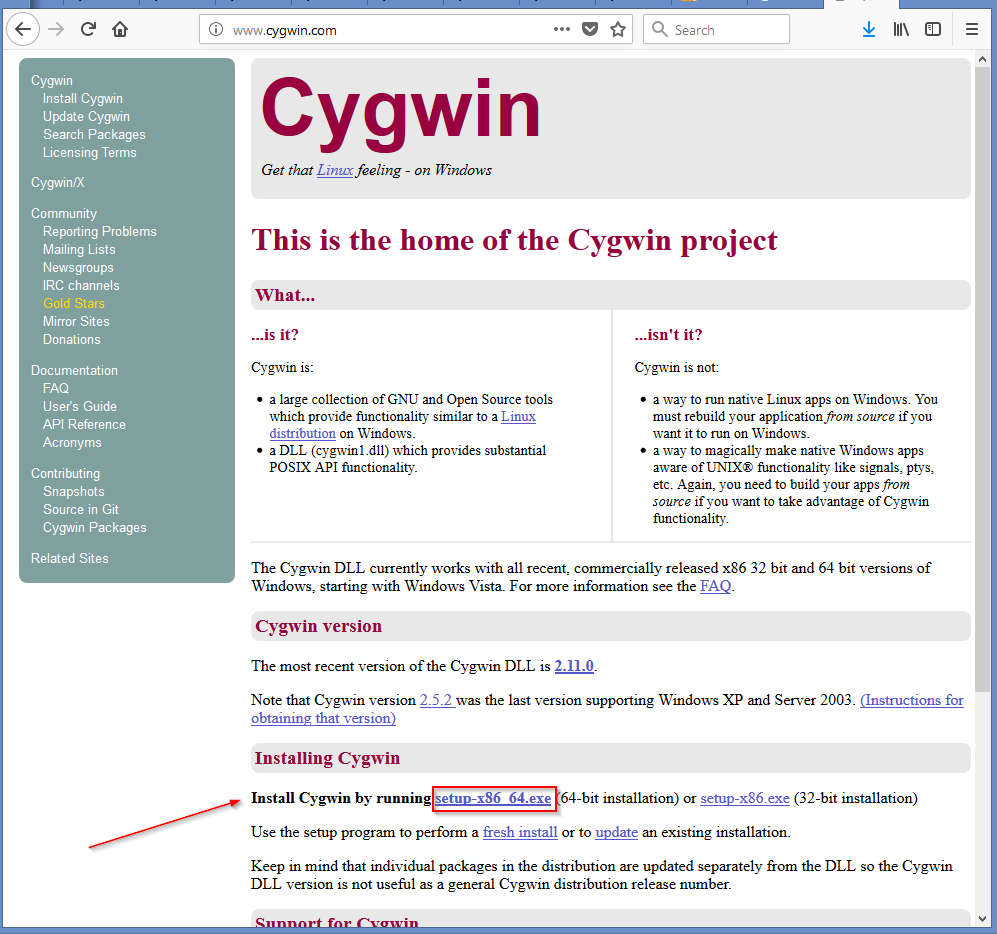
Click on setup-x86_64.exe🌐 URL (see Cygwin 32-bit if you are running 32-bit Windows). Depending on your browser, you will get a download prompt. Download and run the file. See Appendix 11 – Downloading and Running files from the Internet for more information.
Running Cygwin Setup Program
When you run the downloaded Cygwin setup program, you will see the following window.
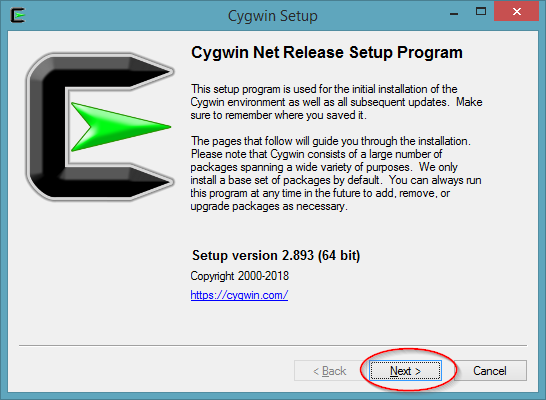
Press Next button to continue.
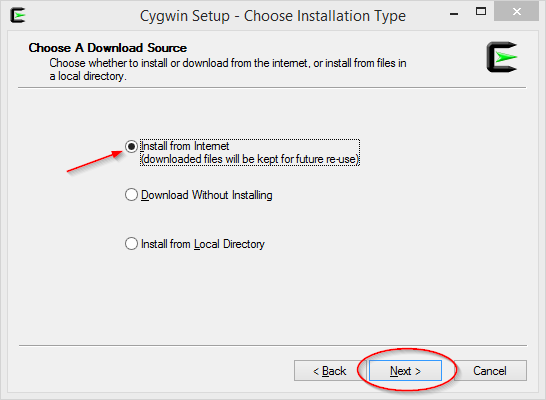
Be sure that “Install from Internet” option is selected. Press Next button.
The next screen will ask to select root install directory.
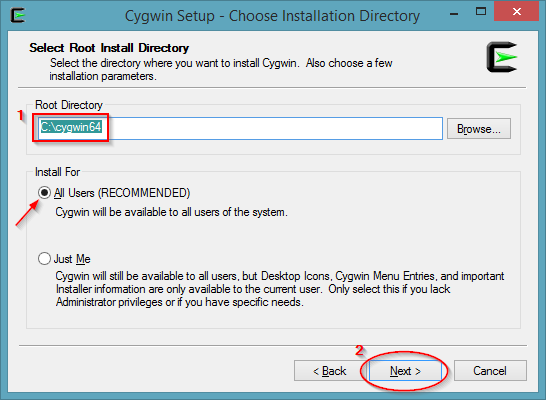
Default settings are OK. By default, Cygwin is installed in C:\cygwin64 on 64-bit Windows. You can change this path in the Root Directory field ① if you prefer Cygwin files to be installed in another folder. Press Next button ② to continue.
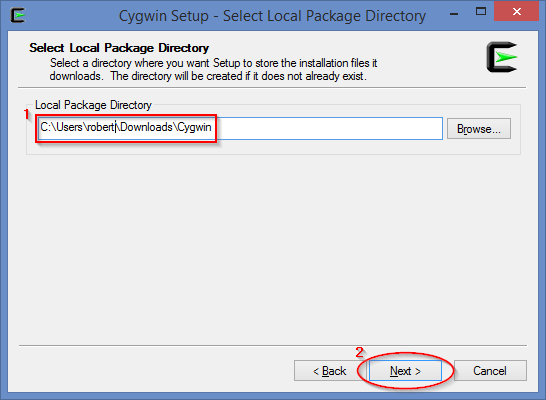
You, probably, will want to change Local Package Directory field ①. The folder will be used to store so called package files. These package files are used to install Cygwin features; they are not needed after the installation.
For example, click right to the highlighted folder path ① and edit it so the packages go to C:\Users\username\Dowloads\Cygwin. Press Next button ②.
You can keep these files if you expect to reinstall Cygwin or to install Cygwin on a different computer. Or you can remove the folder after Cygwin is installed.
If the directory does not exist, you will see a pop-up window asking to confirm the directory creation.
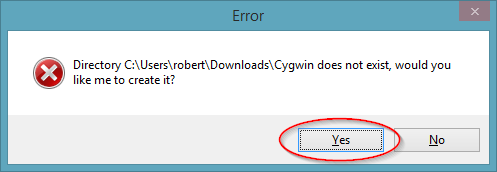
Press Yes button.
You will see the following window
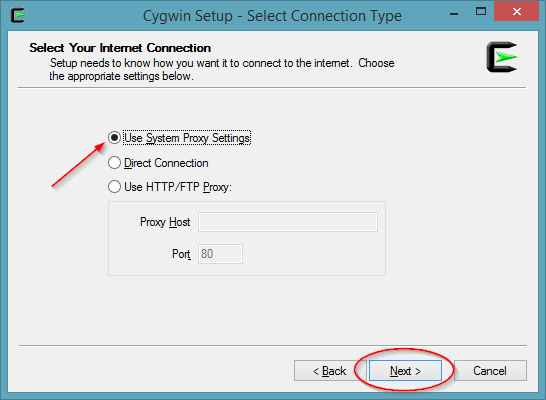
If you want Cygwin setup to use the same Internet connectivity settings as Windows, select Use System Proxy Settings option and press Next button.
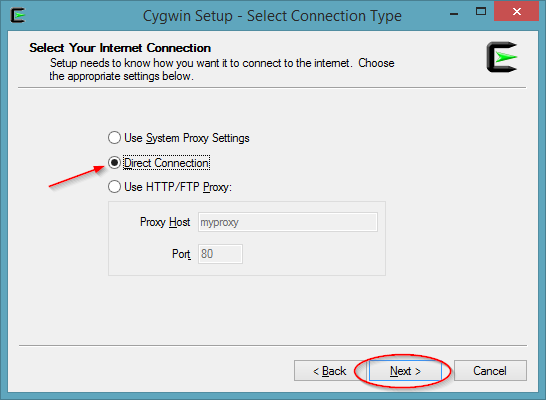
If you want Cygwin setup to access the Internet directly, select Direct Connection option and press Next button.
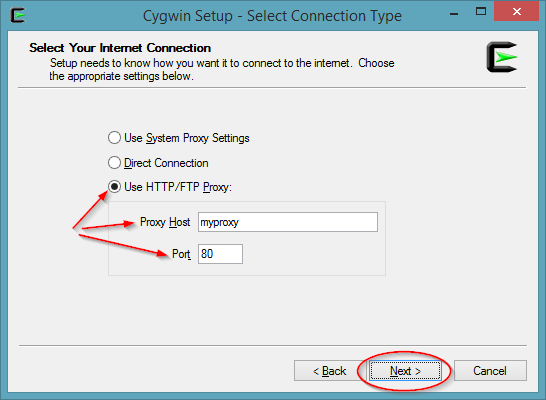
If you want Cygwin setup to use some specific proxy – select Use HTTP/FTP Proxy, enter the proxy name (or address) in Proxy Host field, the proxy port in Port field, and press Next button. Note that the proxy information above is just an example; you have to enter your proxy host and port.
After you selected the Internet connectivity option and pressed Next button, you will see a window with a list of Cygwin download sites. The specific list may vary.
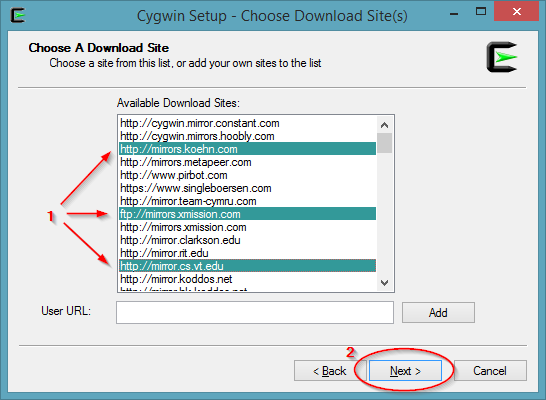
Select at least one of the Available Download Sites - click on a site name ①. If you want, you can select multiple download sites by clicking on a site name while CTRL key is pressed. The sites in the screenshot are just an example, select your own one or more sites.
Press Next button ② to continue.
You will see a progress window.
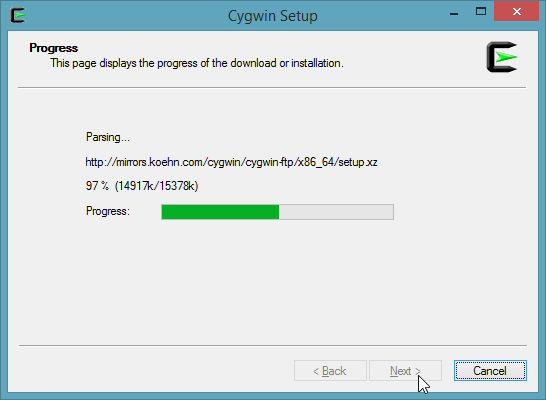
Wait until the next window appears. If you are installing Cygwin the first time, you may see a pop-up window asking to check Cygwin documentation – click OK button to dismiss the window.
Selecting what Packages to Install
After a list of Cygwin packages is downloaded, you will see Select Packages window below (possibly maximized, if you want the window be a normal size, click on Restore Down icon in the top right corner of the window). In the window, select what packages to install.
By default, Cygwin setup will install only the packages in the Base category and their dependencies, resulting in a minimal Cygwin installation.
Unfortunately, Cygwin setup interface is confusing in this case. Look for word after circular arrows  .
.
Default means that Cygwin setup will decide whether to install the packages.
Install means that the packages will be installed.
Uninstall means that the packages will be uninstalled (if installed) or not installed at all.
Skip means leave the package as-is (do not install or uninstall it).
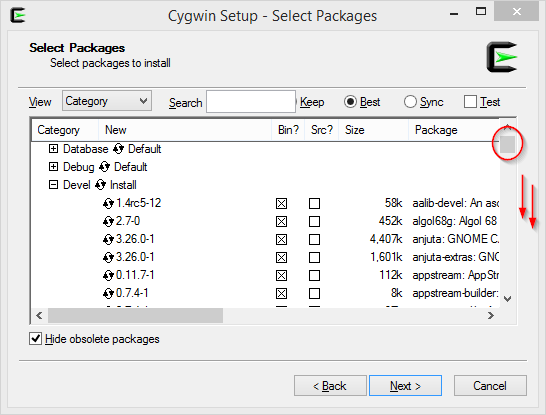
Be sure to select Install for development packages.
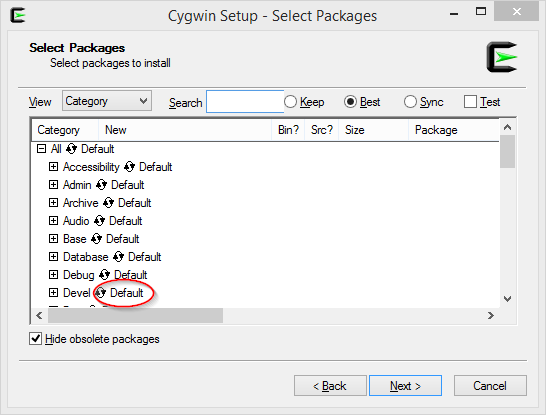
Click on circular arrows right of Devel category – if you click successfully, word Default will be changed to word Install. If you make a mistake you can click on the circular arrow again.
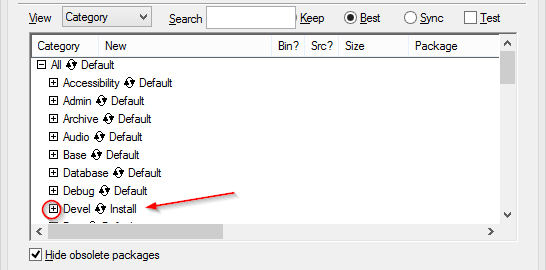
You can click plus sign  icon left of Devel category to see what packages are selected to be installed.
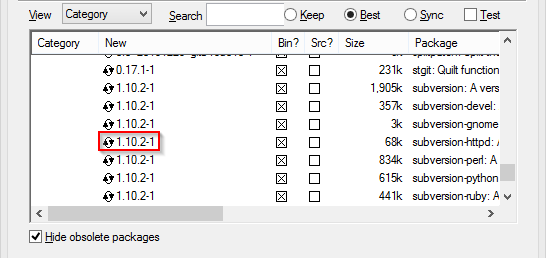
If you like you can add more packages or remove unneeded packages. It is recommended to remove subversion-httpd package (if it is in the list). To do so scroll down until you see the package
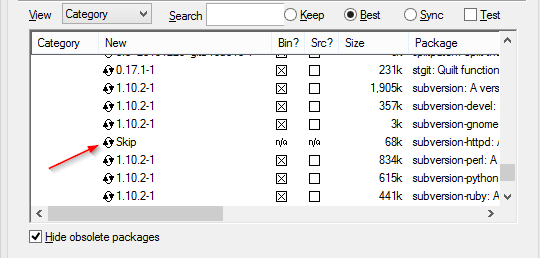
Click few times on circular arrows until you see word Skip instead of the version number. If you make a mistake, you can click on the circular arrow again.

When you are satisfied with the packages selection press Next to continue.
Installing Selected Packages
Cygwin setup will check for dependencies and will ask you to confirm that you want to install the dependencies (additional packages).
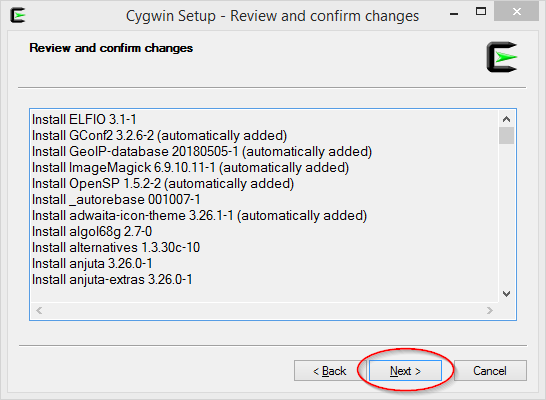
Press Next button to continue.
You will see a window indicating that the packages are being downloaded and verified.

After the packages are downloaded and verified, you will see an installation progress window.

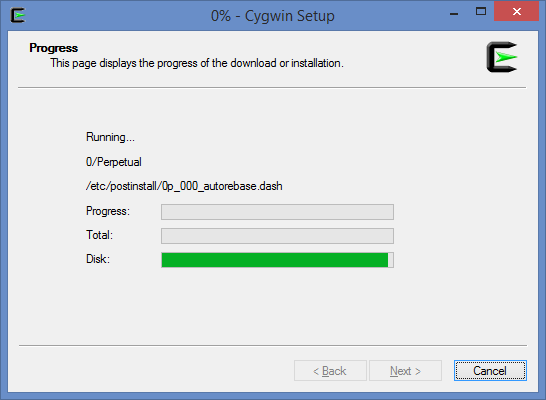
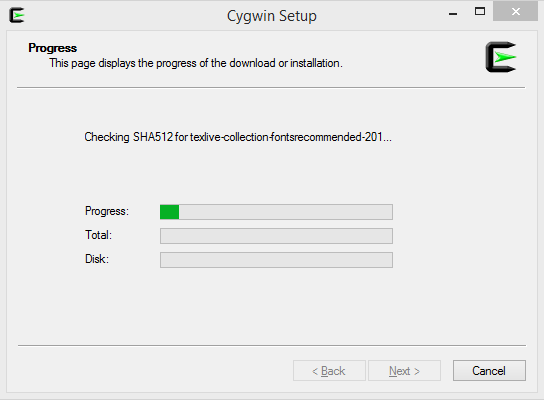
Wait until the download and the installation are completed, it can take a long time (for example, an hour).
At the end, you will see the following window
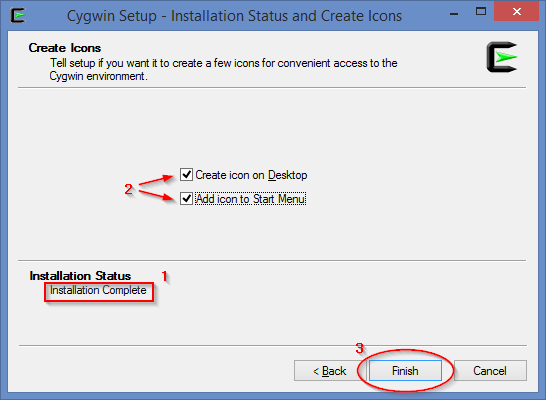
Confirm that the installation status is the Installation Complete ①. Check boxes to create Cygwin icon on desktop and add the icon to start menu ②. Press Finish button ③ to exit Cygwin setup program.
Verifying Cygwin Installation
To verify that Cygwin is installed correctly, open Windows Start Menu and find Cygwin64 Terminal program (in legacy Windows, open All Programs submenu and open Cygwin submenu).
| Windows 10 | Legacy Windows |
|---|---|
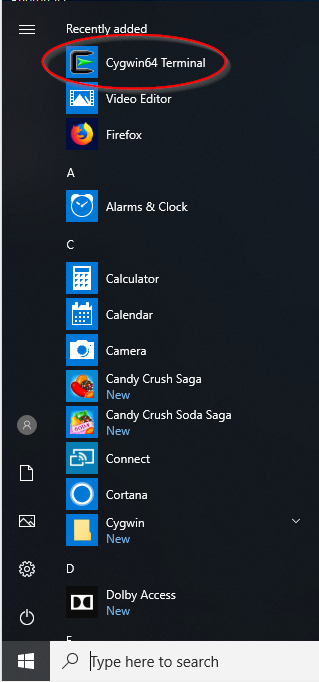 | 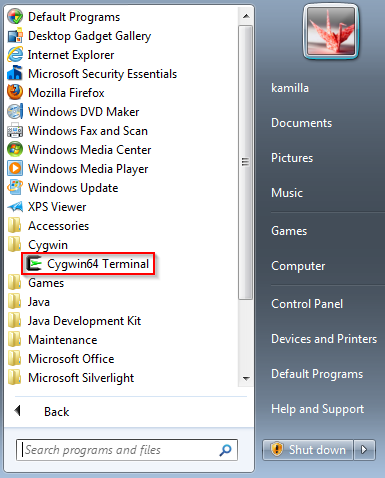 |
Select Cygwin64 Terminal (or just Cygwin Terminal).
After few seconds you are supposed to see either the following window (if you have not used Cygwin shell previously)
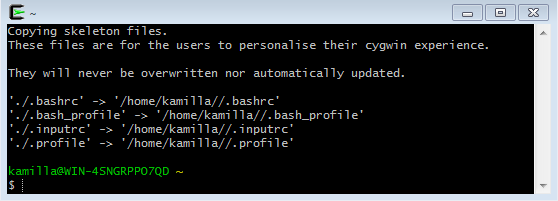
or the window below (if you used Cygwin shell previously)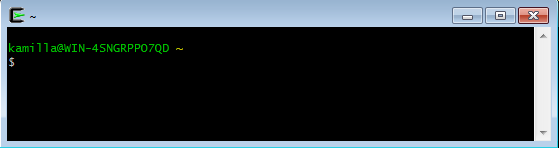
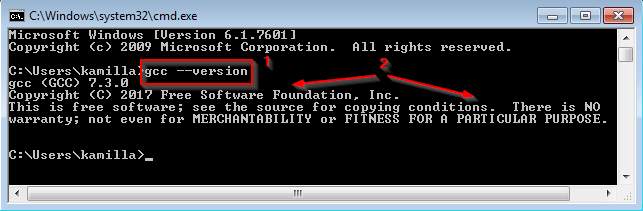
Enter gcc --version command at the shell prompt ① and press Enter key.
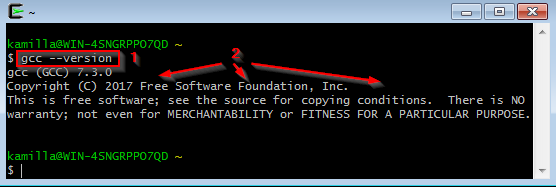
You are supposed to see GCC compiler version and license information ②. You can close the shell window if you do not need it.
Note 1 - There is a space between gcc and --version and two dashes in the --version.
Note 2 - This verifies that a Cygwin shell window can be opened and that the GCC compiler can be invoked from the Cygwin shell. It does not verify that the compiler can be invoked from other Windows programs such as Windows command line shell or Eclipse itself. See Verifying Cygwin in Windows Path below.
Enabling Cygwin Launching via Eclipse
To be able to execute Cygwin programs from Eclipse, Eclipse has to know Cygwin installation folder path. Here are some possible ways to achieve it
Add Cygwin bin subfolder to Windows PATH environment variable (described below).
Write your own batch script that adds Cygwin bin subfolder to PATH variable and calls Eclipse (out of scope of this document).
Configure Cygwin build toolchain in Eclipse C/C++ preferences (out of scope of this document).
Adding Cygwin to Windows Path
After the Cygwin packages are installed, consider adding Cygwin bin subfolder to Windows system or user PATH environment variable. Add Cygwin to the system path if you want all users to be able to use it. Add it to the user path otherwise.
For example, add C:\cygwin64\bin to the system PATH variable. In the case of Windows 10, the Edit environment variable window will look like this

In the case of legacy Windows, the Edit System Variable window will look like this
If you need a detailed walkthrough, see Appendix 1 – Modifying Windows Environment Variables.
Access Environment Variables window, for example, by going to Windows Search -> “environment” -> Edit the system environment variables -> System Properties -> Advanced -> Environment Variables.
In the Environment Variables window, find existing system (or user) PATH variable or create new user PATH variable. Add the Cygwin bin subfolder to the path variable.
Note - The user path is appended to the system path. In most cases, you need Cygwin to be added either to the system or to the user path variable.
Verifying Cygwin in Windows Path
To verify Windows path, launch a command line window. For example, find or open the Windows search box and click inside it, then search for cmd program.
| Windows 10 (Desktop) | Legacy Windows (Windows Start Menu) |
|---|---|
   |    |
Enter word cmd ① in the search field. Click on cmd ② in the list of found programs.
You will see Windows shell (command line) window.
At the shell prompt, enter gcc --version command ① and press Enter key. You are supposed to see GCC compiler version and license information ②.
Note 1 - there is a space between gcc and --version and two dashes in the --version.
Note 2 - This verifies that the GCC compiler can be invoked from a Windows command line shell. If it fails, check that the GCC compiler can be invoked from a Cygwin shell as described in Verifying Cygwin Installation section previously.
Restarting Eclipse
A running Eclipse has to be restarted for the Cygwin related changes to take effect.
If you are running Eclipse, open File menu and select Exit option. Launch Eclipse again.
Eclipse IDE Basics
Eclipse Perspectives
In Eclipse, a perspective is a set of views, editors, panels, etc. tailored for a specific task, for example, for Java development.
You can use multiple perspectives with one Eclipse workspace, for example, Java and C++ perspectives. But only one of them can be visible inside any given Eclipse window.
If you want so, you can have one Eclipse workspace for Java (with Java perspective opened) and one Eclipse workspace for C/C++ (with C/C++ perspective open).
Using Eclipse for Java Development
If you are running Eclipse as Administrator or if the current workspace is not appropriate - exit Eclipse (open File menu and select Exit option), start it again as regular user, and select appropriate workspace.
‘Polling news feeds’ Workspace Issue
✔ If this issue exists, it has to be fixed in each workspace. If it is a shared Eclipse installation, each user shall fix this issue when the user’s workspaces are created.
If Java SE 11 is used to run Eclipse IDE for Java Developers, after the Eclipse is started, you may see the following pop-up window
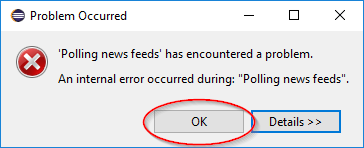
Press OK button to ignore the message. It is a known issue (see bug #540196🌐), it happens because javax.xml.bind package is not included in Java SE 11.
The known workaround is to disable automatic news polling in Eclipse properties.
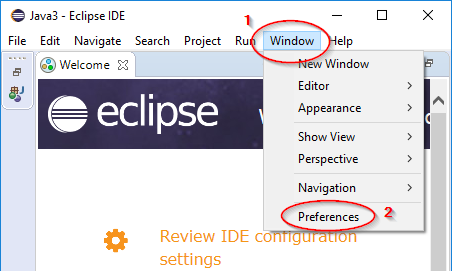
To do so, in Eclipse, open Window menu and select Preferences option.
You will see Eclipse preferences window.

Click on a small white triangle(or angle ) left to “General” to open General preferences. If you do not see the (tri)angles, move the mouse pointer to the left (white) panel and the (tri)angles will appear.
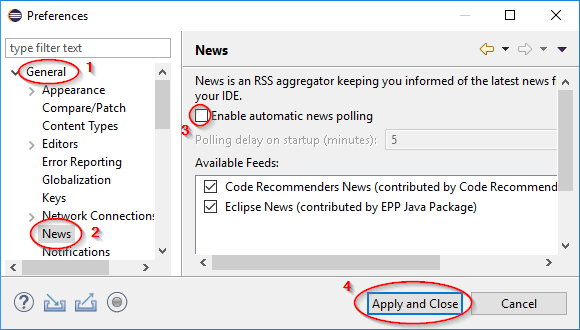
In the General preferences ①, select News ②.
Uncheck option Enable automatic news polling ③. Press Apply and Close button ④ to save the preferences.
Opening Java Perspective
You can open Java perspective if you installed Eclipse IDE for Java or Java EE Developers.
If you see only Welcome pane,
click on “Restore”  icon to make the current perspective visible.
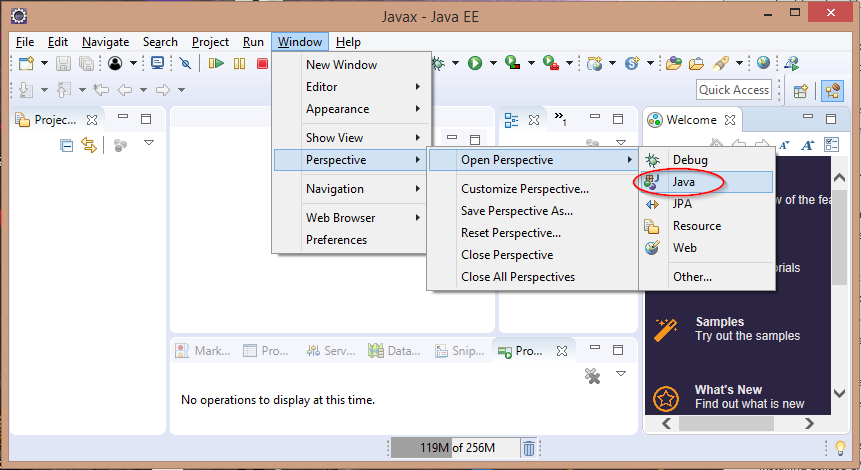
Open Windows menu, select Open Perspective submenu, and select Java perspective.
You are supposed to see the Java perspective opened at this point.
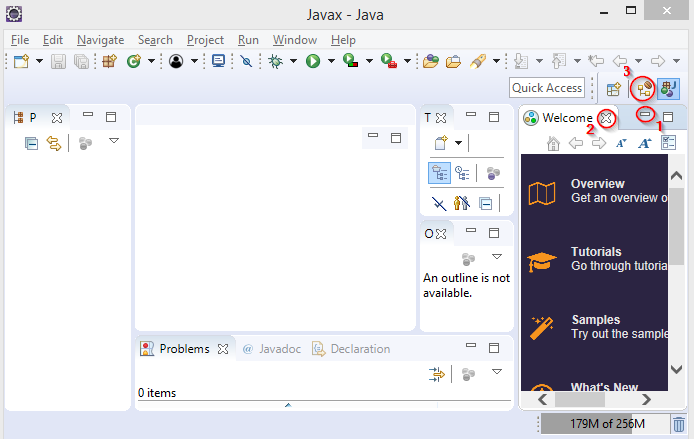
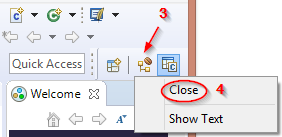
If you want so, you can minimize the Welcome pane by clicking on “Minimize” icon in the panel title ① or even close Welcome panel completely by clicking on “Close”  icon in the panel title ②.
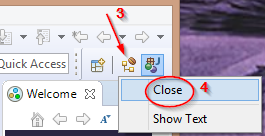
You can also remove Java EE perspective - move the mouse pointer over Java EE  icon ③, click the right mouse button to open a context menu, and select Close option ④.
In the example below, there is only one Java perspective and the welcome panel is closed.
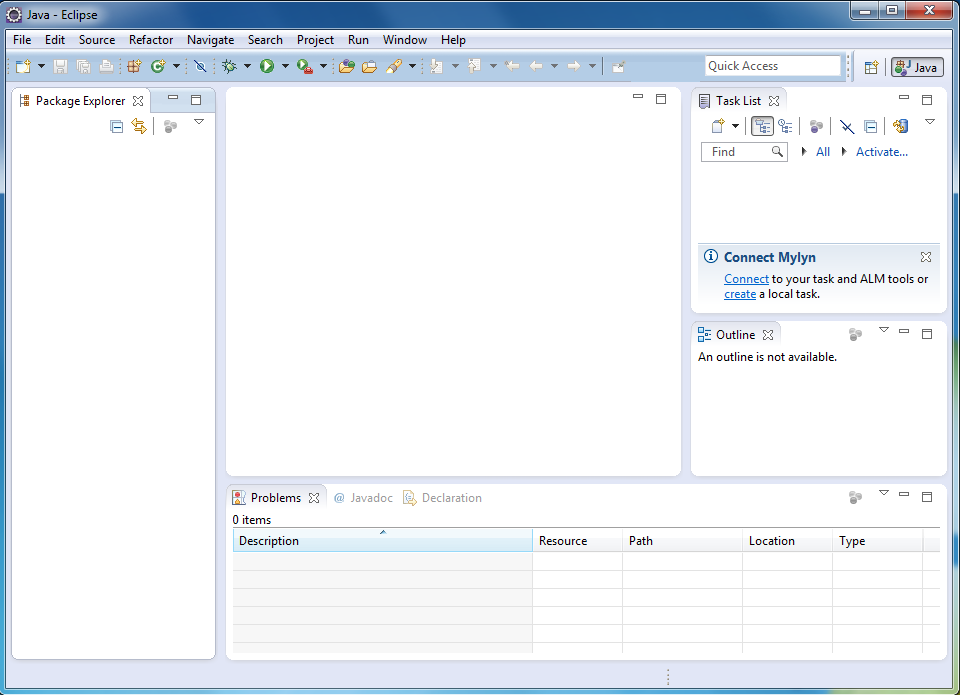
You can use Eclipse at this point to develop Java code.
Java Test Project
Creating HelloJava Java Project
To create a Java project, right click on an empty space in Package Explorer view to open a context menu.
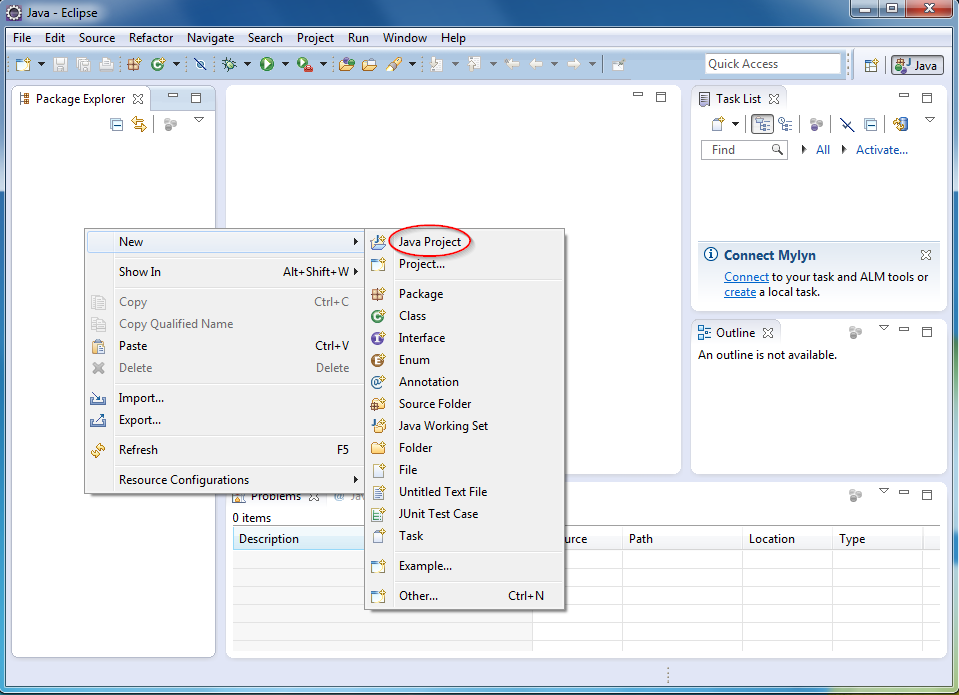
Select New submenu, select Java Project option. You will see New Java Project wizard window.
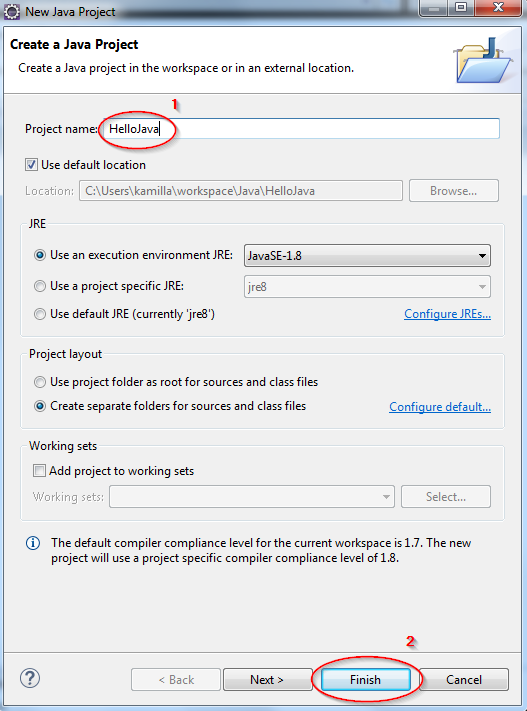
Enter HelloJava text in the Project name field ①. Press Finish button ② to create the project.
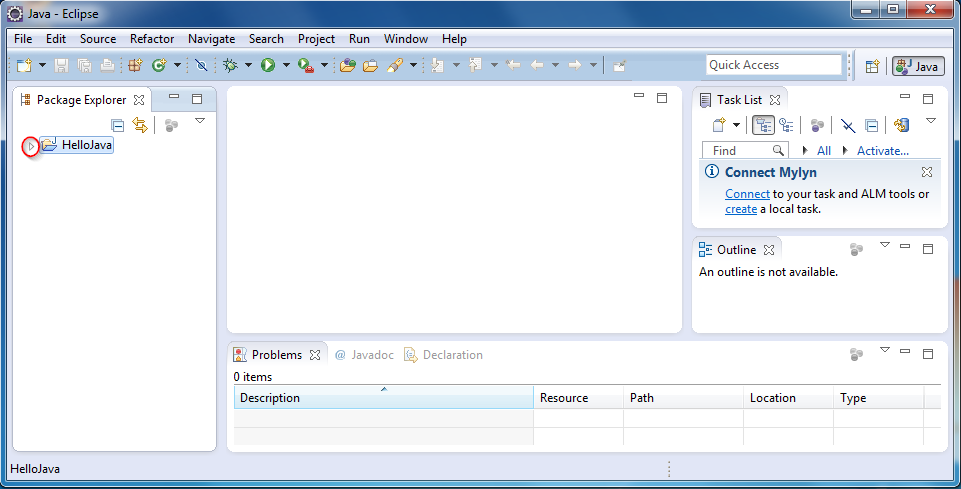
You will see HelloJava project folder in the left panel.
Creating Java Class
Click on the white triangle (or angle ) icon left to HelloJava to open the project folder.
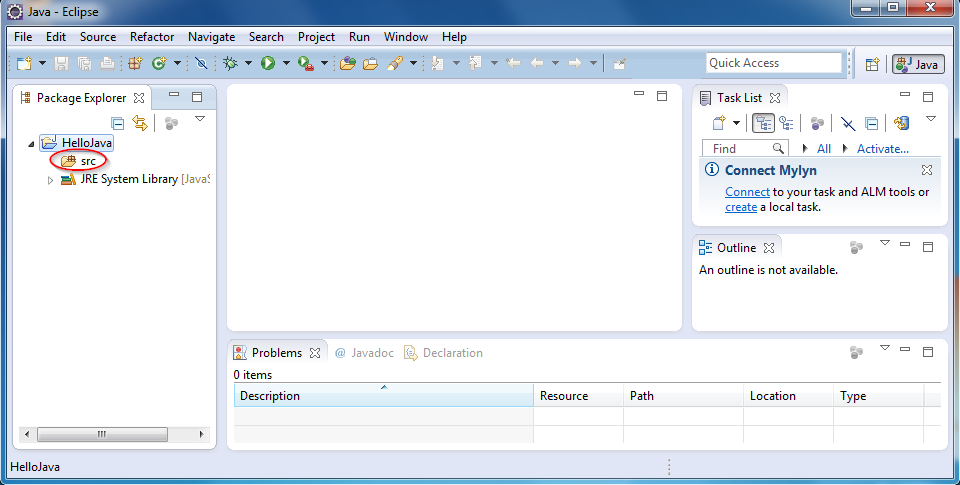
Right click on the src subfolder name to open a context menu.
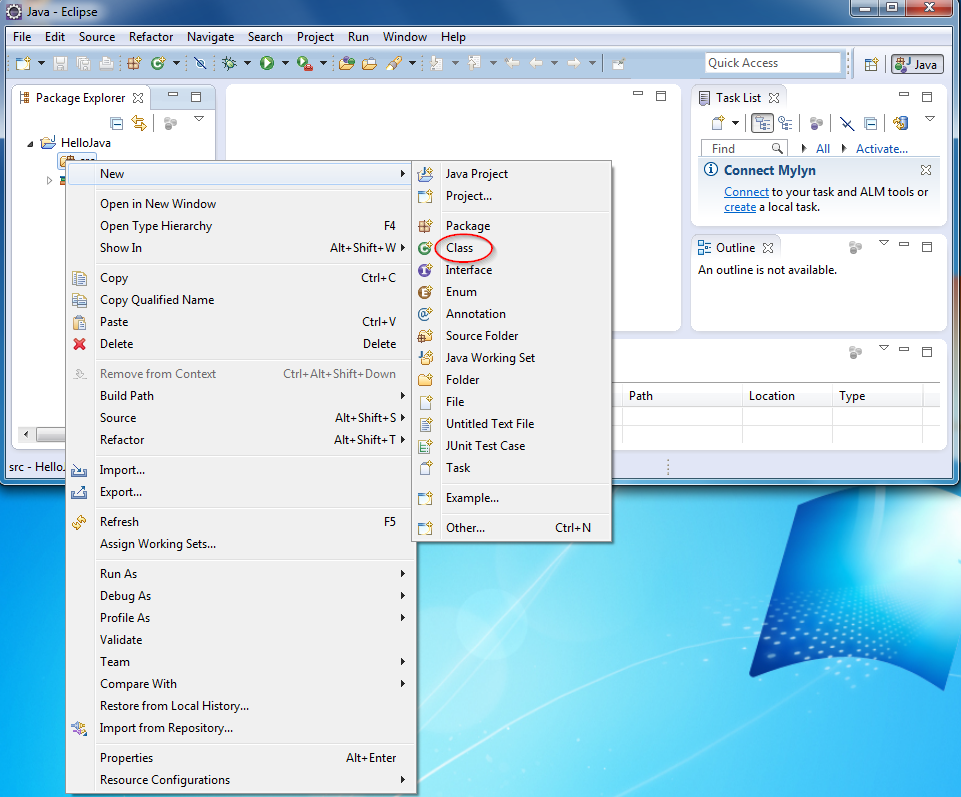
Open New submenu and select Class option.
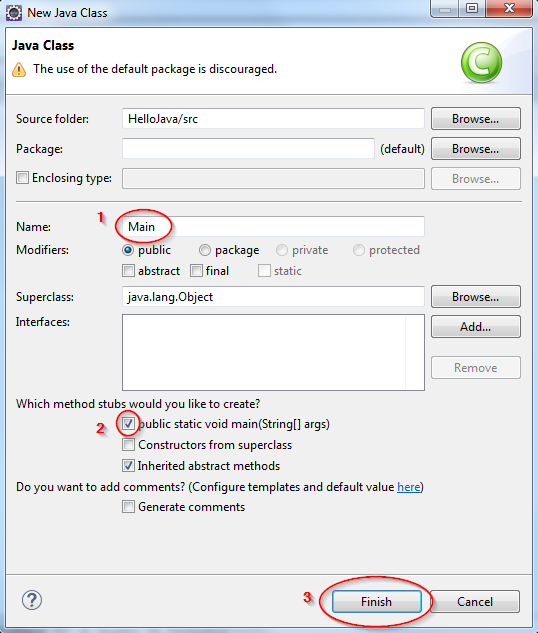
Enter Main word in the Name field ①. Check public static void main(String[] args) option ②. Press Finish button ③ to create the project.
You will see Main.java source code opened in the middle editor pane.
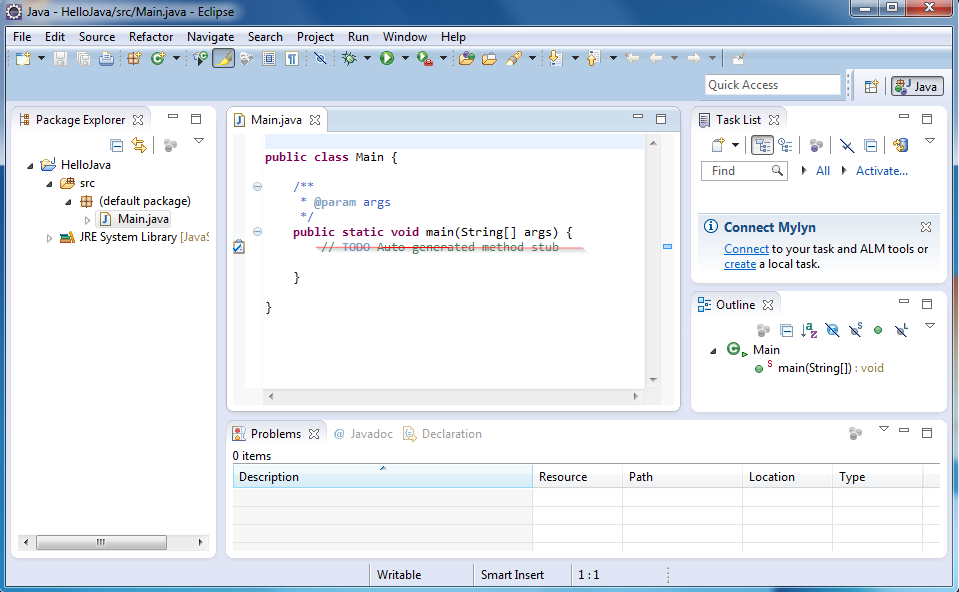
Editing Java Code
Click inside the editor pane and start editing the source code.
Remove the comment
// TODO Auto-generated method stub
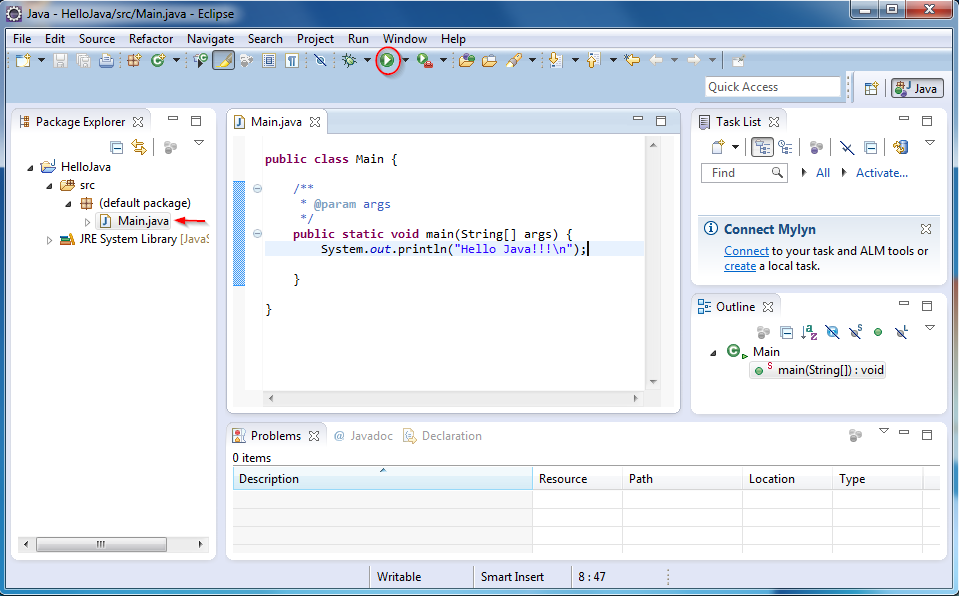
Type the following text instead of it
System.out.println("Hello Java!!!\n");
You are supposed to see the following
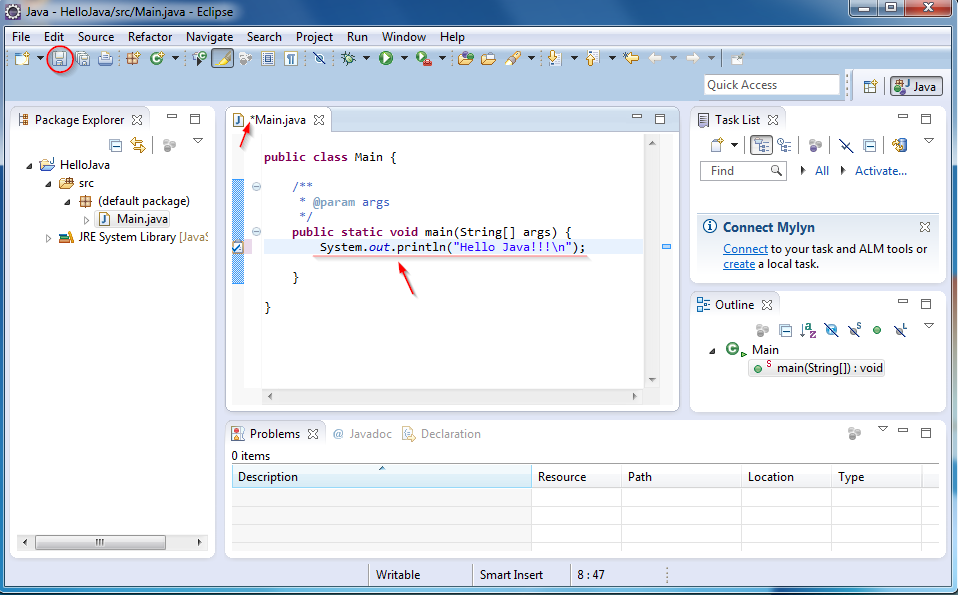
Note asterisk sign * left to Main.java file name. The asterisk means that the file has been modified.
Press floppy  icon to save the Main.java file.
Running Java Program
Be sure that in the left pane HelloJava project or any file or folder inside the project is highlited (Main.java in the example). Otherwise you might get error messages down the road.
To run the program click on “white triangle inside green disk”  icon (if you click on the triangle
  right to the icon you will see a menu that also can be used to run the project).
You are supposed to see Console view opened in the lower panel with Hello Java!!! text inside it.
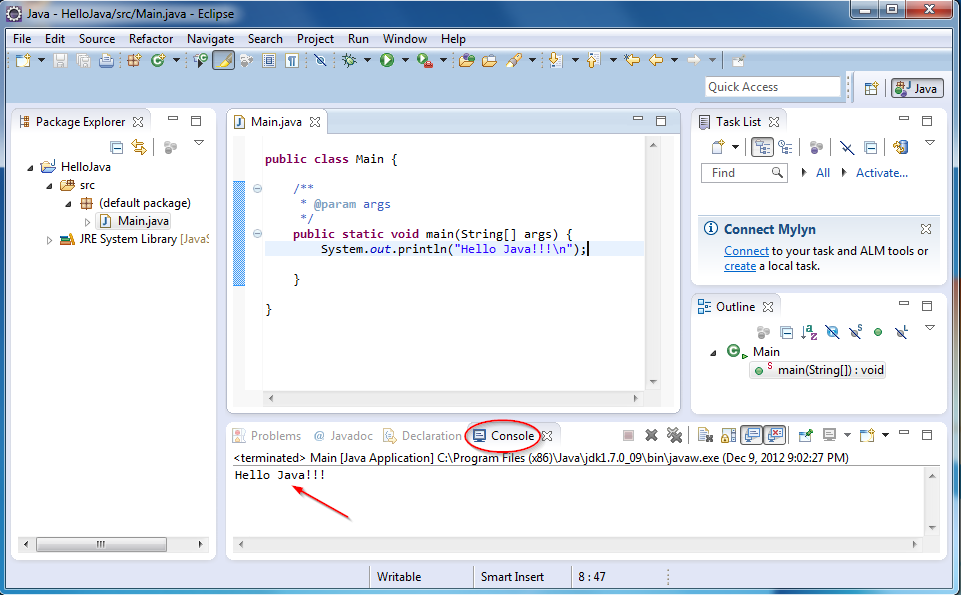
If Console view is not opened, click on Console tab to open it. If Console tab is missing, go to Window menu, select Show View submenu, and select Console option.
Specifying Runtime Parameters
If you want to specify program runtime parameters, for example, program arguments or environment variables, see Appendix 5 – Program Run Configuration. Note that the default run configuration is created automatically the first time the program is run.
| That’s it! You have Eclipse Java Development Tools working! |
Using Eclipse for C++ Development
If you are running Eclipse as Administrator or if the current workspace is not intended for C/C++ development - exit Eclipse (open File menu and select Exit option), start it again as regular user, and select appropriate workspace.
C/C++ Specific Workspace Configuration
To be able to debug C/C++ programs built using Cygwin toolset, it necessary to adjust some Eclipse preferences. Each workspace has own set of preferences. Run Eclipse as a regular user and select appropriate workspace that you use for C/C++ development.
Cygwin uses own notation for file and folder names. For example,
| Windows folder name | Cygwin folder name |
|---|---|
| C:\ | /cygdrive/c |
Because of this different naming convention, Eclipse debugger cannot find source files unless source file lookup rules are configured.
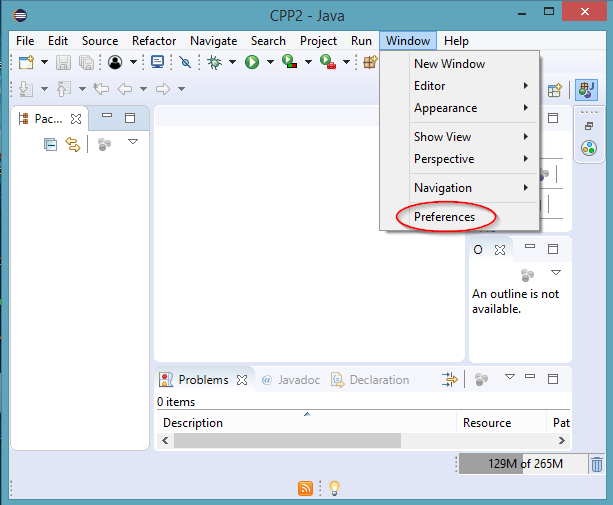
To adjust the preferences, open Window menu and select Preferences option.
You will see Eclipse preferences window.
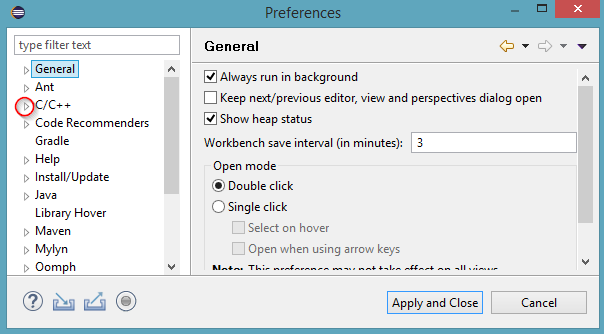
Click on a small white triangle(or angle ) left to “C/C++” to open C/C++ preferences. If you do not see the (tri)angles, move mouse pointer to the left (white) panel and the (tri)angles will appear.
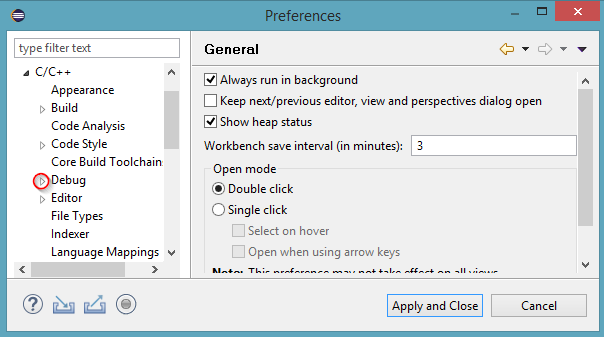
Click on a small white triangle(or angle ) left to ”Debug” group to open C/C++ debug preferences.
Click on “Source Lookup Path” to select Source Lookup Path preferences.
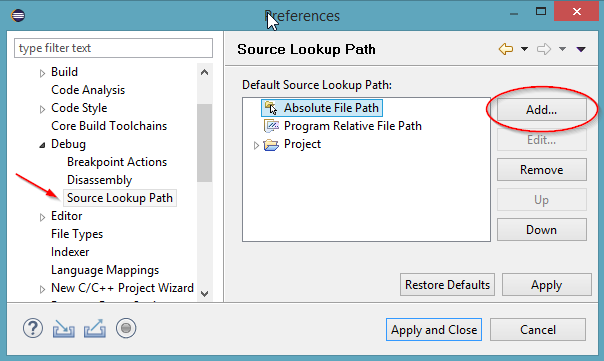
Press Add button. You will see “Add Source” pop-up window.
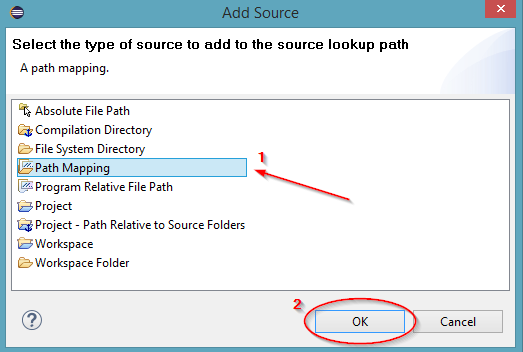
Click on Path Mapping option ① so it becomes selected. Press OK button ②.
You will see Path Mapping window.
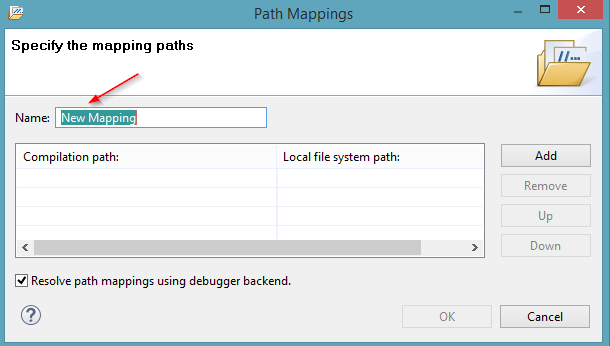
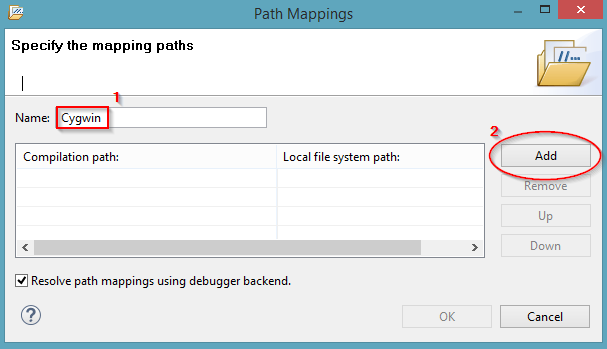
Enter Cygwin word in the Name field ①. Press Add button ②.
Find Compilation path column in the row that has  icon at the left
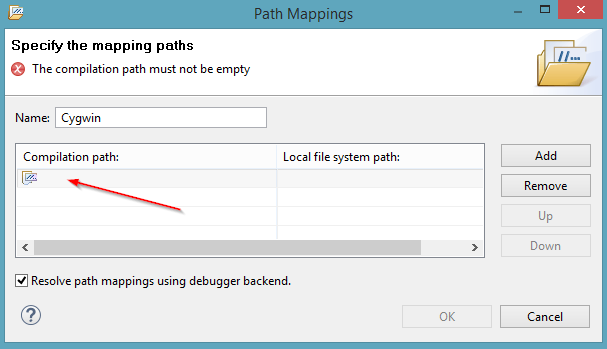
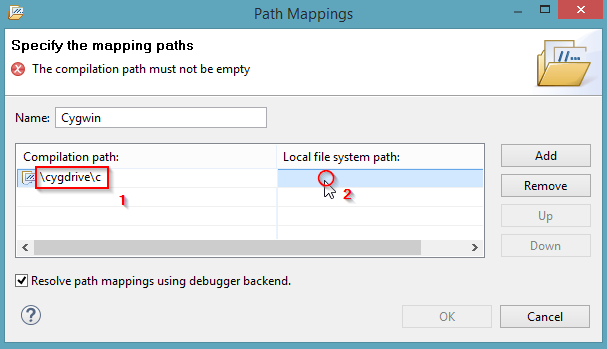
Enter \cygdrive\c (no spaces) text in the compilation path field ①. Click inside Local file system path column ②. icon will appear.
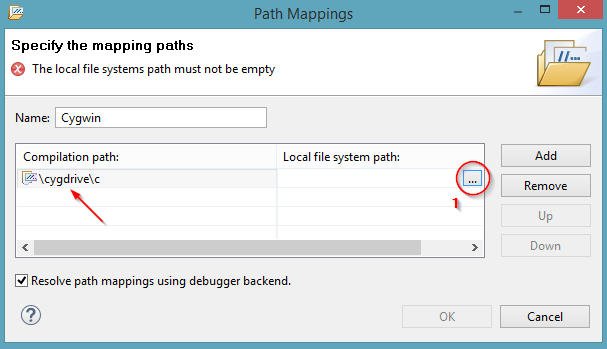
Click on “…” box icon. “Select Folder” pop-up window will open.
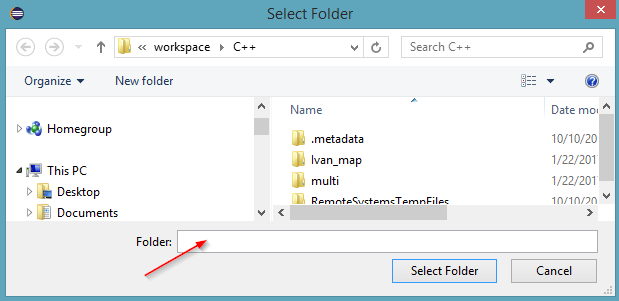
For this mapping, you need to select C:\ folder.
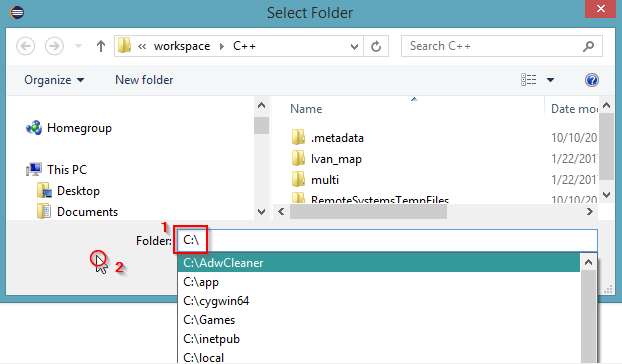
Enter C:\ (no spaces) path in the Folder field ①. As soon as you enter the path you might see a menu opened with a list of suggested folders. Ignore the suggestions by clicking somewhere in grey area ②.
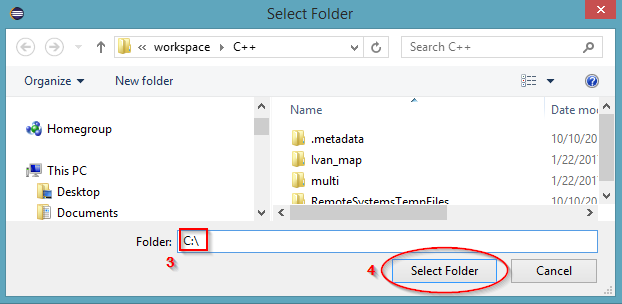
Be sure that Folder field shows C:\ ③. Press Select Folder button to close the window. You are supposed to see the new mapping displayed.
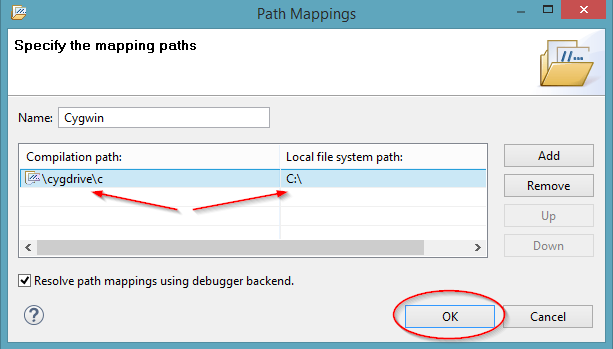
If you keep all your development related files on C: drive, you can press OK to close the window.
If some of your development related files are on other drives, add similar pathes for all drives in use. For example, if you use drives D: and E:, you shall add 2 more rules so the window will look like
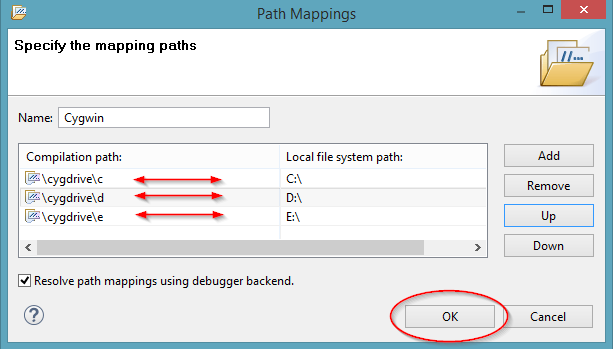
Press OK button when all pathes are added. You will be returned to the preferences window.
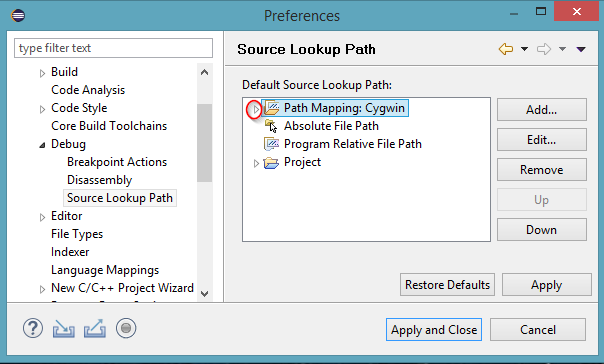
To verify that the path mapping is in place, click on white triangleicon (or angle ) left to Path Mappings: Cygwin.
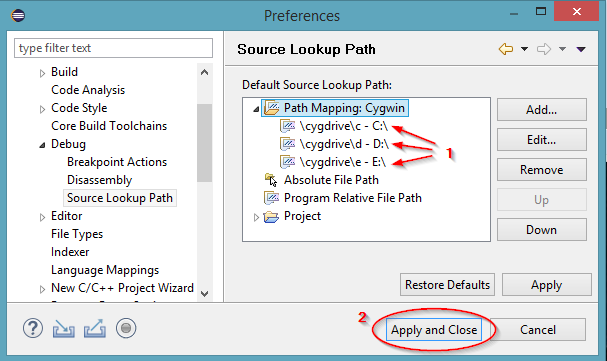
You are supposed to see the created path mappings ①. Click OK button ② to close the preferences window.
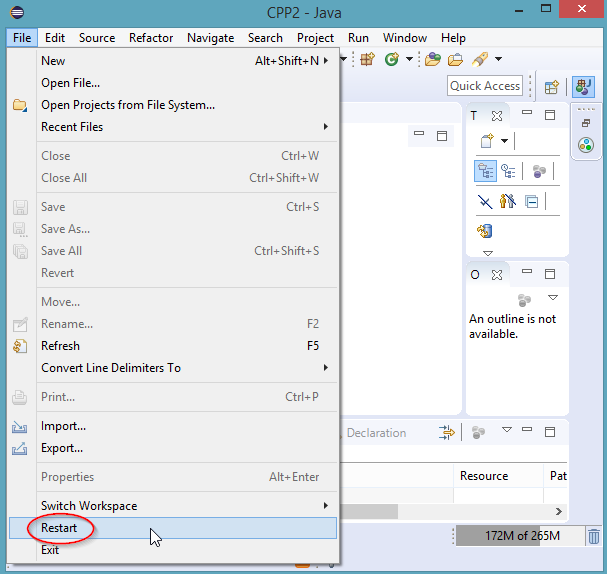
You have to restart Eclipse for the changes to take effect. Open File menu, select Restart option. Wait until Eclipse is restarted.
Opening C/C++ Perspective
You may want to switch to a different workspace if you were using Eclipse to develop Java programs previously. To do so - exit Eclipse, run it again, and select appropriate workspace (or you can try to select appropriate workspace from File->Switch Workspace menu).
You shall open C/C++ perspective (you can do it if you installed CDT as a part of Eclipse IDE for C/C++ Developers or as Eclipse add-on).
You can open Java perspective if you installed Eclipse IDE for Java or Java EE Developers.
If you see only Welcome pane,
click on “Restore” icon to make the current perspective visible.

Open Windows menu, select Open Perspective submenu, and select Other … option.
In Open Perspective window
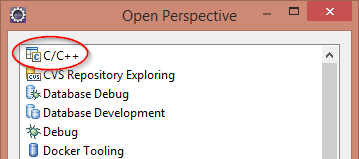
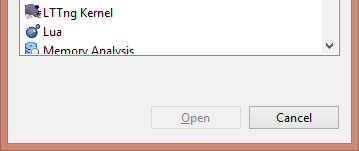
click on C/C++ to select it.

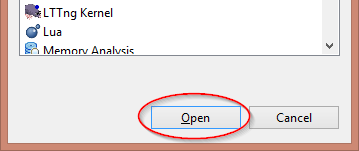
Press OK Button.
If you see Welcome pane and do not see any perspective opened, click on “Restore” icon to make the current perspective visible.
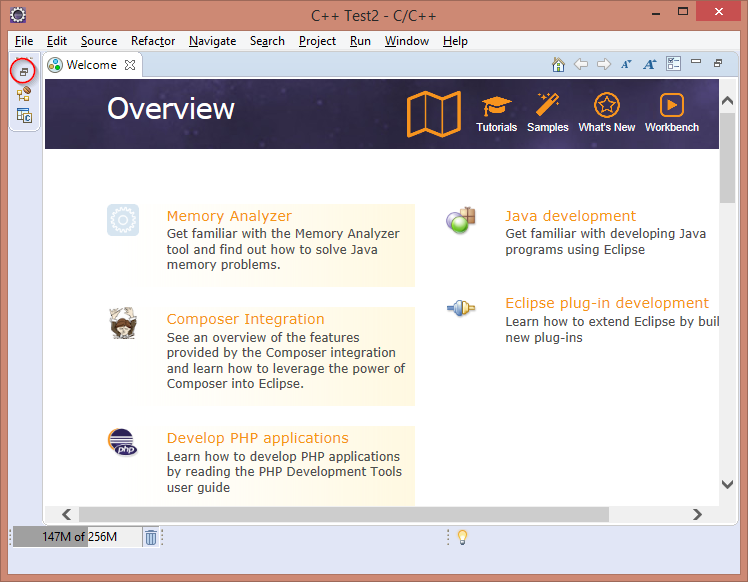
You are supposed to see so called C/C++ Perspective opened at this point.
If you want so, you can minimize the Welcome pane by clicking on “Minimize” icon in the panel title ① or even close the Welcome panel completely by clicking on “Close” icon in the panel title ②.
You can also remove Java EE perspective - move the mouse pointer over “Java EE” icon ③, click the right mouse button to open a context menu, and select Close option ④.

Note that in the screenshot C++ Test2 is the workspace name and C/C++ is the perspective name.
Adding C/C++ Specific Views
By default, you will see Project Explorer view ①. The project explorer can be used, but it is not tailored for C/C++ development.
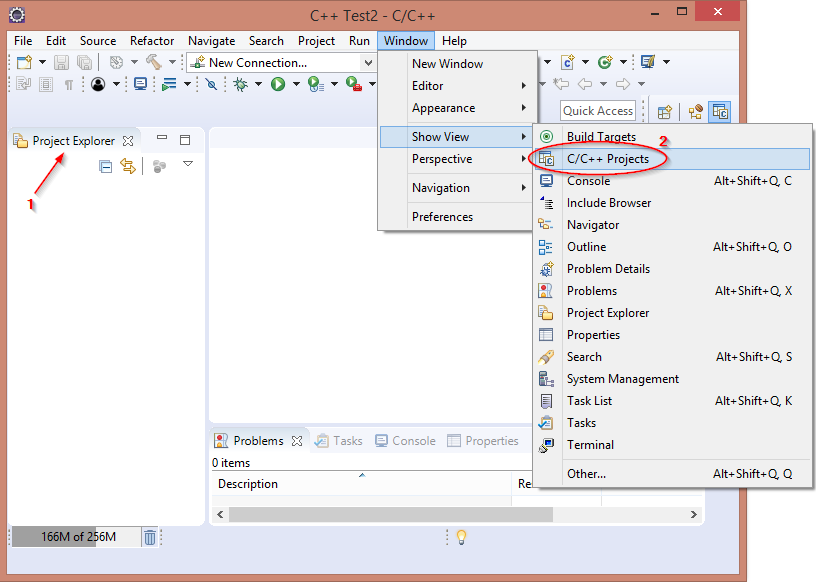
Open Windows menu, select Show View submenu, and select C/C++ Projects option.
You will see that C/C++ Projects view is shown in the left pane.
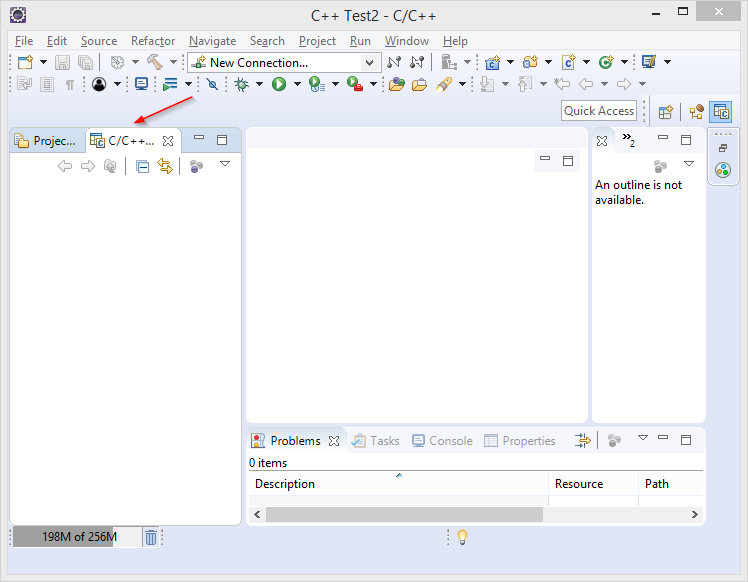
You may close the Project Explorer view by right clicking on the view name and selecting Close option. The view always can be reopened later.
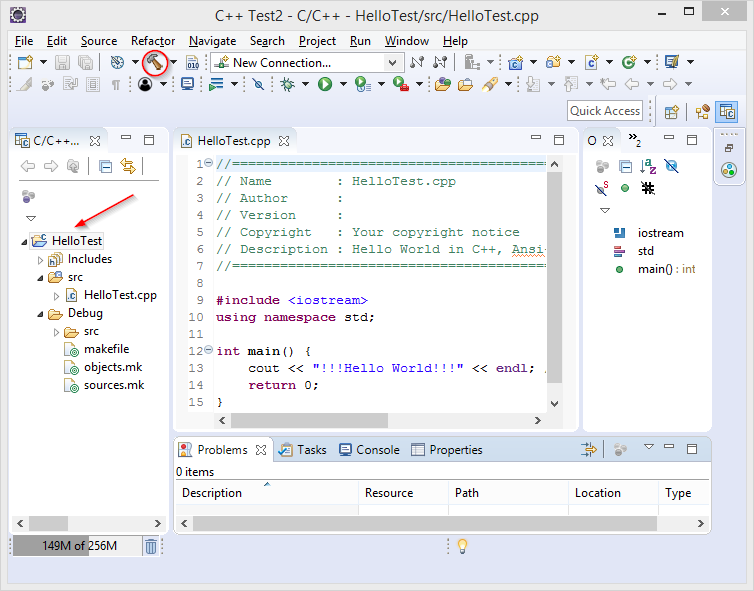
C++ Test Project
Creating HelloWord C++ Project
To create a C++ project, right click on empty space in C/C++ Projects view to open a context menu (you can also use main File menu).
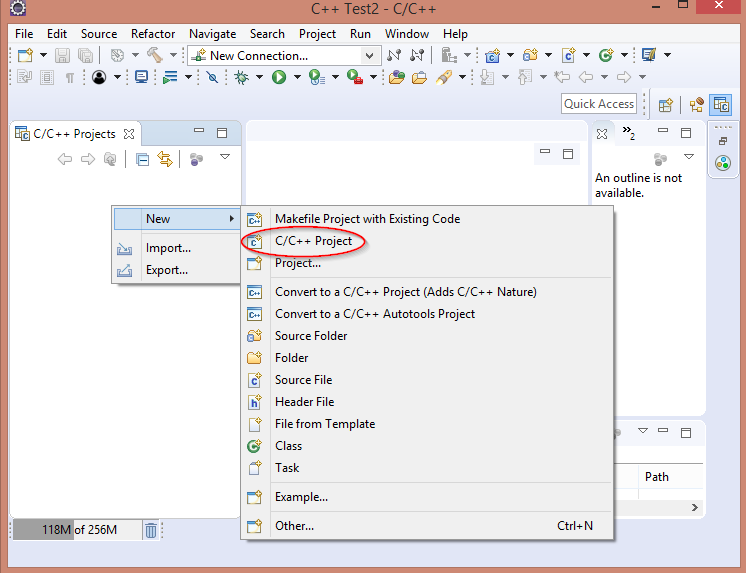
Select New submenu, select C++ Project option.
You will see New C++ Project wizard window.
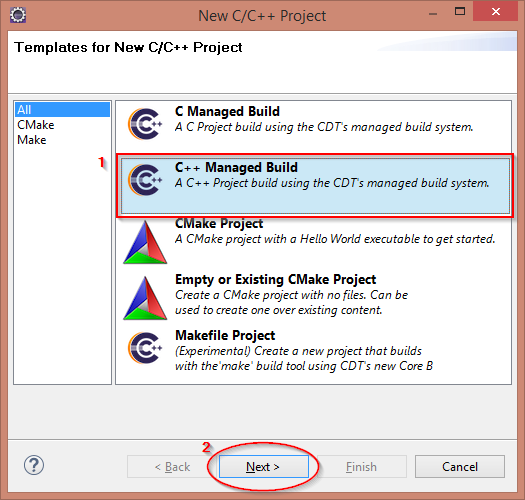
Click on C++ Managed Build ① to select it. Press Next button ②.
You will see C++ Project wizard.
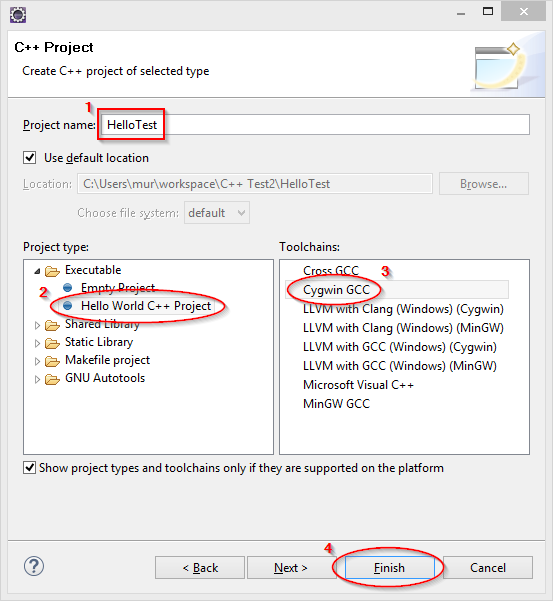
Enter HelloTest text ① in the Project name field. Click to select Hello World C++ Project ② in the Project Type pane. Click to select Cygwin GCC ③ toolchain in the Toolchains pane. Press Finish button ④ to complete the project creation.
If you press Next button (instead of Finish), you will see some advanced options (that are out of this document scope).
You will see the HelloTest.cpp source code in the middle editor pane. If you see red error markers, wait until Eclipse completes the source code indexing.
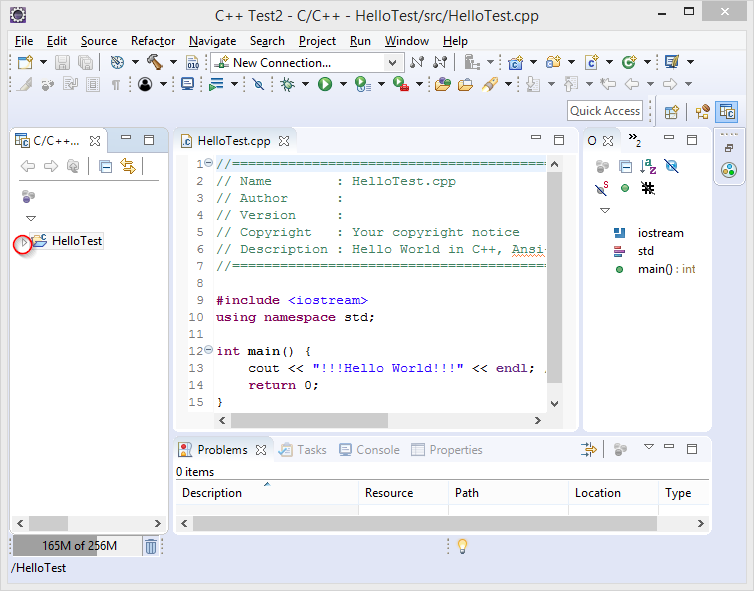
Click on a small white triangle(or angle ) left to HelloTest folder to expand the folder. If you do not see the (tri)angle, move mouse pointer to the left (white) area and one will appear.
Expand src and Debug subfolders in similar way.
Building C++ Project
At this point, you can build the project (compile the source code, link resulting object files, etc).
Be sure that, in the left pane, the current project folder, subfolder, or file is selected (its name in the left pane is highlited), otherwise you might get error messages down the road. To build the project click on hummer  icon (if you click on the triangle right to the hummer icon you will see a menu that also can be used to buid the project).
You will see the build progress status at the bottom of the main Eclipse window.
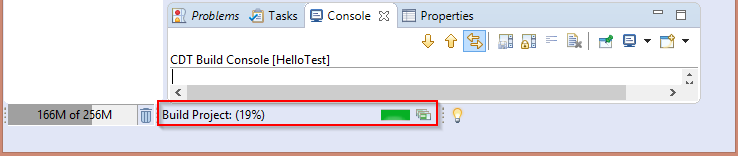
Wait until the build is completed.
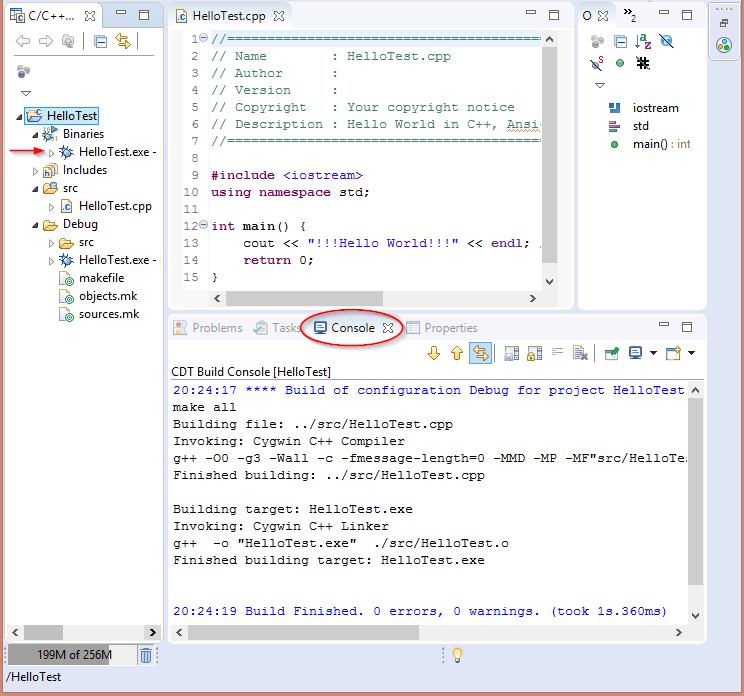
Inside HelloTest project, expand Binaries to see the just created executable file HelloTest.exe.
You also are supposed to see Console view in the lower panel, with build output inside it.
If Console view is not opened, click on Console tab to open it. If Console tab is missing, go to Window menu, select Show View submenu, and select Console option.
Running C++ Program as Local Application
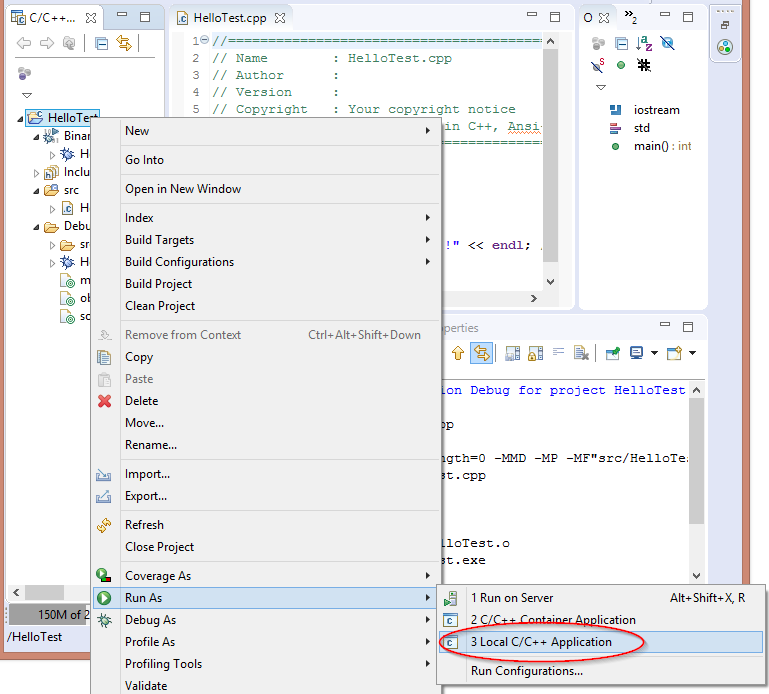
Right click on the project folder to open a context menu. Select Run As submenu, select Local C/C++ Application option.
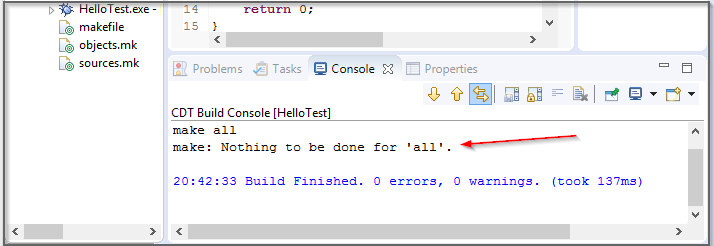
The Eclipse will build (again) and run the program. You may see build console output stating that there is nothing to be done.
After the build is completed, the program will run.
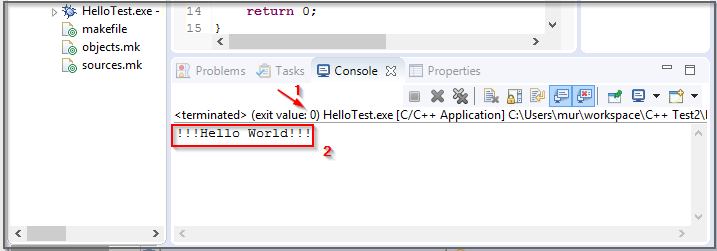
The Console view is supposed to switch to the program output. In the screenshot, you can see the program exit code zero ① and the program output !!!Hello Word!!! ②.
Switching Console View
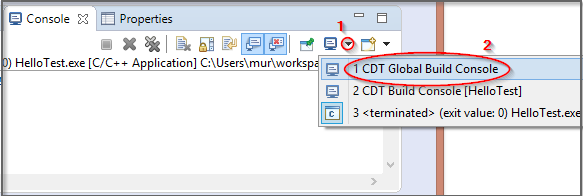
If you want to see the build console output, click on black triangle  icon ① and select CDT Global Build Console ② from the drop-down menu. Similarly, you can switch to the program output in the console view.
Editing Program Code
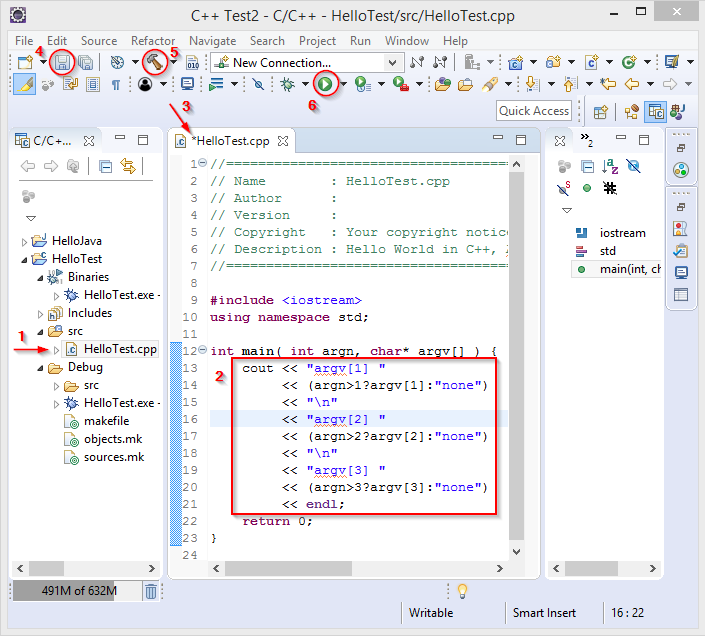
In the left pane, select HelloTest.cpp file ①. Click inside the editor pane in the middle and start editing ② the source code.
Note asterisk sign * ③ left to HelloTest.cpp file name in the editor view. The asterisk means that the file has been modified.
Click on floppy icon ④ to save the file. Click on hummer icon ⑤ to rebuild the project. To run the program, using the last run configuration, click on “white triangle inside green disk” icon ⑥.
Specifying Runtime Parameters
If you want to specify program runtime parameters, for example, program arguments or environment variables, see Appendix 5 – Program Run Configuration. Note that the default run configuration is created automatically the first time the program is run.
| That’s it! You have Eclipse C/C++ Development Tooling and Cygwin working! |
Appendix 1 – Modifying Windows Environment Variables
PATH Environment Variable
Access Environment Variables window, for example, by going to Windows Search -> “environment” -> Edit the system environment variables -> System Properties -> Advanced -> Environment Variables.
In the Environment Variables window, find existing system (or user) PATH variable or create new user PATH variable. Add the OpenJDK and Cygwin bin subfolders to the path variable, as needed.
Note - The user path is appended to the system path. In most cases, you a folder shall be added either to the system or to the user path.
Including OpenJDK in Windows PATH
After the OpenJDK files are extracted to an installation folder, consider adding its bin subfolder to Windows system or user PATH variable. Add OpenJDK to the system path if you want all users to be able to use it. Add it to the user path otherwise.
For example, add C:\Program Files\OpenJDK\jdk-11\bin to the system PATH variable.
Including Cygwin in Windows PATH
After the Cygwin packages are installed, it is necessary to add Cygwin bin subfolder to Windows system or user PATH variable. Add Cygwin to the system path if you want all users to be able to use it. Add it to the user path otherwise.
For example, add C:\cygwin64\bin to the system PATH variable.
Environment Variables in Windows 10
Accessing Windows 10 System Properties
Find Windows search box. In the case of Windows 10, it is usually at the left bottom corner of the screen
Start typing word environment in the search box.
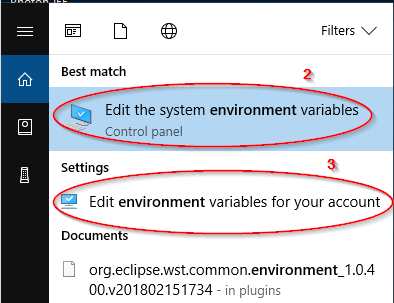
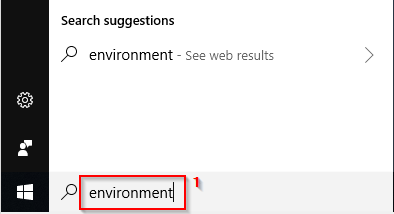
Type word environment in the search box ①. Click on Edit the system environment variables ② if you are modifying the variables for all users. Otherwise, click on Edit environment variables for your account ③.
If you clicked the Edit the system environment variables, you will see System Properties window.
Accessing Windows 10 Environment Variables
In the System Properties window
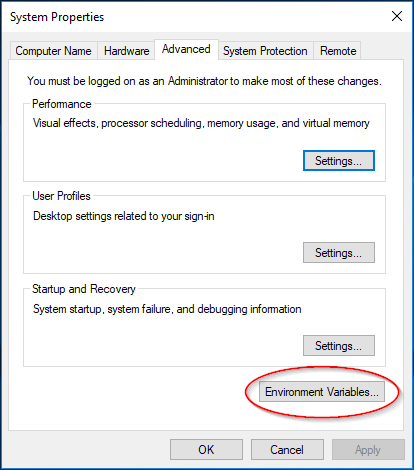
press Environment Variables button.
Editing Windows 10 Environment Variables
In this example, we modify PATH environment variable. In the Environment Variables window

If you are adding a folder to the system PATH variable, scroll down in System variables section until you see Path line.
Click on Path line ① to select it. Press Edit button ② in System variables section.
If you are adding the folder to the user PATH variable that already exists, find it in User variables section, click on it to select it, and press Edit button in the User variables section.
You will see Edit environment variable window.
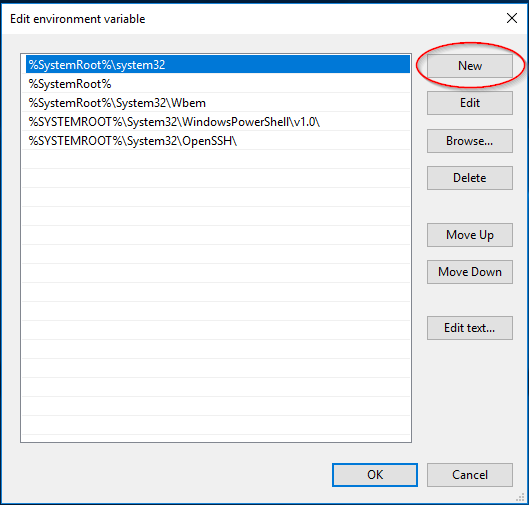
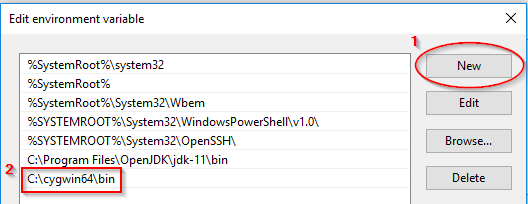
Press New button to add new folder to the bottom of the folder list.

Enter the folder pathname in the text box, for example
C:\Program Files\OpenJDK\jdk-11.0.1\bin or
C:\cygwin64\bin
Press Enter key to complete the pathname.
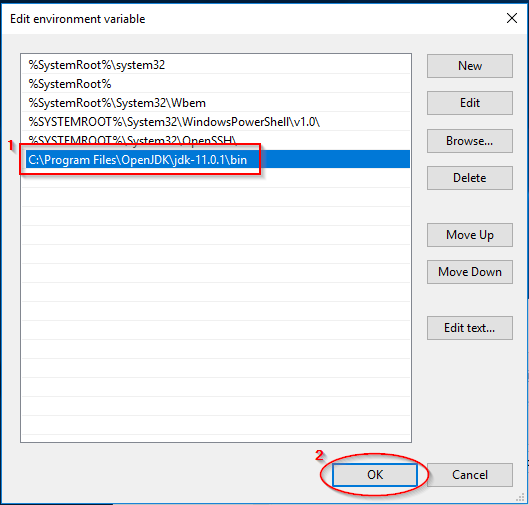
Confirm that the desired folder is in the list ①. Press OK button to close Edit environment variable window.
Saving New Value of Windows 10 Environment Variable
In the Environment Variables window
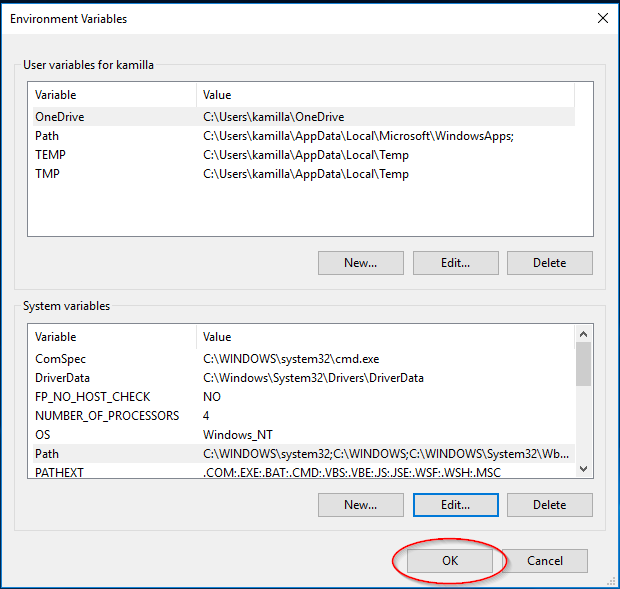
press OK button to save the new variable(s) value. If you press Cancel button, the new value(s) will be discarded.
If you have System Properties window open, you can close it by pressing OK button.
Environment Variables in Legacy Windows
Accessing System Properties in Legacy Windows
Getting to System Properties via Windows Search
Depending on your Windows version find or open Windows search box.
Type word environment in the search box ①. Click on Edit the system environment variables ② if you are modifying the variables for all users. Otherwise, click on Edit environment variables for your account ③.
If you clicked the Edit the system environment variables, you will see System Properties window. Otherwise, you will see Environment Variables window.
Getting to Environment Variables via Computer Properties
Right click on your desktop Computer icon to open a context menu and select Properties. If you do not have Computer icon open Windows Start Menu
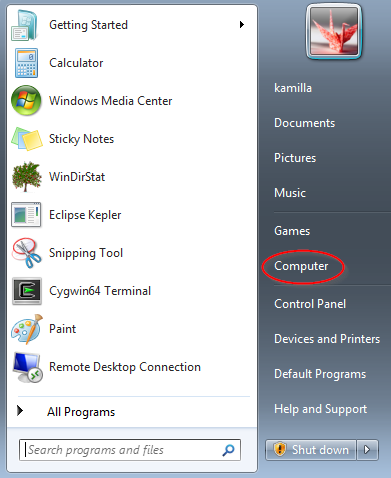
Move mouse over Computer item and right click it to open a context menu.
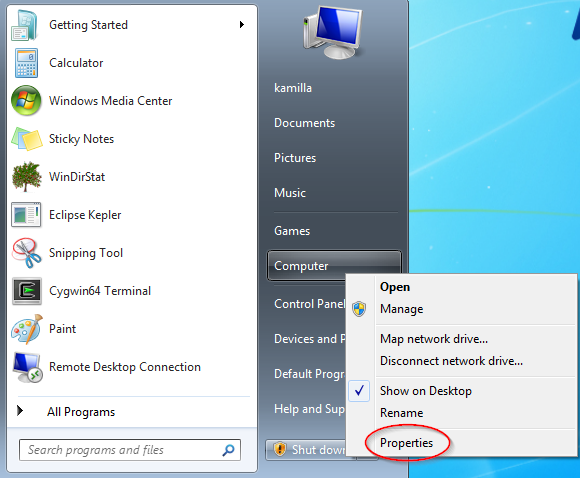
Select Properties option.
In the case of Windows XP, the System Properties window will open right away (see the next page). Otherwise you will see the following window
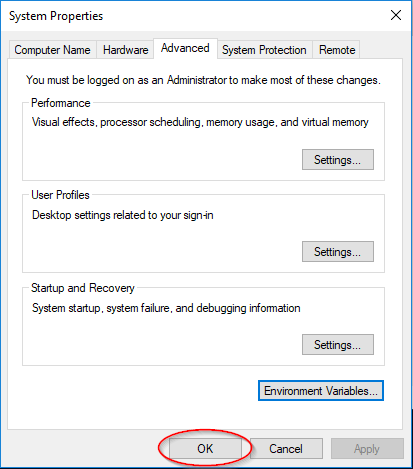
Click on Advanced system settings. You might see “User Account Control” popup window with a warning message “A program needs your permission to continue” and “Advanced System Settings” - press Continue button.
Accessing Environment Variables in Legacy Windows
Note - If you clicked the Edit environment variables for your account, you will not see System Properties window. You will see Environment Variables window instead. Skip to the next section in such a case.
In the System Properties window
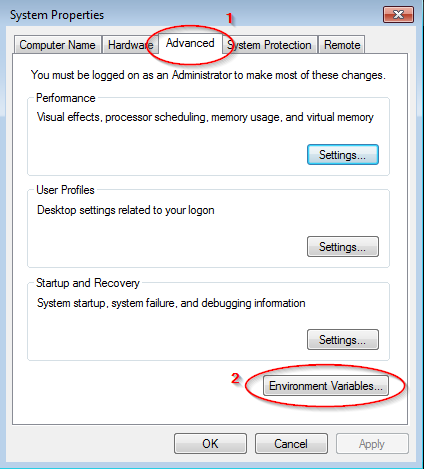
select Advanced tab ①, if not already selected. Press Environment Variables button ②.
Adding OpenJDK to Windows PATH
In these examples, we are adding OpenJDK folder C:\Program Files\OpenJDK\jdk-11\bin to the PATH environment variable.
Adding OpenJDK to Existing Path Variable
If you are adding OpenJDK to the system PATH environment variable,
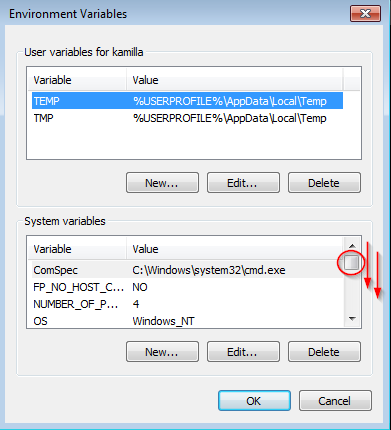
scroll down in System variables section until you see Path line.
Click on Path line ① to select it. Press Edit button ② in System variables section.
If you are adding OpenJDK to the user PATH variable that already exists, find it in User variables section, click on it, and press Edit button.
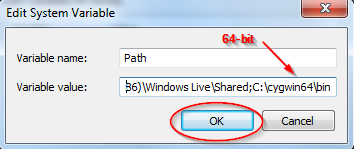
In the Edit System Variable pop-up window, note that the old path value is selected (has blue background).

Click somewhere in the Variable value field to deselect the old path value, move the cursor to the right, and add OpenJDK bin subfolder.
✔ Be sure to deselect the old path value by clicking inside it. Otherwise, when you start typing, the old path value will be lost.
For example, add the following text
;C:\Program Files\OpenJDK\jdk-11\bin
Note that you have to insert ; (semicolon) between the old path value and the folder pathname. Also, no spaces are allowed around the semicolon.
Confirm that the path is correct ①. Press OK button ②.
Creating User Path Variable and Adding OpenJDK to it
If you are adding OpenJDK to the user PATH variable that does not exist yet,
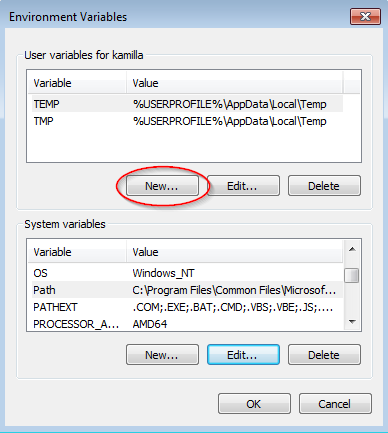
press New button in User variables section.
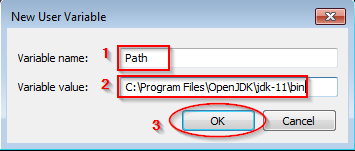
Enter Path word in Variable name field ①. Enter
C:\Program Files\OpenJDK\jdk-11\bin
in Variable value field ②. Press OK button.
Adding Cygwin to Windows PATH
In these examples, we are adding Cygwin folder C:\cygwin64\bin to the PATH environment variable.
Adding Cygwin to Existing PATH Variable
If you are adding Cygwin to the system PATH variable,
scroll down in System variables section until you see Path variable.
Click on Path line ① to select it. Press Edit button ② in System variables section.
If you are adding Cygwin to the user PATH variable that already exists, find Path line in User variables section, click on it, and press Edit button.
In the Edit System Variable pop-up window, note that the old path value is selected (has blue background).
Click somewhere in the Variable value field to deselect the old path value, move the cursor to the right, and add Cygwin bin subfolder.
✔ Be sure to deselect the old path value by clicking inside it. Otherwise, when you start typing, the old path value will be lost.
For example, add the following text
;C:\cygwin64\bin
Note that you have to insert ; (semicolon) between the old path value and the folder pathname. Also, no spaces are allowed around the semicolon.
Press OK button.
Creating User PATH Variable and Adding Cygwin to it
If you are adding Cygwin to the user PATH variable that does not exist yet,
press New button in User variables section.
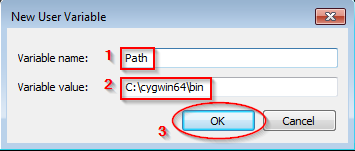
Enter Path word in Variable name field ①. Enter
C:\cygwin64\bin
in Variable value field ②. Press OK button.
Saving New Value of Windows Environment Variable
In the Environment Variables window,
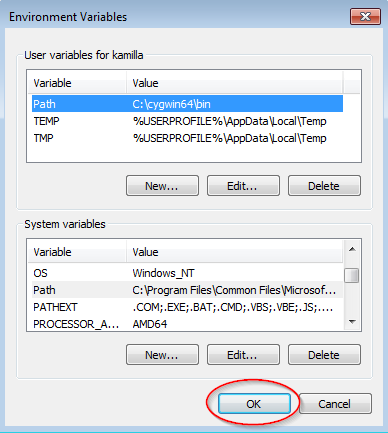
press OK button to save the new value of variable(s). If you press Cancel button, the new value(s) will be discarded.
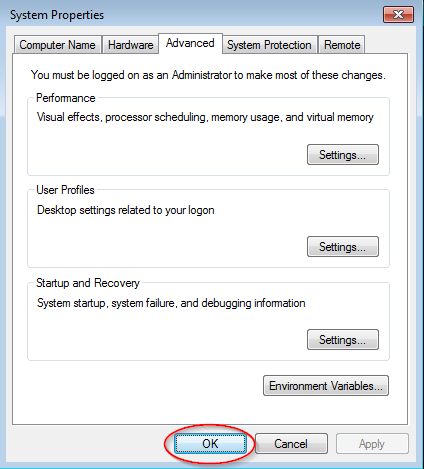
Press OK button one more time to close System Properties window.
Appendix 2 – Configuring Eclipse Lunch Properties (eclipse.ini)
During Eclipse startup eclipse.ini file is read to figure out various Eclipse launch properties, for instance, what Java version to use, how much memory to allocate, etc. Some information about eclipse.ini file can be read at eclipse.ini🌐 wiki page.
➤ If you modify eclipse.ini file while Eclipse is running, the Eclipse has to be restarted for the changes to take effect.
Editing eclipse.ini File
Find eclipse.ini file in the eclipse subfolder. To find eclipse.ini look for icon. Depending on you File Explorer settings you may see eclipse.ini or just eclipse right to it.

Make a backup copy of the eclipse.ini file. Move the mouse pointer over the icon and click the right mouse button to open a context menu. Select Copy from the menu.
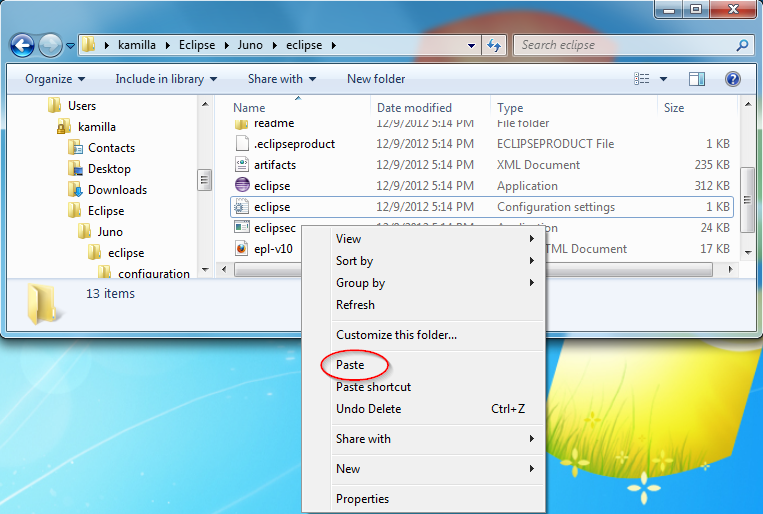
Find some empty space inside the eclipse folder, move the mouse pointer there, and click the right mouse button to open a context menu. Select Paste from the menu. You will see eclipse - Copy.ini backup file created.
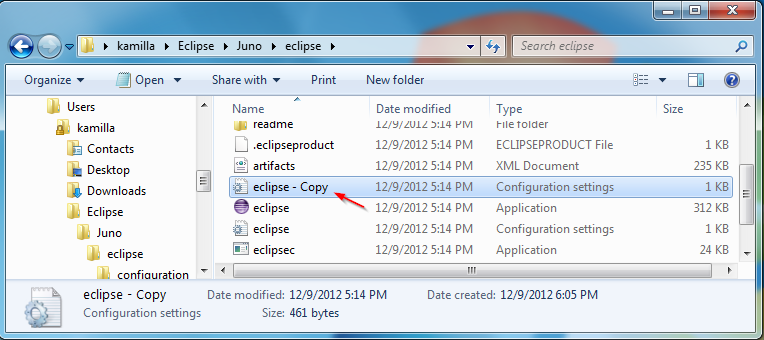
At this point, open eclipse.ini file in your favorite editor. Below it is assumed that WordPad is used to edit the file.
If Eclipse is installed in a folder that the user can write to, for example in your user data folder, or you are running Windows XP
✔ You can edit eclipse.ini file in a usual way. For example, move the mouse pointer over the eclipse.ini filename, click the right mouse button, select Open with, and select WordPad from the context menu.
If you are running Windows other than Windows XP and Eclipse is installed in a folder that the user cannot write to, for example, inside C:\Program Files
✔ You have to edit eclipse.ini file as administrator. To open the file in WordPad as Administrator do as described below
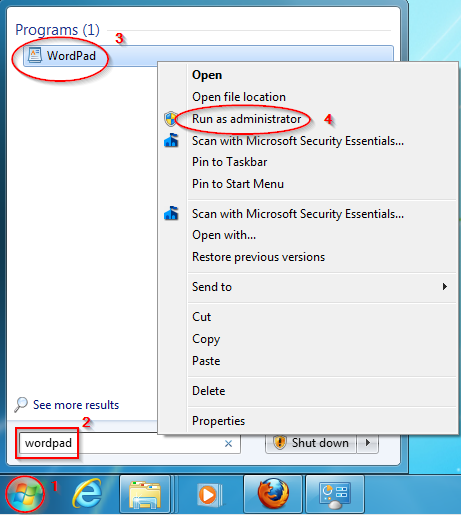
Open Windows Start menu ①, enter wordpad in the search field ②. You are supposed to see a list that has WordPad in it. Move the mouse pointer over WordPad name ③ and click right mouse button to open a context menu. Select Run as Administrator from the menu ④.
Whichever way you started WordPad (as regular user or as administrator), you will see an empty WordPad window opened.
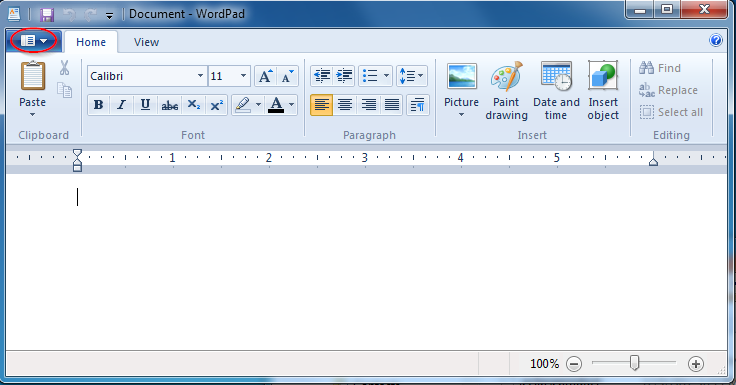
Go to File menu and select Open option (depending on the Windows version you may need to click on File in the menu bar or on  icon).
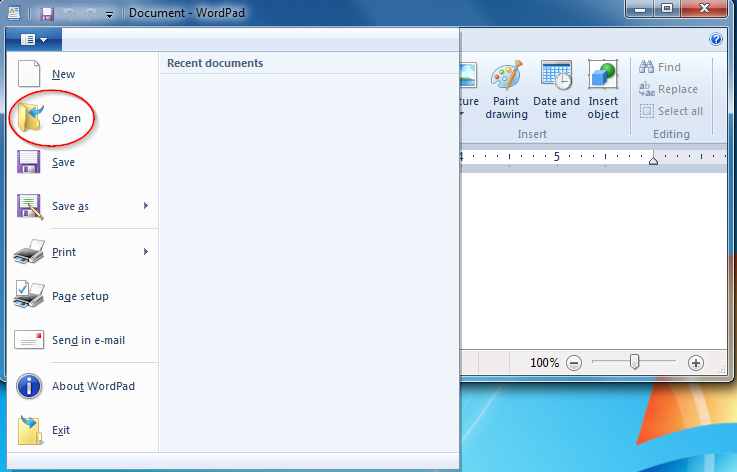
You will see a file selection window

Click on small black triangle right to All Wordpad Documents and select All Documents option. Browse to the eclipse folder (C:\Users\kamilla\Eclipse\Juno\eclipse in the example screenshot).
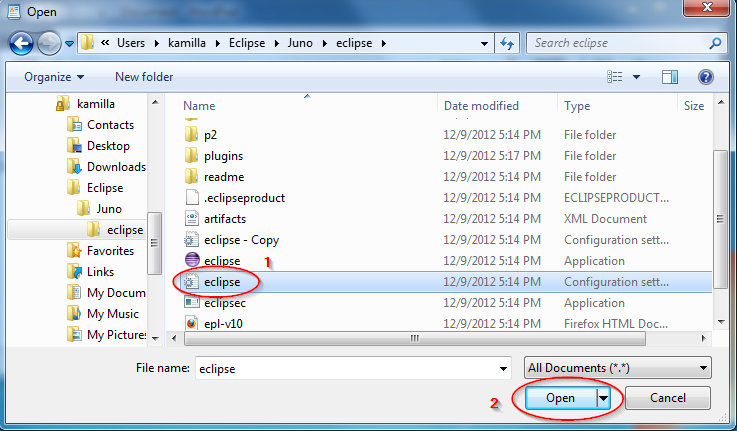
Click on eclipse.ini filename or icon to select it ①. Click Open button ②.
Specifying Java Virtual Machine
You will see eclipse.ini file displayed inside the WordPad window.
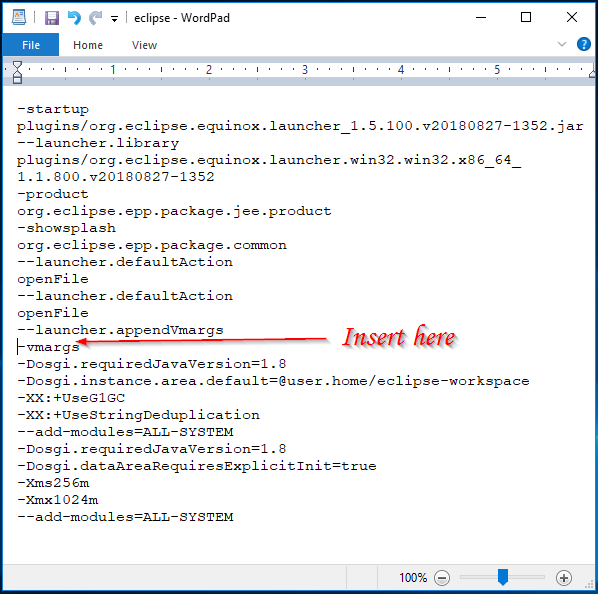
Add two lines before -vmargs line. The first line has to be
-vm
The second line has to contain a path to jvm.dll file in JDK folder, for example
C:\Program Files\OpenJDK\jdk-11.0.1\bin\server\jvm.dll or
C:\Program Files (x86)\Java\jdk1.7.0_09\jre\bin\client\jvm.dll
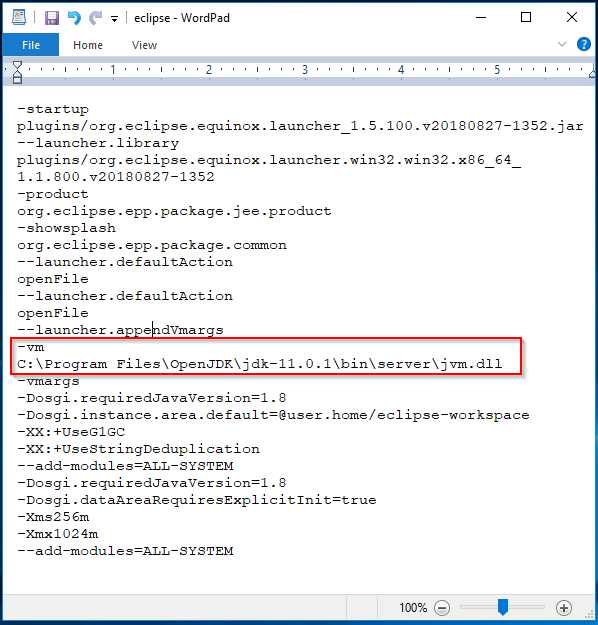
So, these two lines shall look like (note that empty lines are not allowed)
-vm
C:\Program Files\OpenJDK\jdk-11.0.1\bin\server\jvm.dll
Increasing Java Heap Size
There are two Java virtual machines parameters that define Java heap size and affect garbage collection frequency
-Xms initial heap size
-Xmx maximum heap size
Note that the heap does not grow as long as, after a garbage collection, there is free memory in the heap. So, the maximum heap size sets a limit for memory consumption in the worst case. When the initial heap size sets the usual limit and affects the garbage collection frequency.

Adjust these settings as needed. For example, to increase maximum heap size and to reduce garbage collection frequency set
-Xms1024m
-Xmx2048m
The initial heap size will be 1024 MiB. The actually used heap memory size will be between 0 and 1024 MiB, as long as it is enough. If the initial heap size is not enough, the heap may grow up to 2048 MiB.
See also FAQ How do I increase the heap size available to Eclipse?🌐
Saving and Applying eclipse.ini File
Open File menu and select Save option (or press Save icon  if the WordPad window has one).
If you get the pop-up window below press Yes to confirm that you want to save the file.
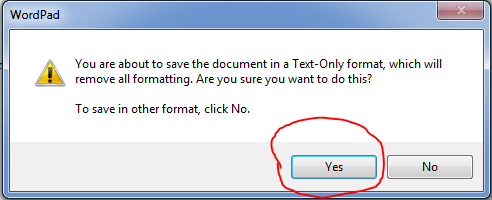
After the file is saved close the WordPad window. To apply the changes, restart Eclipse if it is running.
Appendix 3 – Configuring Eclipse for Internet Access
Some features of Eclipse require Internet access. If your workstation is behind a firewall/proxy you might need to enter firewall/proxy information in the Eclipse workspace preferences.
Instructions below assume that your firewall/proxy setup is simple. If you have more complex setup or Eclipse cannot access the Internet contact your network administrator.
Configuring Network Proxy in Internet Browser Settings
Check Internet Explorer firewall settings. Open Internet Explorer properties (for example, in Windows Vista, launch Internet Explorer, open Tools Menu, and select Internet Options).
Select Connections tab
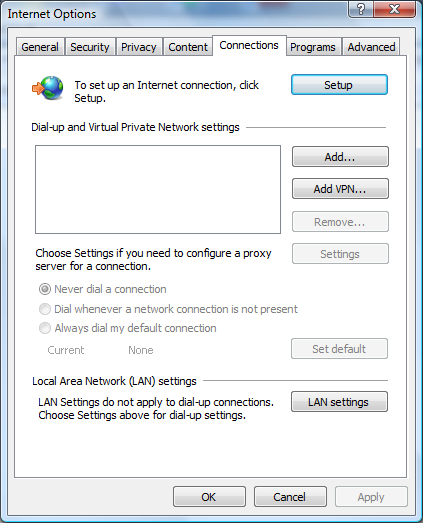
Press LAN settings button.
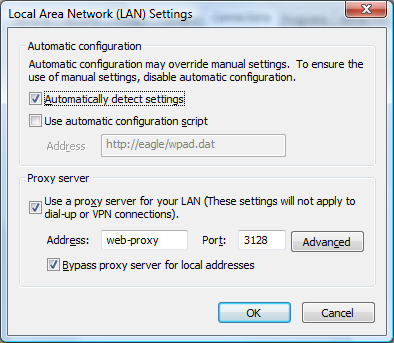
Look for Proxy server section. If the checkbox Use a proxy server for your LAN is checked, you need to write down Address and Port information. For example, address web-proxy and port 3128 (the address and port here are just an example, you have to look into the settings on your workstation).
To close Internet Options press Cancel button and press Cancel button again.
Locating Eclipse Network Preferences
Now return to the Eclipse window. Open Window menu and select Preferences.
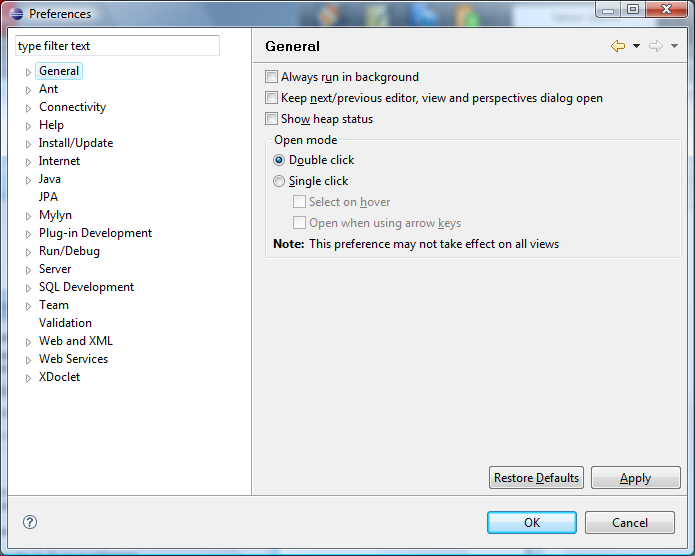
Click on a small white triangle(or angle ) left to the “General” group to open general preferences. If you do not see the (tri)angles, move mouse pointer to left (white) panel and the (tri)angles will appear.
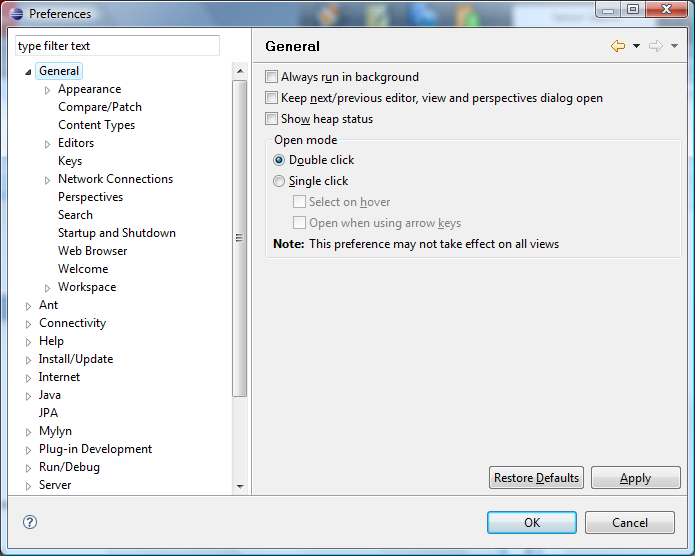
Click on Network Connections preferences to open them.
Configuring Network Proxy in Eclipse Preferences
In the Network Connections preferences,

click on the small black triangle right to the Active Provider to open a menu, select
Direct if Eclipse shall connect to the Internet directly
Manual if Eclipse shall use a proxy and Internet Explorer does not use the proxy (does not use any proxy or uses a different proxy)
Native if Eclipse shall use the same proxy as Internet Explorer
If you selected Direct or Native press OK button to close the preferences.
Otherwise you will see the preferences changed
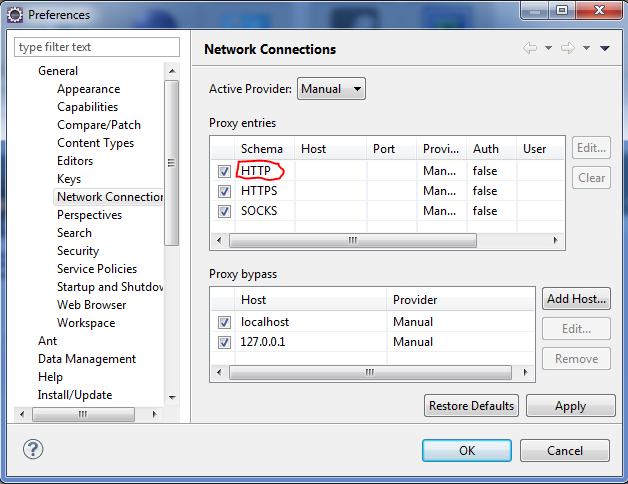
Click on HTTP word in Schema column to select HTTP line.
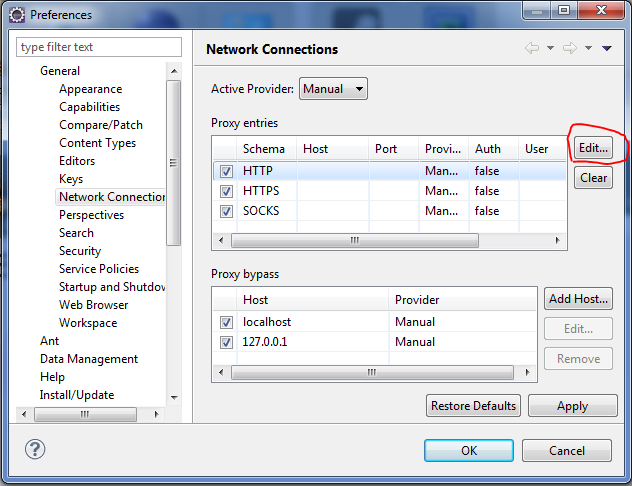
Click Edit button to open Edit Proxy Entry window. Enter the proxy address in “Host” field and the proxy port in “Port” field. For example,
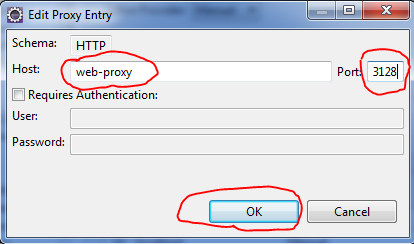
Press OK button to return to main preference window.
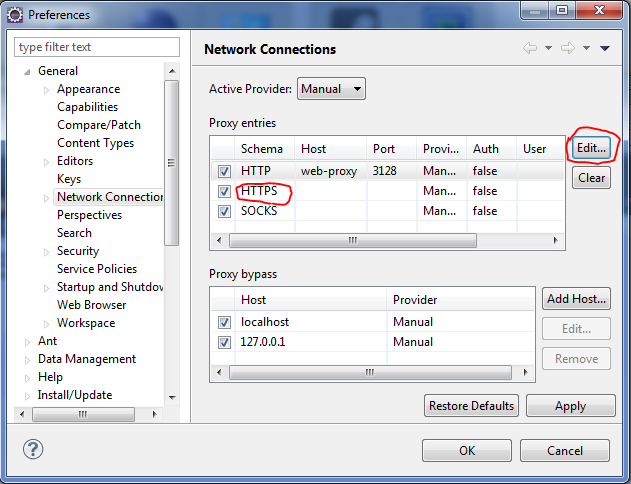
Click on HTTPS word in Schema column to select HTTPS line. Click Edit button to open Edit Proxy Entry window. Enter the proxy address in Host field and the proxy port in Port field. Press OK button to return to main preference window.
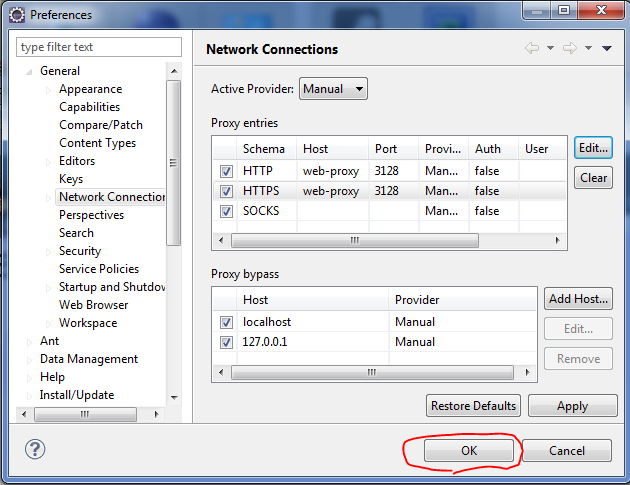
Adjust other Network Connection preferences as needed. Press OK button to save and close the preferences.
Appendix 4 – Managing Eclipse Software
When to Run Eclipse as Administrator
If you are using Windows other than Windows XP and Eclipse is installed in a folder that the user cannot write to, for example, C:\Program Files or C:\Program Files (x86)
✔ You have to run Eclipse as Administrator in order to be able to install, update, and maintain Eclipse software.
✔ You shall run Eclipse the first time as Administrator
✔ You shall use dedicated administrative workspace while running Eclipse.
✔ After Eclipse software is installed/updated, exit the Eclipse and start it again regular way.
✔ IMPORTANT! Do not run Eclipse and do not do software development “as Administrator”
If Eclipse is installed in a folder the user can write to (such as your user data folder)
✔ You can install and update Eclipse software by launching Eclipse regular way, using any Eclipse workspace.
To run Eclipse as Administrator, close current Eclipse instance and start Eclipse again with “Run as Administrator” option.
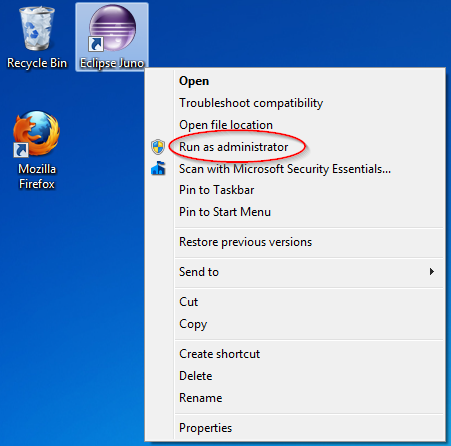
Move the mouse pointer over the Eclipse icon. Click the right mouse button to open a context menu. Select Run as Administrator from the menu. You will see a pop-up window asking to select a workspace.
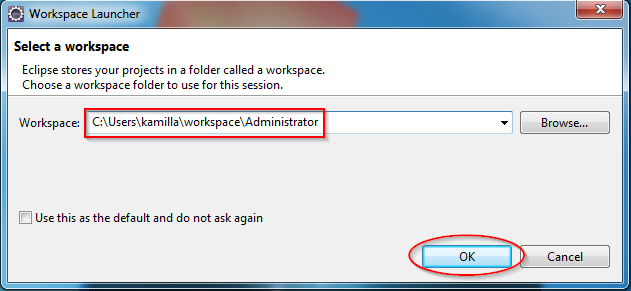
Select an appropriately named workspace that is not used for anything else (for example, C:\Users\Kamilla\workspace\Administrator). Press OK to continue.
After the main Eclipse window is opened proceed with the Eclipse software install/update/maintenance. See Installing Additional Eclipse Software and Updating Eclipse Software for information. After Eclipse software is installed/updated exit the Eclipse and start it again regular way.
Installing Additional Eclipse Software
See sections Installing CDT Add-on and Installing Java SE 11 Support Patch for some examples.
Updating Eclipse Software
It is recommended to update Eclipse components periodically to the latest version as described in this section.
To be able to update (or to install add-ons) Eclipse requires an Internet access. By default, Eclipse uses the same settings as Edge and Internet Explorer browser, so, if you can browse the Internet via these browsers, you, very probably, will be able to use install/update features in Eclipse. See Appendix 3 – Configuring Eclipse for Internet Access if you are having Internet connectivity problems in Eclipse.
✔ If you are using Windows other than Windows XP and Eclipse is installed in a folder that the user cannot write to (for example, inside C:\Program Files), you have to run Eclipse as Administrator in order to be able to install and update Eclipse software. See When to Run Eclipse as Administrator for more details.
If needed, close Eclipse, start it again as Administrator, and select administrative workspace. Assuming that Eclipse is already running, do as described below.
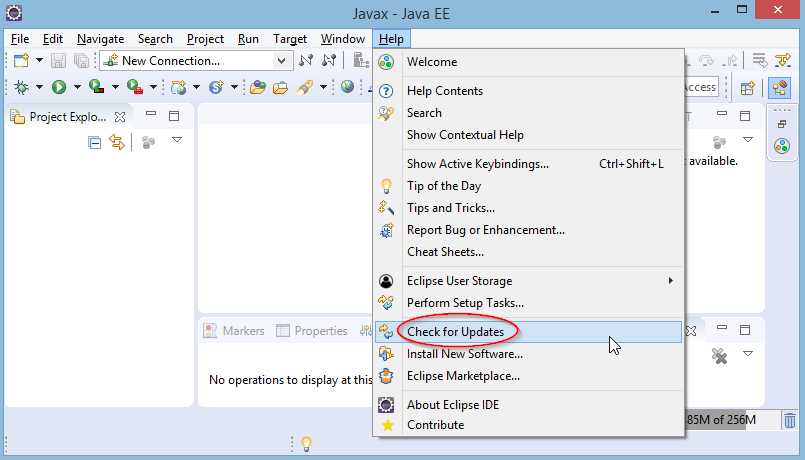
Open Help menu and select Check for updates. Eclipse will search for updates.
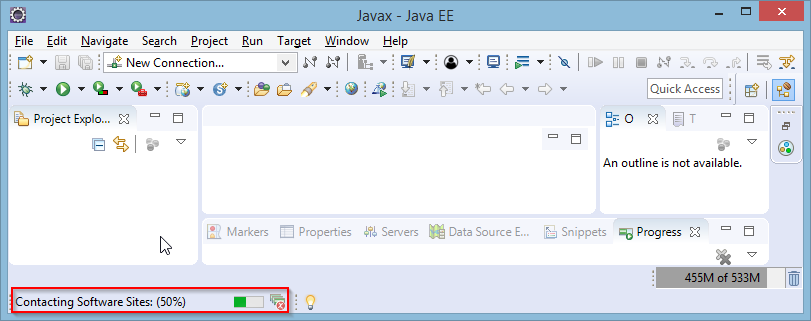
In the screenshot above, at the bottom of the main Eclipse window, you can see the progress message.
➤ If the update fails because there are problems with some plugins (for example, because the plugins are obsolete), a pop-up window will be displayed. In such a case, see section Dealing with Failed Eclipse Update. Return here after the issue is resolved.
If there are no updates available, Eclipse will display a window similar to one below. Press OK button. If Eclipse is running as Administrator, exit Eclipse and start Eclipse again in regular way if needed.
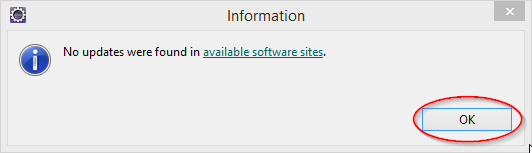
If the updates are found Eclipse will display a window similar to one below
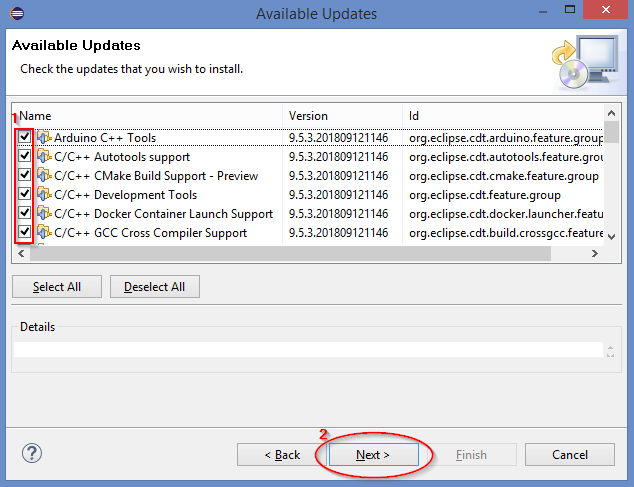
Be sure that all desired updates are selected ①. Press Next button ② to proceed (or Cancel button to stop the update).
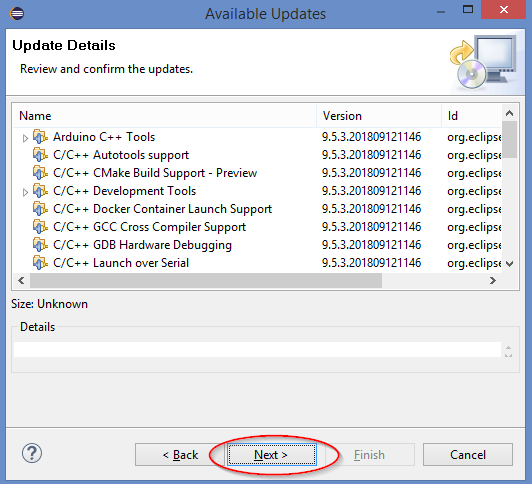
Review the list of updates one more time, press Next button again to continue (or Cancel button to stop the update).
Review the licenses. Check I accept the terms of the license agreements ① and press Finish button ② to continue (or press Cancel button to stop the update).
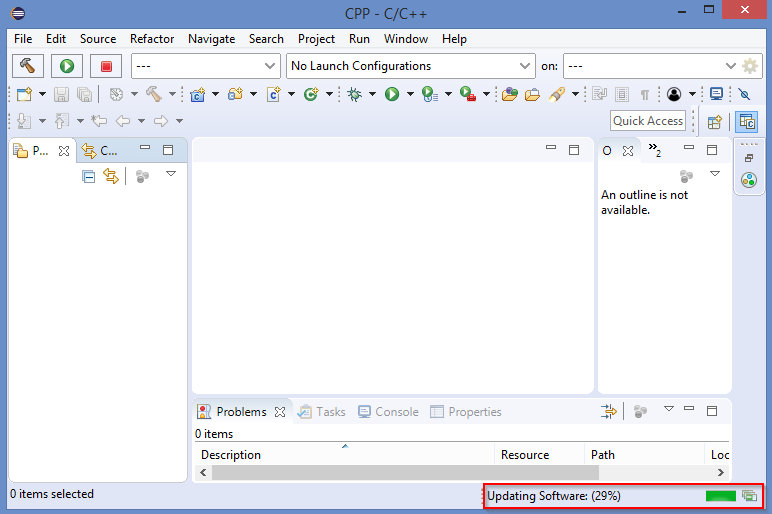
The update progress will be displayed at the bottom of main Eclipse Window.
If some software is unsigned (by its developers), you may see various security prompts. See Appendix 13 – Eclipse Pop-ups and Prompts for more details.
Finally, after the software is updated, you will see a prompt asking to restart Eclipse.
Press Restart Now button ① and wait until the Eclipse is restarted.
If Eclipse is running as Administrator - press No button ② instead and exit Eclipse. Start Eclipse again in regular way, if needed.
While updating the software or when restarting Eclipse, you may see various Eclipse prompts. See Older Workspace Version and Requirements Update sections in Appendix 13 – Eclipse Pop-ups and Prompts.
Dealing with Failed Eclipse Update
If, during an update, there are problems with some plugins (for example, because the plugins are obsolete), a prompt will be displayed
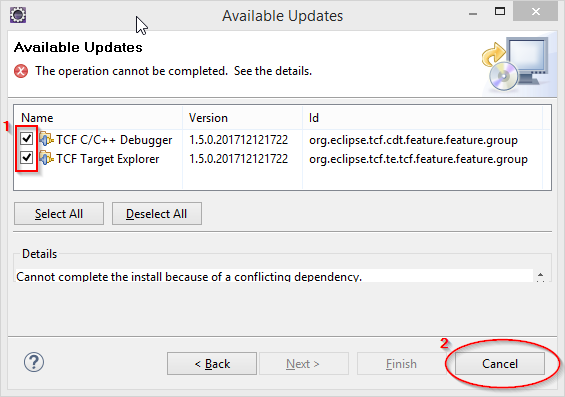
The window shows a list of plugins that are supposed to be updated and checkboxes ①. Unfortunately unchecking the plugins in the list does not help. The only way to proceed is to press Cancel button ②.
You may also see “Problem Occurred” pop-up window.
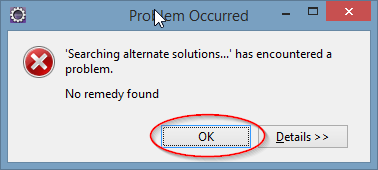
Press OK button to close it.
The recommended way to resolve it is to uninstall such plugins. See the next section for more help.
Uninstalling Eclipse Components
If needed, close Eclipse, start it again as Administrator, and select administrative workspace.
To uninstall Eclipse software components (plugins and addons), open Help menu.
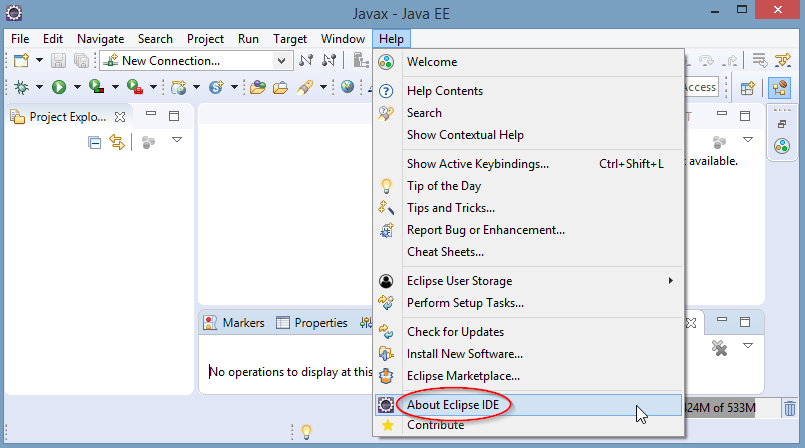
Select About Eclipse IDE to open a popup window below.
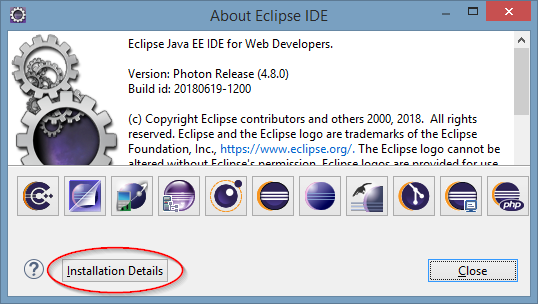
Press Installation Details button to open Eclipse IDE Installation Details window.
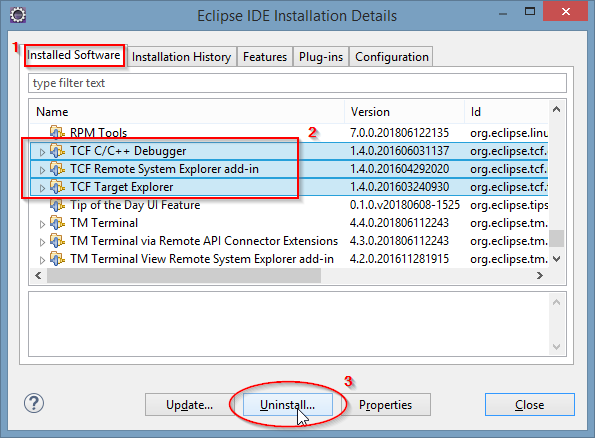
In the details window, go to Installed Software tab ①. Select components that you want to uninstall ②. Press Uninstall button ③ to start the uninstall process.
After some time, you will see Uninstall Details window.
Review the list of components and press Finish button to proceed with uninstall.
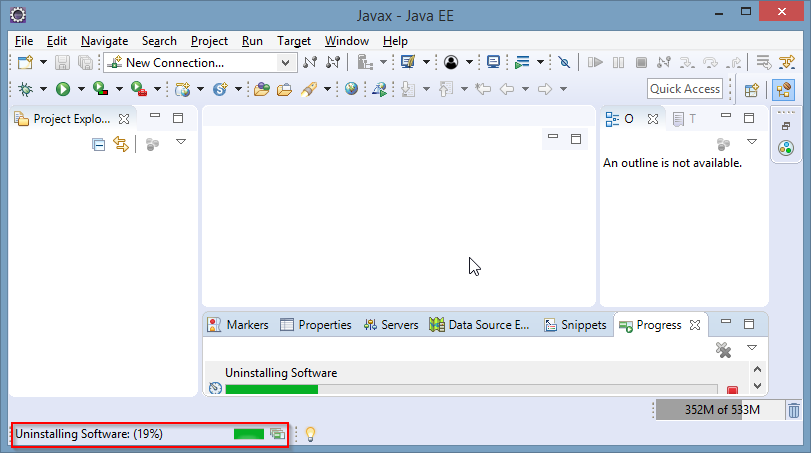
At the bottom of main Eclipse window, you will see the progress message. Wait until it is completed.
Finally, after the components are uninstalled, you will see a prompt asking to restart Eclipse.
Press Restart Now button ① and wait until the Eclipse is restarted.
If Eclipse is running as Administrator - press No button ② instead, exit Eclipse, start Eclipse again in regular way, if needed.
Importing and Reinstalling Previously Installed Eclipse Plugins
If you are updating an Eclipse instance or if you already have some instance of Eclipse installed and you are installing a different instance of Eclipse, you may be prompted to reinstall previously installed plugins when you run the new instance for the first time.
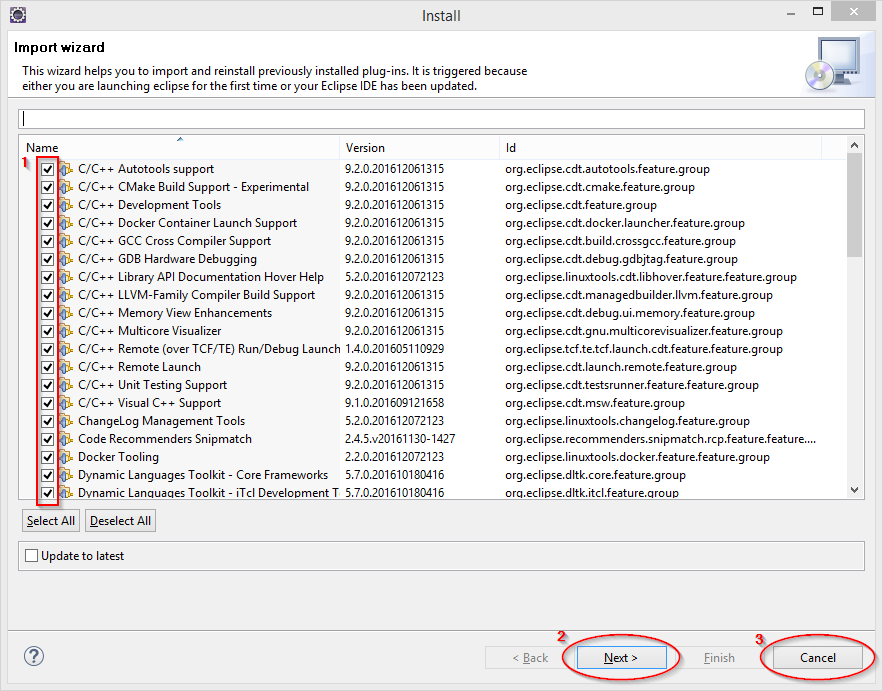
In the import wizard window, you can select what plugins you want to add to the new Eclipse instance ①. Press Next button ② if you want to proceed the import or Cancel button ③ if you do not want the plugins.
Note that plugins names can be confusing sometimes, look for such plugins on the Internet if you want your Eclipse instance to be clean.
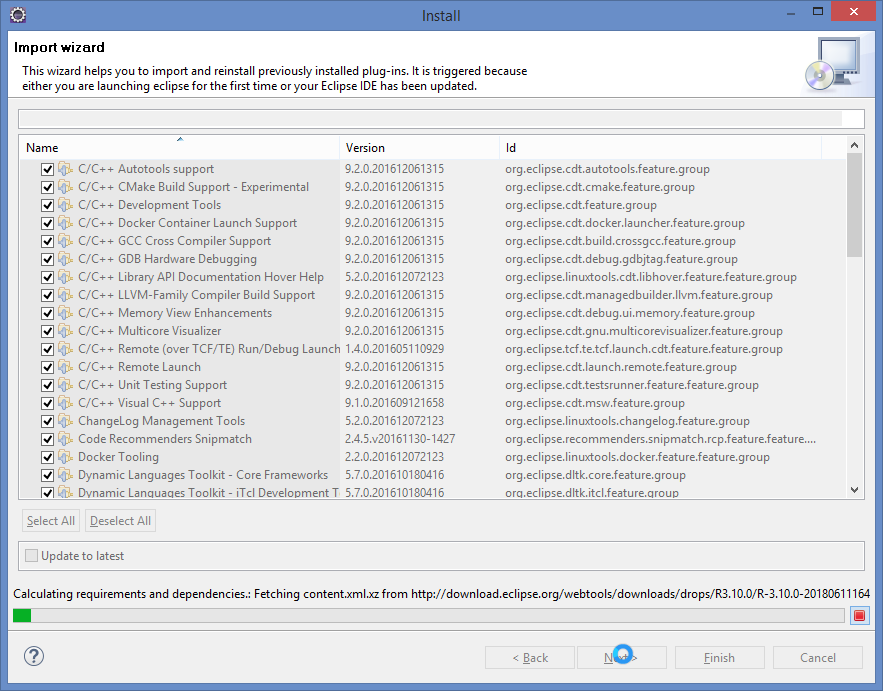
Wait for the wizard to calculate plugins requirements and dependencies. It may take a long time.
If you are installing newer version of Eclipse, it is quite possible that some plugins cannot be imported as they do not exist in the new version (were dropped or replaced). In such a case, you will get “Install Remediation Page” as below (otherwise just skip to the next page).
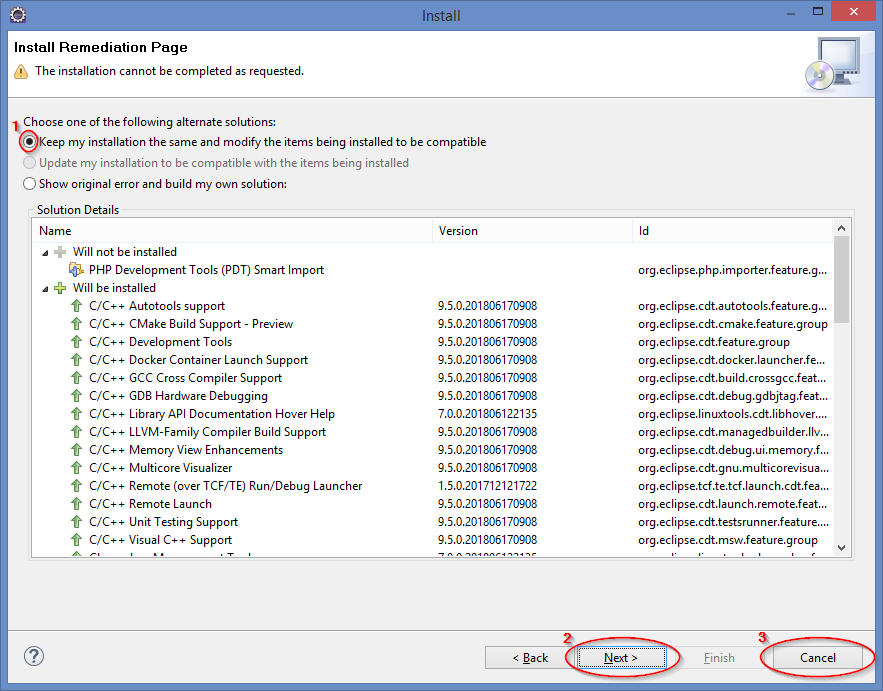
If you select option “Keep …” ① and press Next button ②, the wizard will import plugins that it can. Take a note of plugins that cannot be installed, you may be able to find their replacements and install them later.
You can also press Cancel button ③ if you do not want to proceed with the import. Selecting other option but “Keep…” ① is outside of this document scope.
After the wizard determines the list of plugins to be imported, you will see “Install Details” window
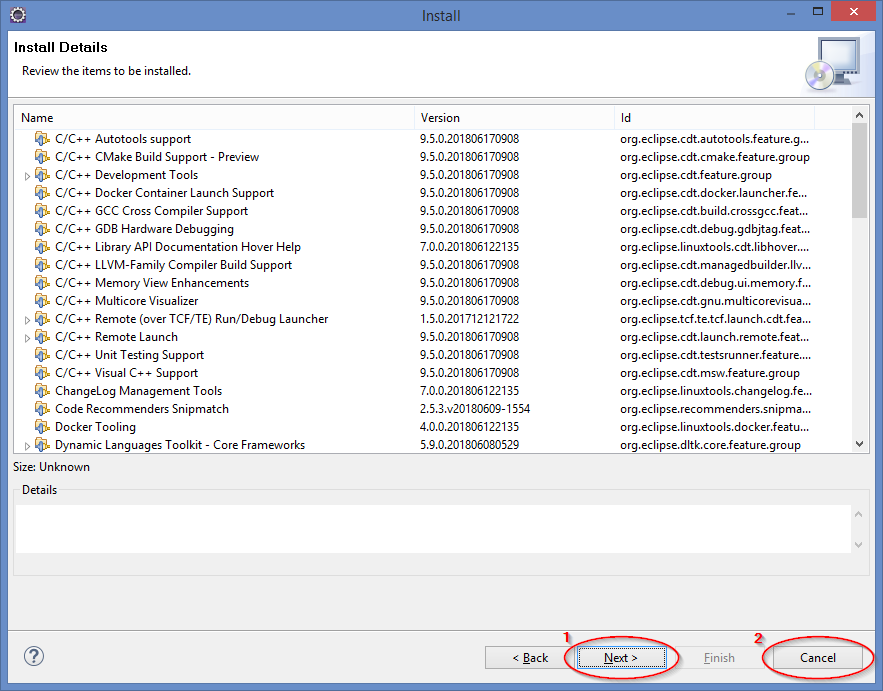
Press Next button ① to continue or Cancel button ② to stop the import.
You will see “Review Licenses” window
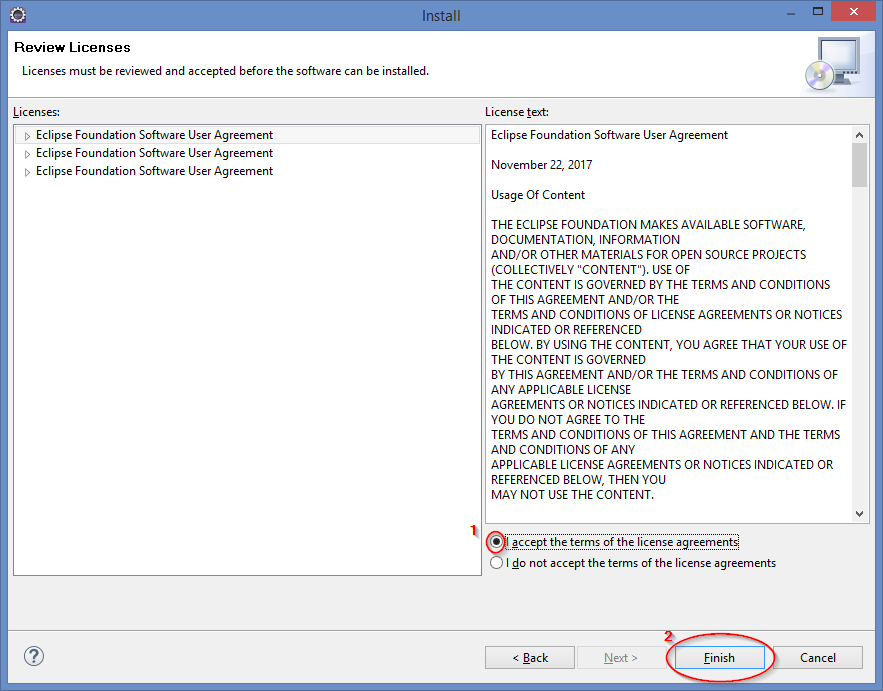
When you are satisfied with the licenses, select “I accept …” option ① and press Finish button ② to continue (or Cancel button otherwise).
At the bottom of the main Eclipse window, you will see progress message “Installing Software …”
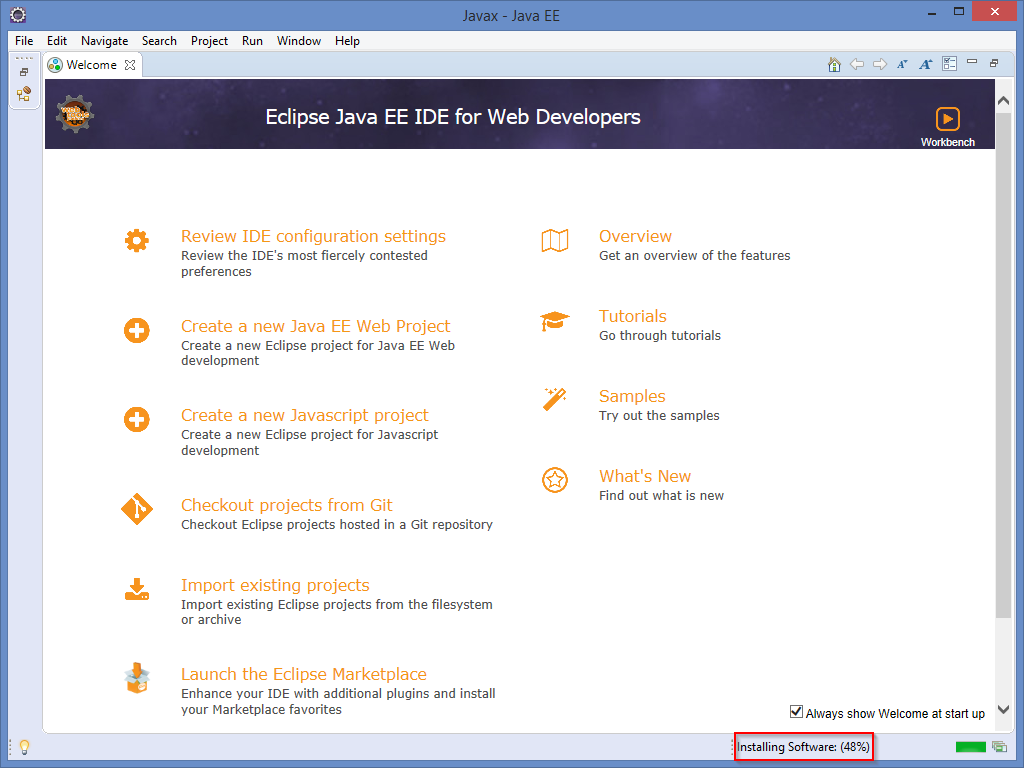
If some plugins are unsigned (by their developers), you will see a security prompt
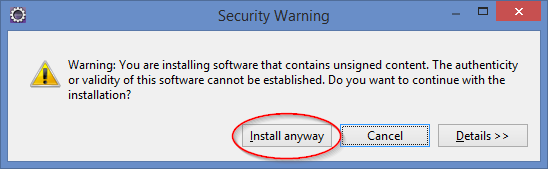
Be sure that you want to install such plugins. Press Details button to see more information about the unsigned plugins. Press Install Anyway button to continue (or Cancel otherwise).
Finally, after the plugins are installed, you will see a prompt asking to restart Eclipse.
Press Restart Now button ① and wait until the Eclipse is restarted.
If Eclipse is running as Administrator - press No button ② instead and exit Eclipse. Start Eclipse again in regular way if needed.
Initializing Shared Eclipse Installation via Command Line
To improve Eclipse performance, if Eclipse is installed in a folder that the user cannot write to, for example C:\Program Files\Eclipse\Photon, it is recommended to initialize Eclipse data.
To initialize the data run eclipse.exe with -initialize option as administrator.
If Eclipse is installed in a folder the user can write to, such as your user data folder, there is no need to initialize the data (though it is safe to do so).
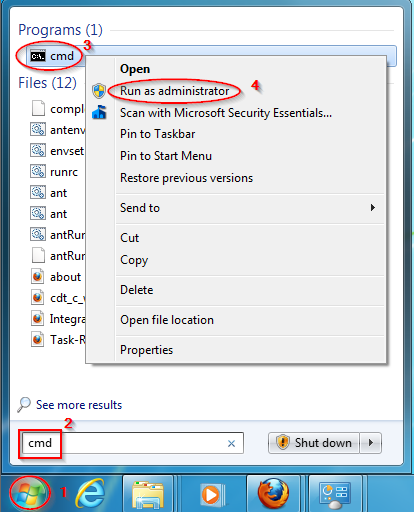
Open Windows Start menu ①, enter cmd in the search field ②. You are supposed to see a list that has cmd in it. Move the mouse pointer over cmd name ③ and click right mouse button to open a context menu. Select Run as Administrator from the menu ④.
You will see a shell window opened. Enter the following commands (substitute real folder path for the example path)
cd \Program Files\Eclipse\Photon\eclipse
eclipse.exe -initialize
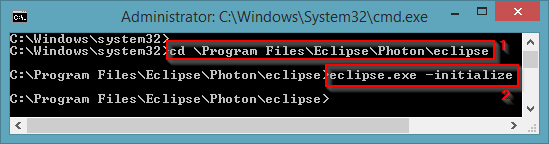
You will see Eclipse splash window.
Wait a minute until the window is closed (and eclipse launcher exits).

Appendix 5 – Program Run Configuration
A run configuration describes how to run a program. You can select what program to run, specify arguments, set environment variables, and configure other runtime parameters.
The default run configuration of a program is created automatically the first time the program is run.
In this appendix screenshots, it is shown how to create and use HelloTest C++ program run configuration. Java run configuration has similar Main, Arguments, Environment, and Common parts.
Creating Run Configuration
Be sure that, in the left pane, the current project folder, subfolder, or file is selected ①.
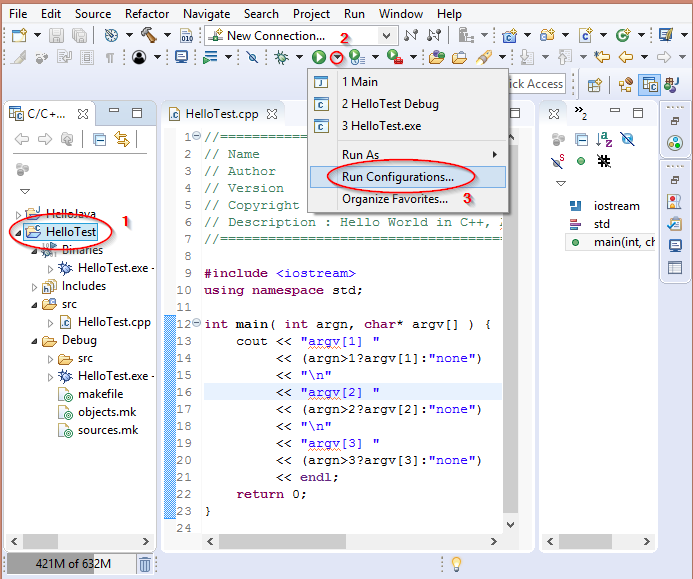
Click on the triangle icon ② right to the “white triangle inside green disk” icon. Select Run Configurations … ③ option from the drop-down menu.
You will see Run Configuration window.
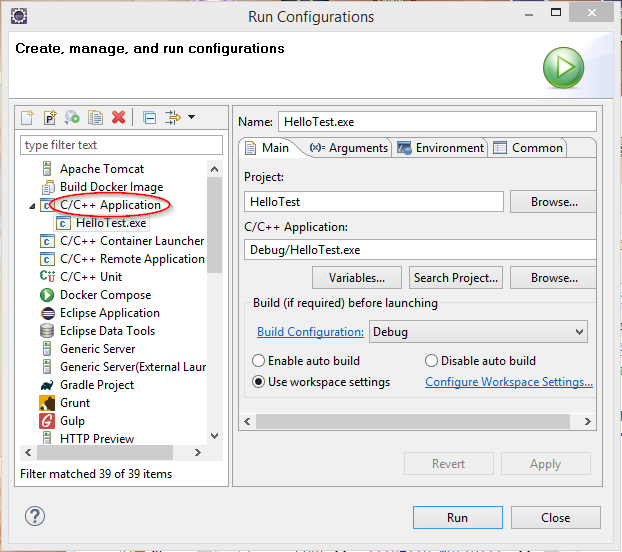
Click to select C/C++ Application in the left pane.
You will see some help information explaining possible actions.
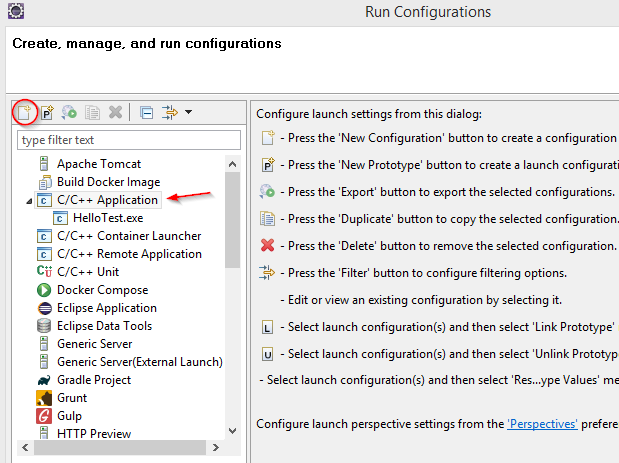
Click on the”Add”  icon in the top left corner.
You will see new run configuration HelloTest Debug.
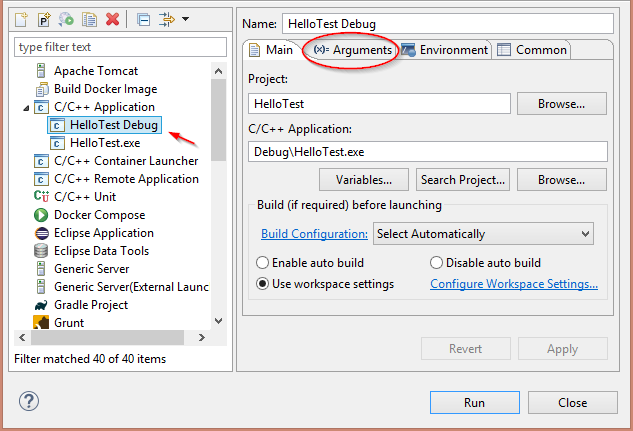
Editing Program Arguments
Click on Arguments tab to edit the program arguments. Enter the arguments ① and press Apply button ② to save the configuration. Separate arguments with whitespaces, quote arguments that have spaces.
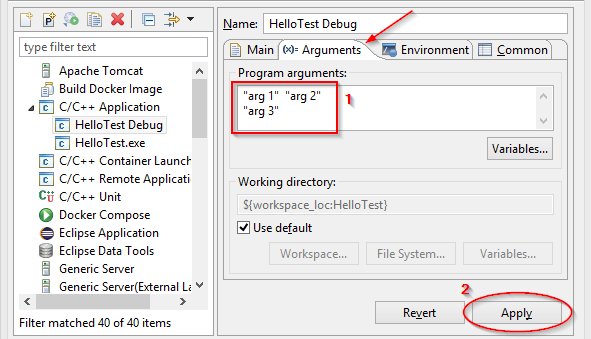
Editing Program Environment
Click on Environment tab ① to edit the program environment.
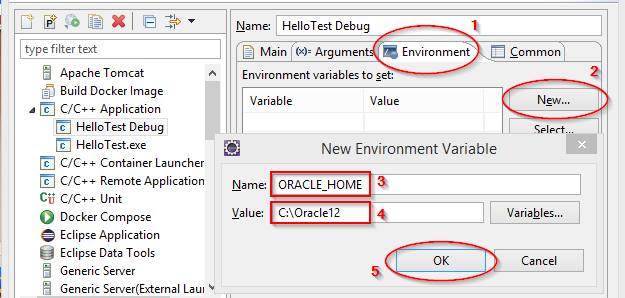
Press New button to open New Environment Variable pop-up window. Enter the variable name ③ and the variable value ④. Press OK button to close the pop-up window.
Saving Run Configuration
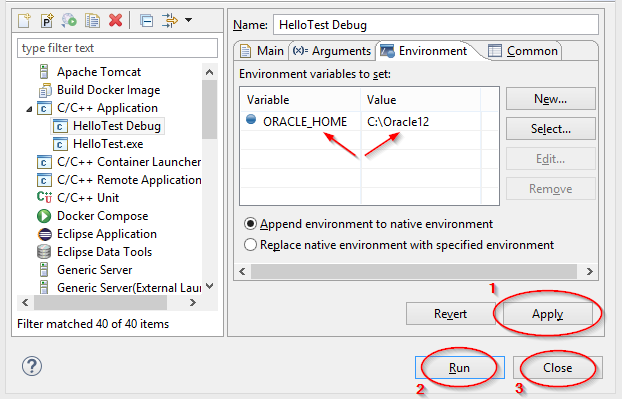
Press Apply button ① to save the configuration. Press Close Button to close the Run Configurations window. Press Run button to run the program (and close the window).
Running Run Configuration
To run the program program from the current project, using the last run configuration,

click on “white triangle inside green disk” icon. Note that, if you hover over the icon, you will see Run HelloTest Debug tooltip.
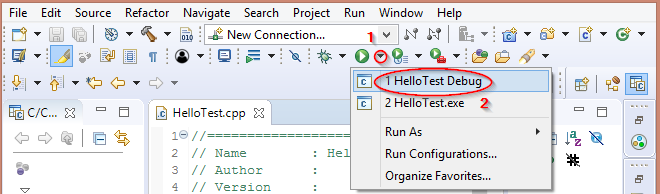
If you click on the triangle right to the icon, you will see a drop-down menu that also can be used to run the project.
Appendix 6 – Making Eclipse Shortcut
Creating Eclipse Desktop Shortcut
To make launching Eclipse easier, create a shortcut on the desktop. Go inside the Eclipse installation folder, then go inside eclipse subfolder.
Move the mouse pointer over eclipse.exe icon and click the right mouse button to open a context menu. Depending on you File Explorer settings, you may see eclipse.exe or just eclipse right to it.
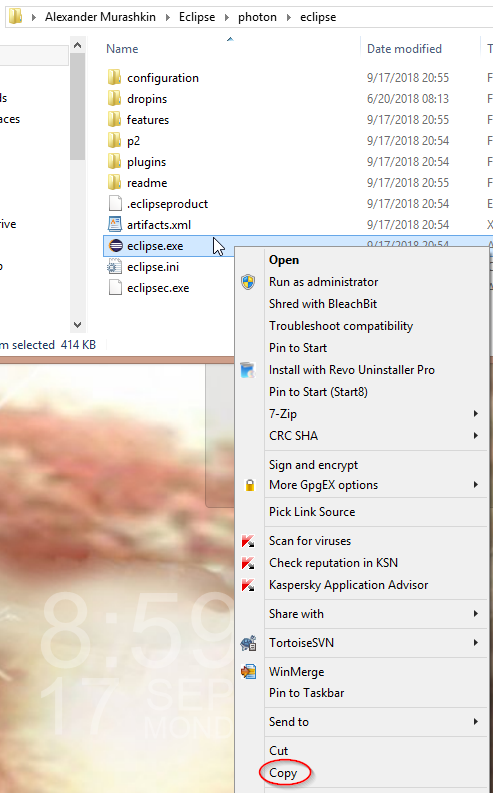
Select Copy from the menu. Find some empty space on your desktop, move the mouse pointer there, and click the right mouse button to open a context menu.
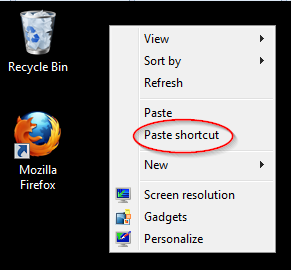
Select Paste Shortcut from the menu. You will see a new shortcut eclipse icon with “eclipse.exe – Shortcut” (or just “eclipse.exe”) underneath.
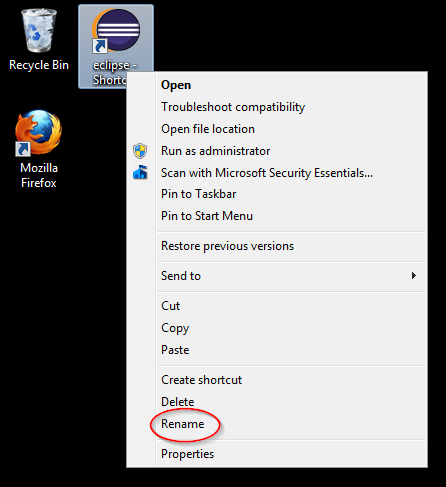
Change the shortcut name to Eclipse Photon (or something else). Move the mouse pointer over the new shortcut icon and click the right mouse button to open a context menu. Select Rename from the menu. Enter the shortcut name in the highlighted box end press Enter key.

➤ The created shortcut will be added to the current user desktop. If you want the shortcut to be available for all users, move it to an appropriate folder, for example, to C:\Users\Public\Desktop.
Using Shortcut Command Line to Specify Java Virtual Machine
If Java bin folder is not in Windows PATH environment variable, or if you want to use a different Java virtual machine (JVM), you can specify JVM in the shortcut command line.
Move the mouse pointer over the shortcut icon and click the right mouse button to open a context menu.
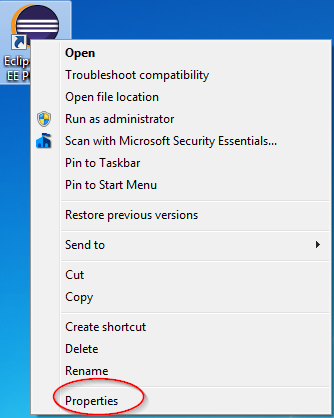
Select Properties from the menu.

In the Target text box, add the following text after eclipse.exe ①
-vm “C:\Program Files\OpenJDK\jdk-11\bin\server\jvm.dll“
Note that eclipse.exe and the text must be separated by a space.
Press OK button ② to close the properties.
Appendix 7 – Eclipse Installer in Advanced Mode
Switching to Advanced Mode
While running Eclipse installer in simple mode,
click on “hamburger” icon ① to open the installer menu. Click on Advanced Mode… ②.
You will get a pop-pup window asking if you want to save the installer files.
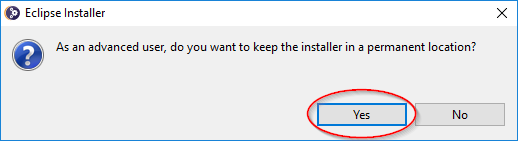
Press Yes button to save the installer files.
You can also press No button. In such a case, if you want to use the installer again, you will have to find Eclipse Oomph Installer executable (eclipse-inst-win64.exe) in the file explorer and run it. Skip the next page if you are not saving the installer files.

If needed, change the destination folder name ① where the installer files are to be saved. Press Browse… button ② if you want to browse folders.
Leave Create start menu and Create desktop shortcut checked ③. Press OK button ④ to proceed.
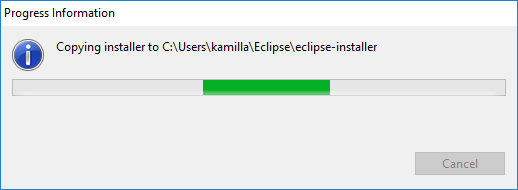
Wait while the installer files are being copied to the destination folder.
You will see the desktop shortcut created.

And the Eclipse installer will be restarted in advance mode. You will see the splash window again.
After a short time, you will see the installer window
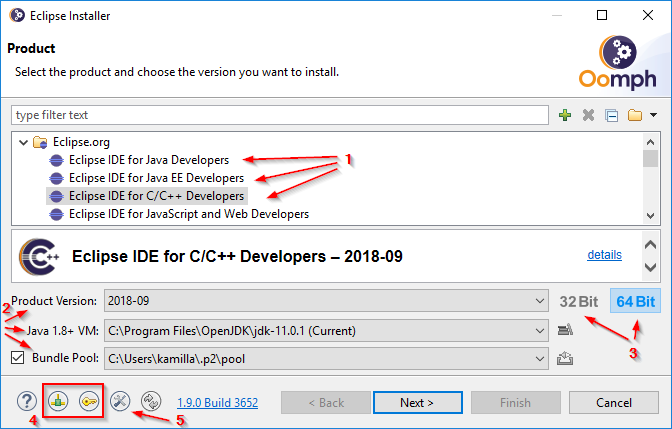
In the advanced mode, you can, for instance
Select Eclipse product (Eclipse IDE for C/C++ in the screenshot).
Select the product version, the Java virtual machine, and the bundle pool.
Select 64-bit or 32-bit variant (64-bit in the screenshot).
Adjust proxy and SSH settings.
Switch back to the simple mode (see Eclipse Installer in Simple Mode section).
If you do not see the Eclipse product list ①, you may have an issue with network connectivity. See Configuring Network Proxy Settings section in such a case.
Selecting Eclipse Product
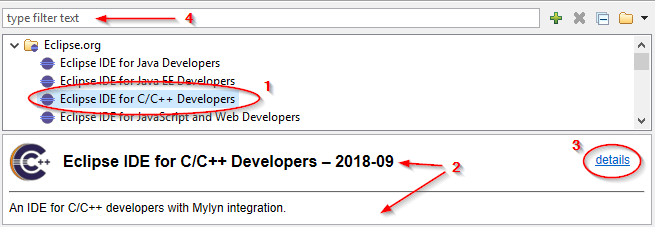
Click on the desired product name ① to select it (scroll down if necessary).
You will see the product description ②. If you need more information, click on details link ③ to open the product webpage.
You can also search for the product by entering some text in the search field ④.
Note – Eclipse products are also called packages in this document.
Selecting Product Version and Bitness
After the product is selected,

Click on down looking (tri)angle ① to open a drop-down menu of available versions. Click on desired version ② to select it.
Click either on 64 Bit or 32 Bit to highlight and select the bitness ③.
Selecting or Adding Java Virtual Machine
Selecting Known Java Virtual Machine
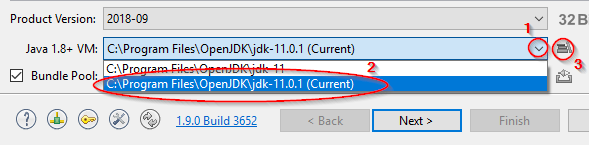
Click on down looking (tri)angle ① to open a drop-down menu of available Java folders. Click on desired Java folder ② to select it. Skip the next section.
Adding Java Virtual Machine
If you do not see required Java folder, press “books”  icon ③ to open Java Virtual Machines window.
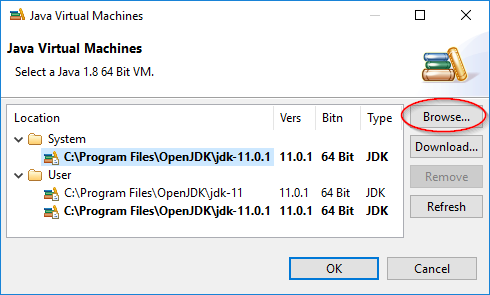
Press Browse button and browse to the desired Java folder.
Note 1 – Pressing Download button leads to a webpage describing old Java versions. Instead, follow instructions in Java Standard Edition (Java SE) section if you need to download and install Java SE.
Note 2 – Pressing Remove button deletes the virtual machine from the list. It does not delete actual Java folder.
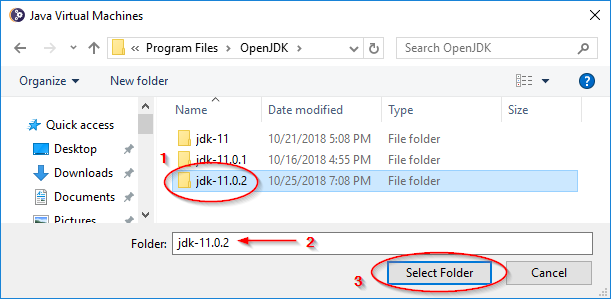
Be sure that a folder containing Java JDK or JRE is selected ② and that the Folder field ② contains the correct folder name. Note – you can also select a parent folder, like OpenJDK, a parent of a parent, etc.
Press Select Folder to search for Java virtual machines inside the folder.
If one or more Java virtual machines are found, you will see a pop-up window confirming it. Press OK button to continue.
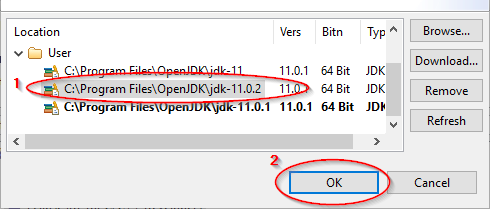
Select the appropriate Java folder ①. Press OK button to close the window.
Confirming Java Virtual Machine Selection
You are supposed to see the correct Java folder selected in the main installer window.

Selecting or Adding Bundle Pool
Selecting Existing Bundle Pool
A bundle pool is a folder containing Eclipse files that are shared between multiple installations of Eclipse.
In the case of single user, the bundle pool is useful as it saves disk space (by keeping only one copy of Eclipse files) and time (as Eclipse files are downloaded only once). For example, if the user has Eclipse IDE for Java and Eclipse IDE for C/C++, the common Eclipse files will be shared.
In the case of multiple users, it also allows to share Eclipse files between the users.

Click on down looking (tri)angle ① to open a drop-down menu of available bundle pools. Click on desired pool folder ② to select it. Skip the next section.
Note – If you uncheck Bundle pool ④ box, a single use bundle pool will be created in the Eclipse installation folder. The result will be similar to installing Eclipse via ZIP archive (see Appendix 16 – Installing Eclipse via ZIP Archive). If you have more than one Eclipse installation, they will take more disk space than in the case of a shared bundle pool (and the Eclipse files will be downloaded for each Eclipse installation).
Adding Bundle Pool
If you do not see required pool folder, press  icon ③ to open Bundle Pool Management window.
In the center of Bundle Pool Management window, you can see a list of so called “p2 agents” and “bundle tools”. To make it easier to understand, think that a bundle pool is a folder containing Eclipse files. And an “agent” is a pool parent folder.
For example,
| P2 Agent | Bundle Pool | Description |
|---|---|---|
| C:\Users\kamilla\.p2 | C:\Users\kamilla\.p2\pool | Default pool that is created for each user |
| C:\Users\kamilla\eclipse\photon-cpp-pkg\eclipse\p2 | C:\jobs\... | Pool that is created when Eclipse is installed via ZIP archive |
| C:\Program Files\Eclipse\p2 | C:\Program Files\Eclipse\p2\pool | Pool that is shared between users |
In the screenshot above, the default agent name is C:\Users\kamilla\.p2 ① and the default pool name is C:\Users\kamilla\.p2\pool ②. If the Eclipse is installed via ZIP archive, it will have agent subfolder p2 and “strange” pool name C:\jobs\... similar to ③.
If a required pool is not in the list, press New Agent ④ to create a pool’s agent (parent) and the pool.
It will open a folder selection window.
Browse to the folder ① under which you want to create the “agent”. Use New folder link ② to create the agent folder ③. Be sure that the folder is selected and its name is shown in Folder field ④.
Press Select Folder button to select the “agent” folder and to close the folder browser.
Select the new pool in the list ①. Press OK button ② to close the management window.
✔ If you do not see the new pool, it probably means that you do not have write access to its folder. In such a case, press Cancel button two times to exit the installer and start the installer again, this time, as Administrator.
✔ Every time you install Eclipse software in a folder or use an agent folder that your user does not have write access to, you have to run the installer as Administrator.
Confirming Bundle Pool Selection
You are supposed to see the selected pool in the main installer window
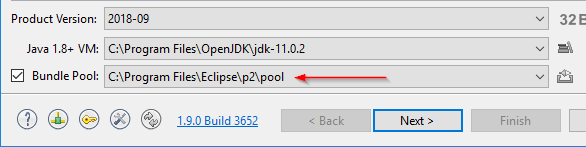
Configuring Network Proxy Settings
If you need to configure network proxy settings,
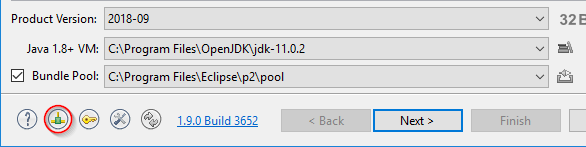
click on  icon. It will open Network Connections window.
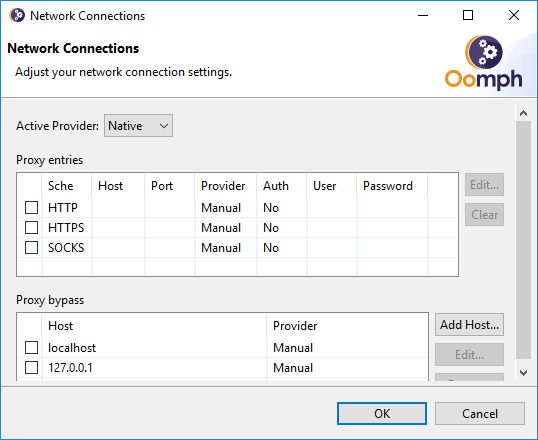
Follow instructions in Configuring Network Proxy in Eclipse Preferences section of Appendix 3 – Configuring Eclipse for Internet Access.
Configuring SSH Settings
If you need to configure network proxy settings,
click on  icon. It will open SSH2 Keys window.
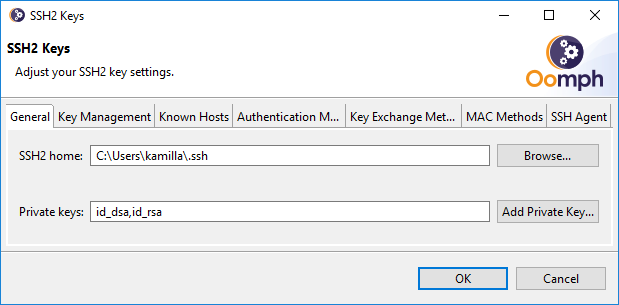
Configuring SSH settings is beyond this document scope.
Finalizing Software Selection
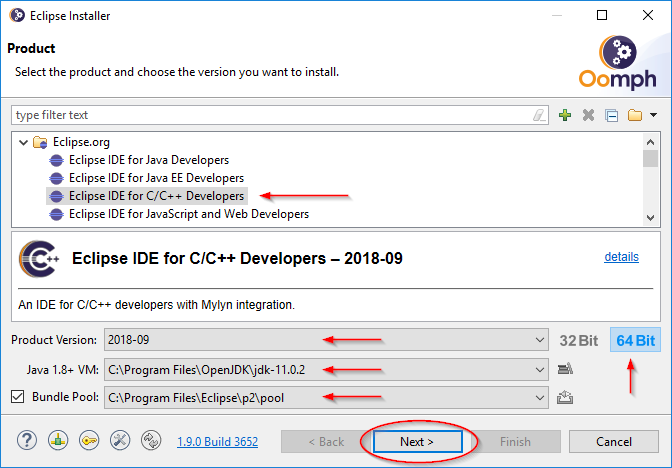
Press Next button to continue. You will see Projects page (that is out of this document scope).
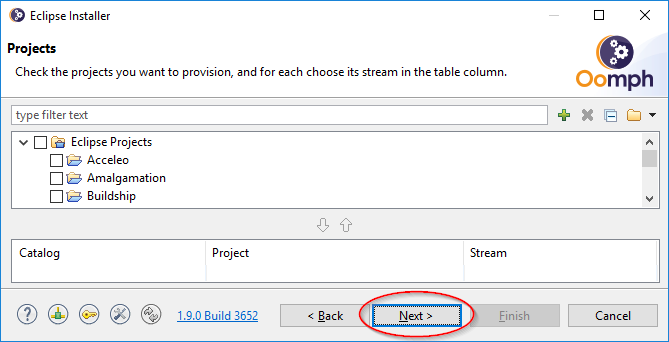
Unless you know what you are doing, do not select anything here. Press Next button to continue.
Eclipse Installation Folder
You will see Variables window.
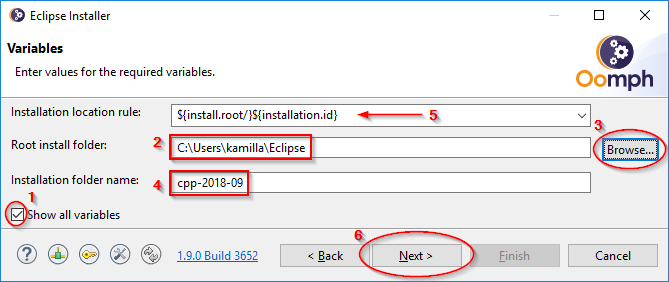
Check Show all variables box ① to see details as in the screenshot. Enter the root (parent) install folder in Root install folder field ②, browse to the folder if needed ③. Enter the installation subfolder name in Installation folder name field ④.
Note that the complete installation folder pathname will be as specified in Installation location rule field. In the screenshot, it will be
C:\Users\kamilla\Eclipse\cpp-2018-09
When you are satisfied with the variables, press Next button ⑥ to continue.
Reviewing Proposed Configuration Changes
You will see Confirmation page.
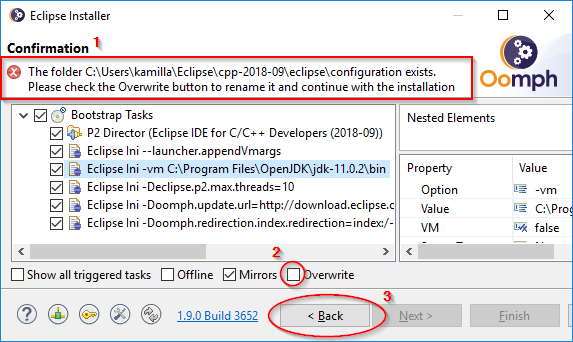
If you see an error message “The folder … exists” ①, it means that there is already some Eclipse installation in the folder. In such a case, you have two choices
Either press Back button and select another folder
Or check Overwrite box ② to install Eclipse files in the existing folder (all old files will be overwritten, except old configuration subfolder that will be renamed)
Also review the proposed changes in Eclipse configuration, specifically line containing -vm option.
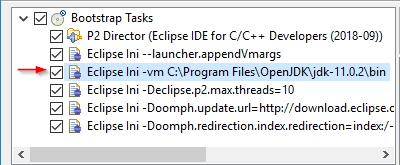
If you want this Eclipse installation to use the specified Java virtual machine (bin subfolder), leave the box checked. See the note below for additional details.

Otherwise, uncheck the box. In such a case, this Eclipse installation will use default Java virtual machine (that has bin subfolder in Windows PATH environment variable). See Adding OpenJDK to Windows Path section.

Note - if you leave the box checked, the installer will add Java SE bin subfolder pathname to the eclipse.ini file, as in the example below.
If you decide Eclipse to run under a different Java SE virtual machine, you will have to edit this file and change the pathname, as described in Appendix 2 – Configuring Eclipse Lunch Properties (eclipse.ini), or remove these two lines completely.
Performing Eclipse Installation
In the screenshot below, you can see unchecked -vm line ① and checked Overwrite box ②.
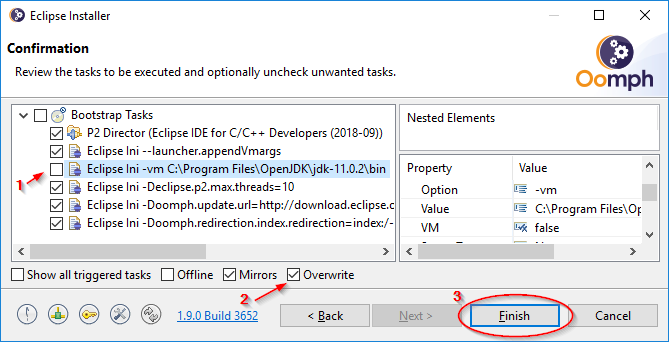
To proceed with the installation, press Finish button ③.
Troubleshooting Installation Issues
If you get an error message “Could not rename … configuration” ①,
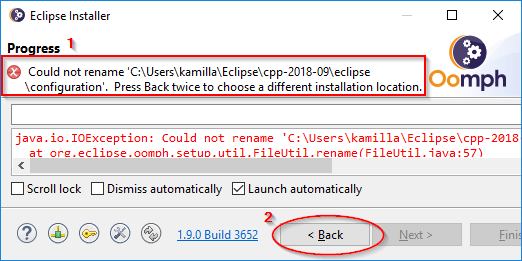
It, probably, means that you are installing in an existing Eclipse folder and there is an Eclipse instance running that is using this folder. In such a case, you have two choices
Either exit the running the Eclipse instance, press Back button ② to return to the previous page, review and adjust the proposed changes as needed, and press Finish button again
Or press Back button ② two times, change the installation folder, press Next button, review and adjust the proposed changes as needed, and press Finish button again.
If you get an error message “There are failed tasks” ①,
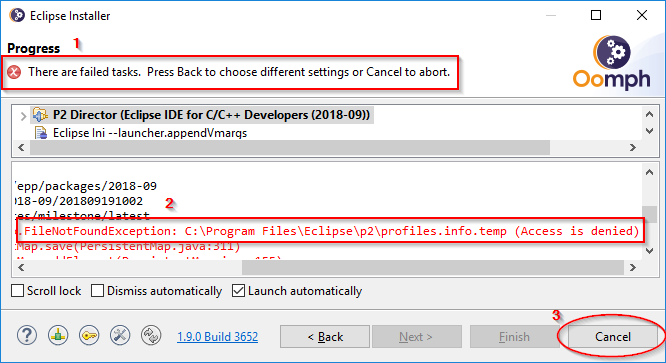
Review the installation messages for clues.
In this screenshot, there is specific error message “… \p2\profiles.info.tmp (Access is denied)” ②. It means that the user does not have write access to the “P2 Agent” folder.
In such a case, press Cancel button ③ to exit the installer and start the installer again, this time, as Administrator.
✔ Every time you install Eclipse software in a folder or use an agent folder that your user does not have write access to, you have to run the installer as Administrator.
Installation Progress
If there are no immediate errors, you will see a progress page similar to one below.
There is a progress bar ① and a message log ②. If you need to stop the installation, click on red square icon ③.
Accepting Code Signing Certificates
While installing Eclipse, the installer may prompt for Eclipse code signing certificate confirmation. You will have to accept the certificate to continue.
Review the certificate list (select a certificate and use Details button to see the certificate information). If you trust the certificate(s), check appropriate box(es) ① and press Accept selected button ②.
See Do you trust these certificates? in Appendix 13 – Eclipse Pop-ups and Prompts for more details.
Exiting Eclipse Installer
Review the message log ①, if needed. Press Finish button ② to exit the installer. Or press Back button ③ few times to return to the previous pages, so you can do another Eclipse installation.
Creating Eclipse Shortcut
In advanced mode, the installer does not create Eclipse desktop shortcut. If you need the shortcut, see Setting Up Eclipse Shortcut section.
Automatic Eclipse Launch
After the Eclipse installation is completed, an Eclipse launcher will be started automatically.
If the installer is run as a regular user, the automatically launched Eclipse instance will also run as the same user. If the installer is run as Administrator, the Eclipse instance will also run as Administrator.
After the splash window you will see Eclipse IDE Launcher window.
Do not press or click anything yet. Put aside, for the moment, the Eclipse IDE Launcher window (you can close it or keep it open).
To proceed, return to the main text of this document.
If a desktop shortcut is needed, complete Setting Up Eclipse Shortcut section.
Afterwards continue to Running Eclipse IDE the First Time section.
Appendix 8 – Installing Oracle JDK for Java SE 11 (Long Term Support)
To download Oracle JDK for Java Standard Edition 11 (Long Term Support), go to Oracle's Java SE Downloads🌐 website. You will need approximately 429 MB of disk space.
Find Java SE 11 (LTS) section ①. Click  button ② that is under Oracle JDK label.
As the next step, you have to download and run JDK setup program
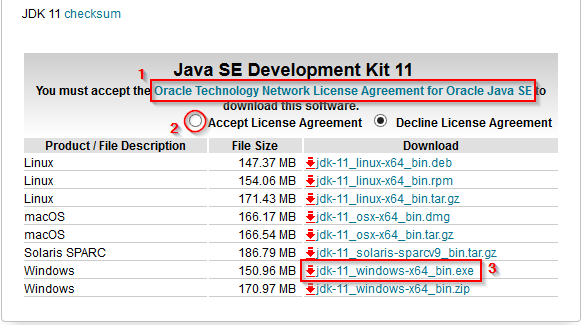
If needed, read Oracle Technology Network License Agreement for Oracle Java SE ①.
Select Accept License Agreement ②.
Click on the filename that is in the intersection of Windows row and Download column ③. In the example screenshot it is jdk-11_windows-x64_bin.exe.
Depending on your browser, you will get a download prompt. Download and run the file. See Appendix 11 – Downloading and Running files from the Internet if you need help with the file downloading.
The next steps do not depend on the browser. If you see a security pop-up window, click through it. You will get the following window
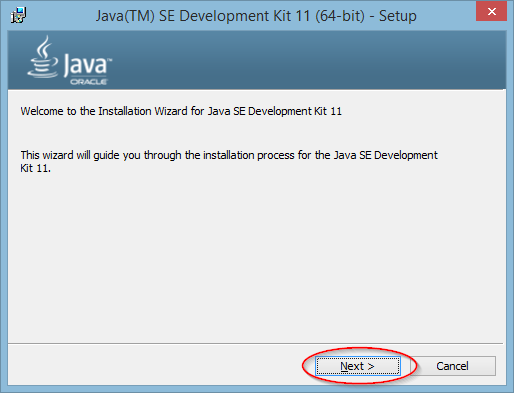
Press Next button.
You will get the following window.
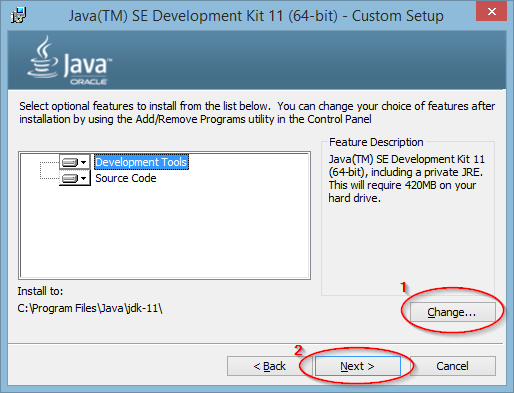
If you need to change the default JDK folder (C:\Program Files\Java\jdk-11 in the example screenshot) press Change button ①.
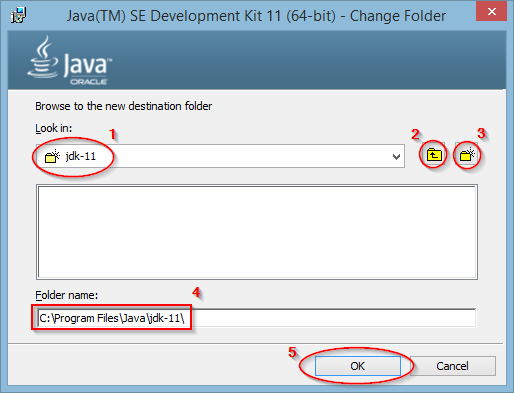
Browse to the place where you want to install Java SE to ①②. Use Make New Folder button ③, if needed, to create folders. Make sure that the destination folder name is correct ④. Press OK ⑤ button after the destination folder is selected.
You will be back to the previous window. See the previous screenshot - press Next button ② to continue. You will see JDK installation progress window.
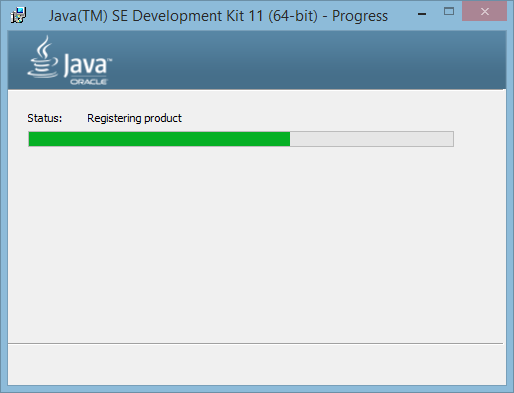
After JDK installation is completed you will see
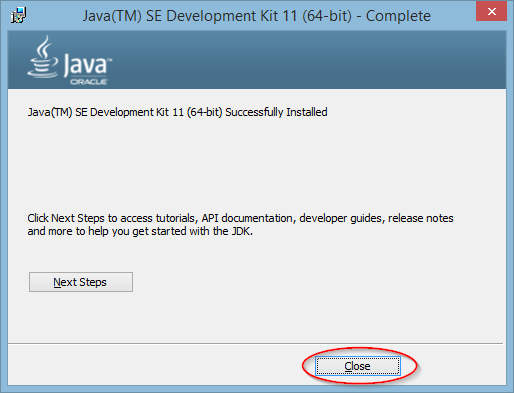
Press Close button. The Java SE 11 is installed.
To be able to run Eclipse, Eclipse launcher has to know JDK installation folder path. See section Enabling Eclipse Launching via OpenJDK. Substitute appropriate Oracle JDK folder (C:\Program Files\Java\jdk-11 in this example) for OpenJDK folder.
Appendix 9 – Installing Legacy Versions of Java SE
You may install Java SE 10 or Java SE 8 instead of Java SE 11 if so needed. When running legacy Java SE setup program, the setup screens are very similar to Java SE 11 screenshots, the main difference is the Java banner color.
See Java Standard Edition 10 (64-bit) and Java Standard Edition 8 (32-bit and 64-bit) for more details.
Note - Java SE 8 does not have public updates after January 2019. Java SE 9 has reached end of support. Users of Java SE 8 and 9 should switch to Java SE 11 or 10.
Legacy JDK and JRE
There are two options when installing legacy Java Standard Edition (Java SE)
Install Java Runtime Environment (JRE)
Install Java Development Kit (JDK) – includes JRE
The recommended approach is to install JDK (that also includes JRE). If you are not going to do Java (or Java EE) development, you can save some disk space by installing only JRE.
Note – Java SE 11 has only JDK option, it does not have JRE option. It is enough to install Java SE 11 JDK as it includes executables and other files similar to files in the legacy JRE.
Here is a table that describes minimum software requirements depending on programming languages that are used for development. Select the column corresponding to the languages and install all components marked with Yes or Possible.
| C and C++ | Java | Java and Java1 Enterprise | C, C++, and Java | C, C++, Java, and Java1 Enterprise | |
|---|---|---|---|---|---|
| Java Runtime Environment (JRE) | Possible | ||||
Java Development Kit (JDK) * includes JRE | Yes | Yes | Yes | Yes | Yes |
Note 1 - To run Java Enterprise programs an appropriate Java Enterprise Application Server is required (that is out of this document scope).
Java Standard Edition 10 (64-bit)
You may install a Java Runtime Environment (JRE) or a Java Development Kit (JDK) that includes JRE. JDK is needed for Java and Java EE development. In the case of C/C++, JRE or JDK can be used to run Eclipse. There is no point to install JRE separately if JDK is installed (as JRE is a part of JDK).
You have to have approximately the following free disk space before installing Java SE
| Java SE 10 64-bit | |
|---|---|
| Java Runtime Environment (JRE) | 202 MB |
| Java Development Kit (JDK) *includes JRE | 757 MB |
See Installation of the JDK and the JRE on Microsoft Windows Platforms🌐 for more details.
Downloading Java SE 10
To download Java Standard Edition 10, go to Oracle's Java SE Downloads🌐 website.
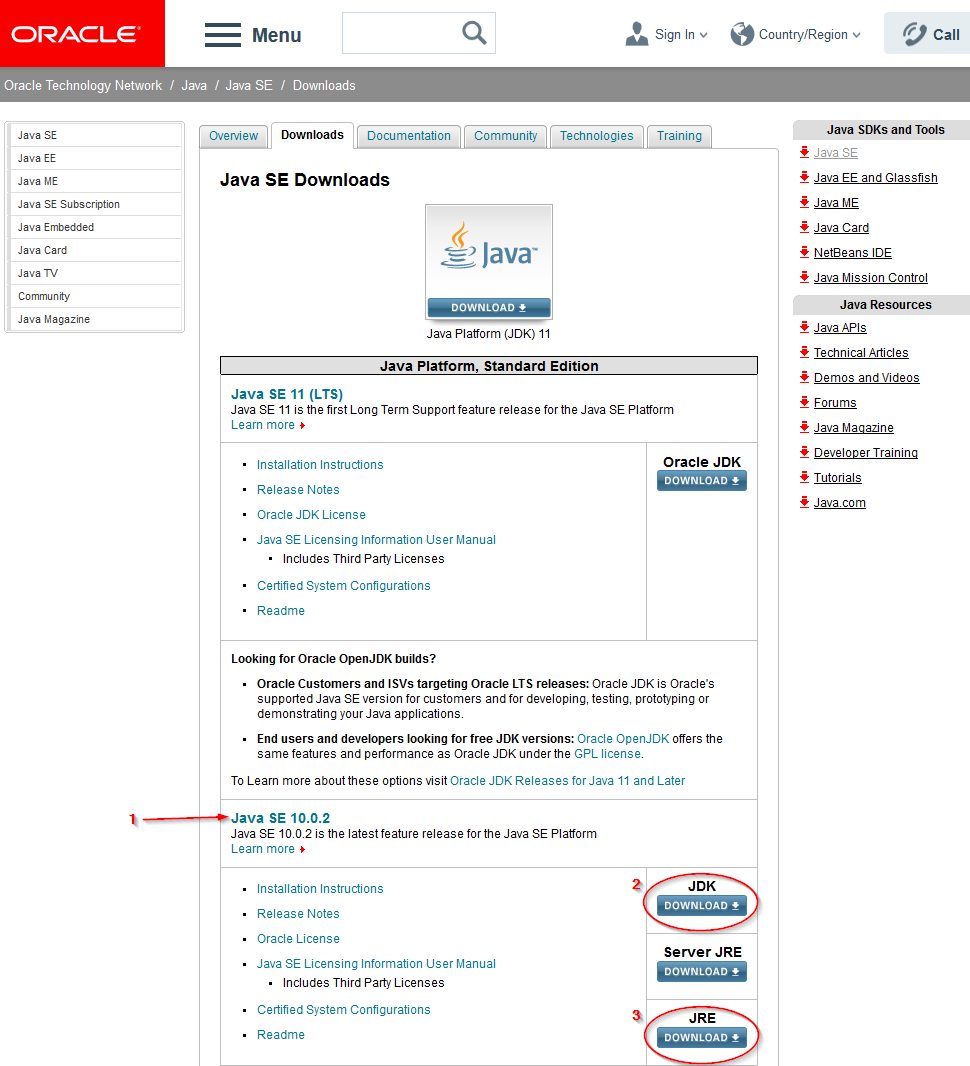
Find Java SE 10 section ①. Click button that is under JDK ② or JRE ③ label. You shall download JDK (that includes JRE) if you want to develop Java programs, otherwise it is enough to download JRE only.
Installing Java SE Runtime Environment 10 (JRE)
If you are installing JRE, you have to download and run JRE setup program
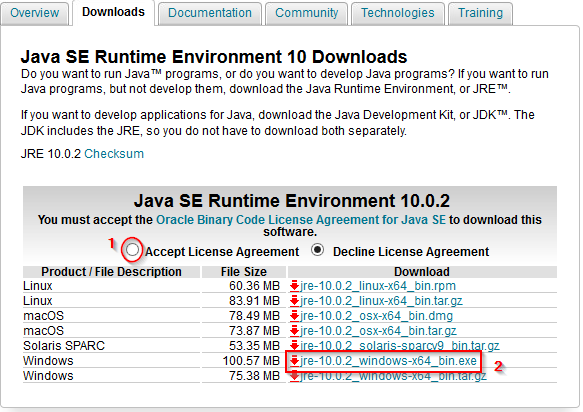
Select Accept License Agreement ①. If downloading Java SE 10 find first “Windows” row, otherwise find “Windows x64” row. Click on the .exe filename that is in the intersection of the found row and Download column ②. In the example screenshot, it is jre-10.0.2_windows-x64_bin.exe.
Depending on your browser, you will get a download prompt. Download and run the file. See Appendix 11 – Downloading and Running files from the Internet for more information.
The next steps do not depend on the browser. If you see a security pop-up window, click through it. Then you will get the following window
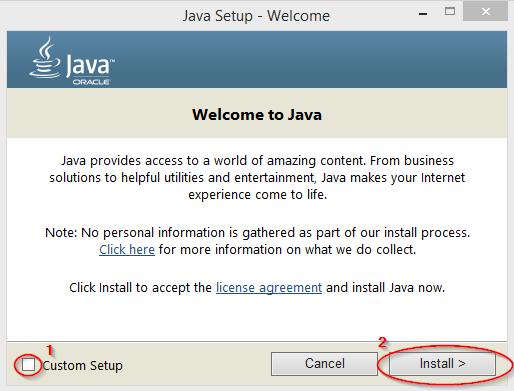
Select Custom Setup ① if you want to change the folder that Java SE is installed to. Press Install button to continue ②.
If you select Custom Setup, you will see the following “Custom Setup” window
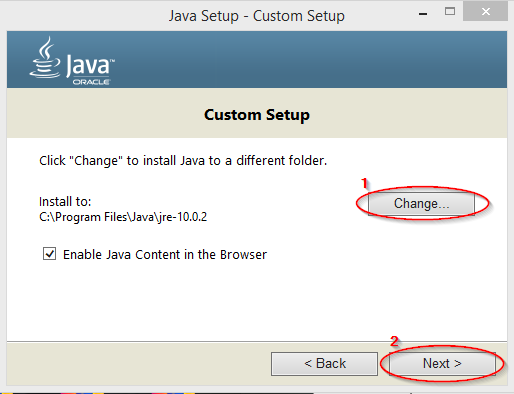
If you need to change the default folder (C:\Program Files\Java\jre-10.0.2 in the example screenshot) press Change button ①. You will see the following window

Browse to the place where you want to install Java SE to. Use Make New Folder button, if needed, to create the destination folder. Press OK button after the destination folder is selected.
When you are satisfied with the destination folder path, press Next button ② from the previous screenshot to start the Java SE installation.
If you selected Change destination folder initially and pressed Next button in the “Destination Folder” window after it or if you left Change destination folder unselected and pressed Install button right away you will see the following window
The window is supposed to show Java installation progress. When the installation is completed you will see the following window
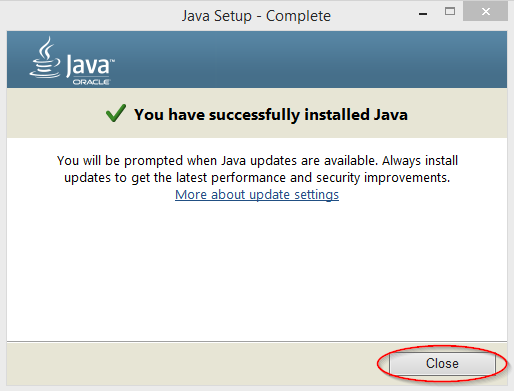
Press Close button. The Java SE runtime is installed.
Installing Java SE Development Kit 10 (JDK)
If you are installing JDK, you have to download and run JDK setup program
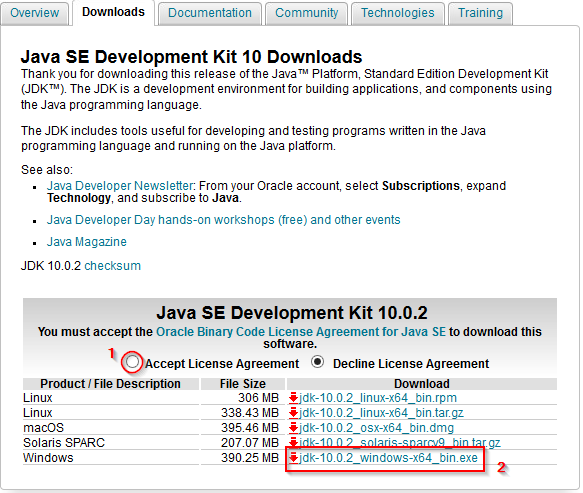
Select Accept License Agreement ①. Click on the filename that is in the intersection of Windows row and Download column ②. In the example screenshot it is jdk-10.0.2_windows-x64_bin.exe.
Depending on your browser, you will get a download prompt. Download and run the file. See Appendix 11 – Downloading and Running files from the Internet for more information.
The next steps do not depend on the browser. If you see a security pop-up window, click through it. You will get the following window

Press Next button.
You will get the following window.
If you need to change the default JDK folder (C:\Program Files (x86)\Java\jdk1.8.0_11 in the example screenshot) press Change button ①.
You will see the following window
Browse to the place where you want to install Java SE to ①②. Use Make New Folder button ③, if needed, to create folders. Make sure that the destination folder name is correct ④. Press OK ⑤ button after the destination folder is selected.
You will be back to the previous window. Press Next button ② to continue.
You will see JDK installation progress window.
If you do not have current Java Runtime (JRE) installed, you will also see a window suggesting JRE installation (if JRE is already installed skip the next two screenshots). In such a case, follow walkthrough in previous section Installing Java SE Runtime Environment (JRE).
After JDK (and, possibly, JRE) installation is completed, you will see
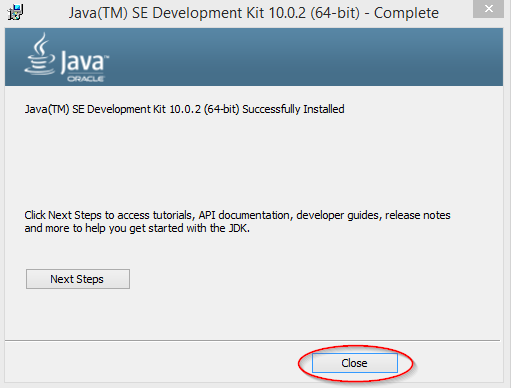
Press Close button. The Java SE JDK is installed.
Java Standard Edition 8 (32-bit and 64-bit)
If you want to use 32-bit Java, you have to install Java 8. Java 8 is the last release that has 32-bit version (Java 9 has reached end of support).
If you are running Microsoft Windows 32-bit, you have to install Java SE 32-bit. If you are running Microsoft Windows 64-bit, you may install Java SE 32-bit or Java SE 64-bit (or both).
| Java SE 8 32-bit | Java SE 8 64-bit | |
|---|---|---|
| Java Runtime Environment (JRE) | 126 MB | 128 MB |
| Java Development Kit (JDK) * includes JRE | 398 MB in destination folder 88 MB in temporary folder | 409 MB in destination folder 93 MB in temporary folder |
See Windows System Requirements for JDK and JRE🌐 for more details.
Downloading Java SE 8
To download Java Standard Edition 8 go to Oracle's Java SE Downloads🌐 webpage (the same as Java 10 downloads).

Click button that is under JDK or JRE label. You shall download JDK (that includes JRE) if you want to develop Java programs, otherwise it is enough to download JRE only.
Installing Java SE 8 Runtime Environment (JRE)
If you are installing JRE, you have to download and run JRE setup program
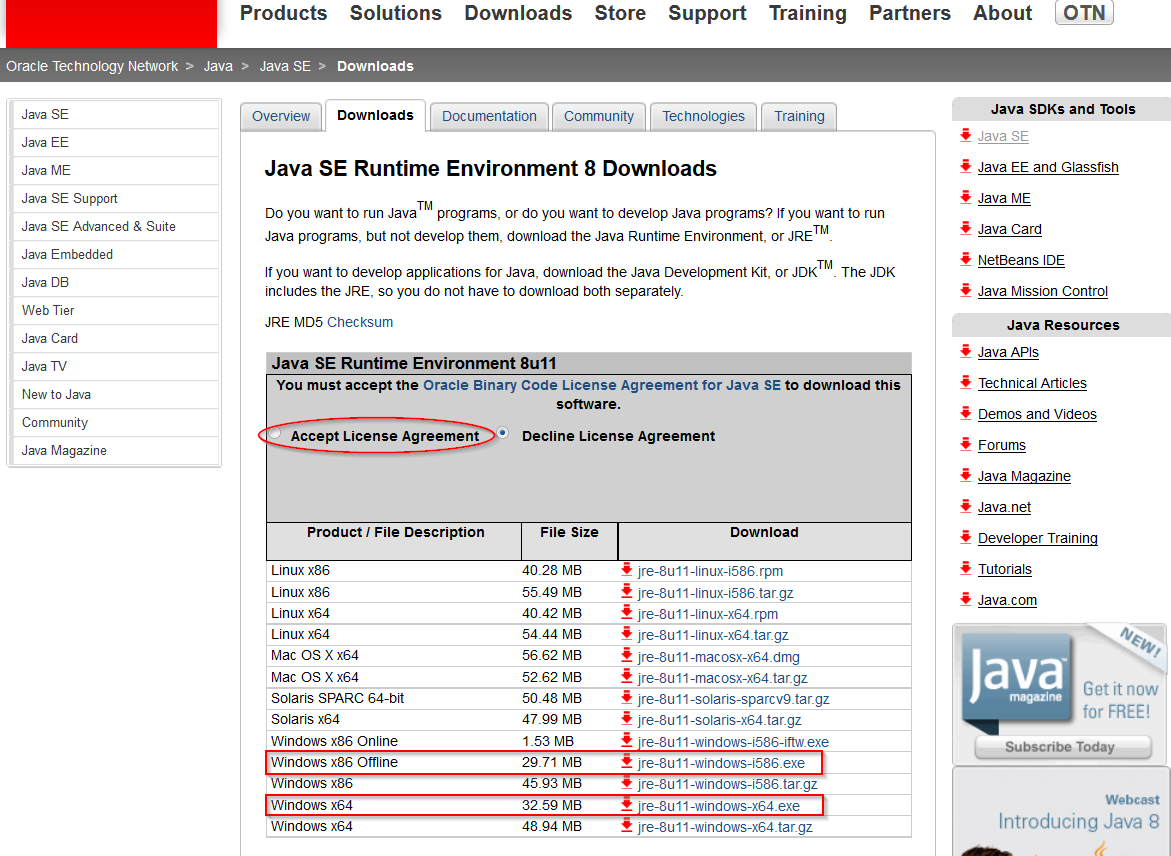
Select Accept License Agreement. Click on the filename that is in the intersection of “Windows x86 Offline” row and Download column. In the example screenshot it is jre-8u11-windows-i586.exe.
Depending on your browser, you will get a download prompt. Download and run the file. See Appendix 11 – Downloading and Running files from the Internet for more information.
The next steps do not depend on the browser. If you see a security pop-up window, click through it. Then you will get the following window

Select Change destination folder if you want to change the folder that Java SE is installed to. Press Install button in any case.
If you selected Change destination folder you will see the following “Destination Folder” window
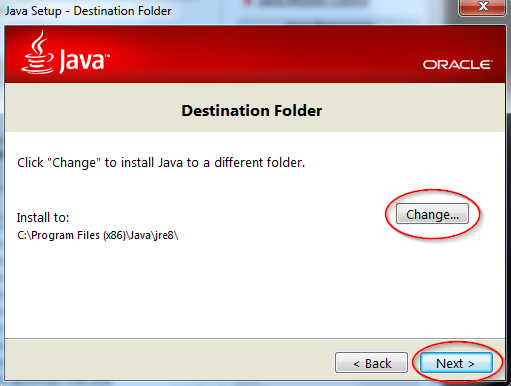
If you need to change the default folder (C:\Program Files (x86)\Java\jre8 in the example screenshot) press Change button. You will see the following window
Browse to the place where you want to install Java SE to. Use Make New Folder button if needed to create the destination folder. Press OK button after the destination folder is selected, it will close the pop-window
When you are satisfied with the destination folder path press Next button to start the Java SE installation.
Installing Java SE 8 Development Kit (JDK)
If you are installing JDK, you have to download and run JDK setup program. Note that it will also install JRE.
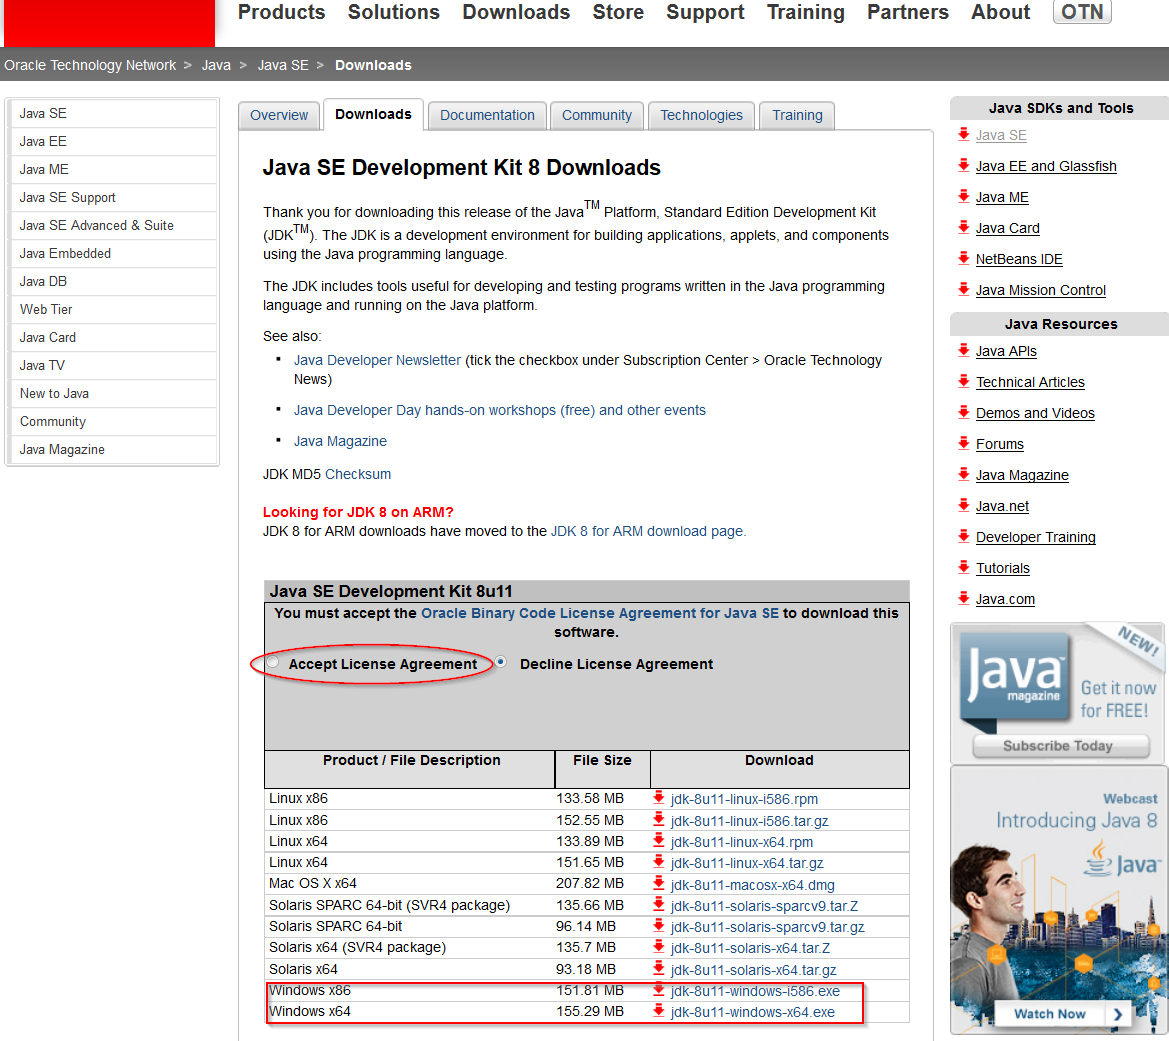
Select Accept License Agreement. If downloading Java SE 32-bit find “Windows x86” row, otherwise find “Windows x64” row. Click on the filename that is in the intersection of the found row and Download column. In the example screenshot it is either jdk-8u11-windows-i586.exe or jdk-8u11-windows-x64.exe.
Depending on your browser, you will get a download prompt. Download and run the file. See Appendix 11 – Downloading and Running files from the Internet for more information.
The next steps do not depend on the browser. If you see a security pop-up window click through it. You will get the following window
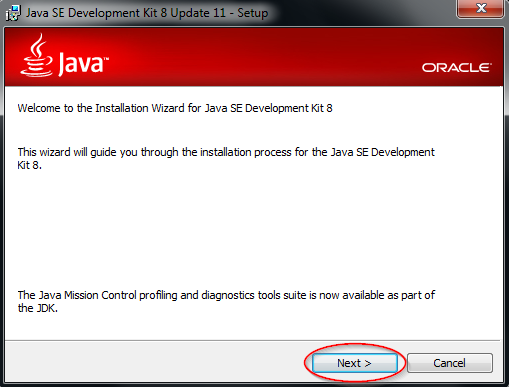
Press Next button. You will get the following window.
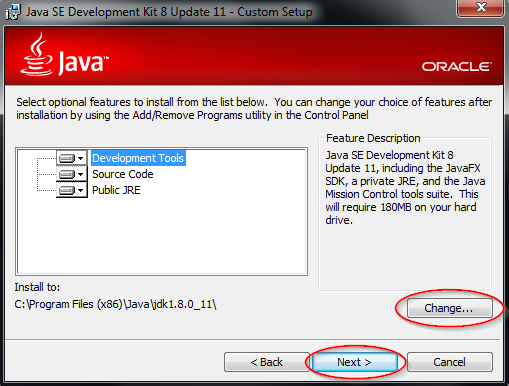
If you need to change the default JDK folder (C:\Program Files (x86)\Java\jdk1.8.0_11 in the example screenshot) press Change button.
You will see the following window
Browse to the place where you want to install Java SE JDK to. Use Make New Folder button (top right icon) if needed to create the destination folder. Press OK button after the destination folder is selected.
You will be back to the previous window. Press Next button to continue.
You will see JDK installation progress window.
If you do not have current Java Runtime (JRE) installed, you will see a window suggesting JRE installation (if JRE is already installed, skip the next two screenshots).
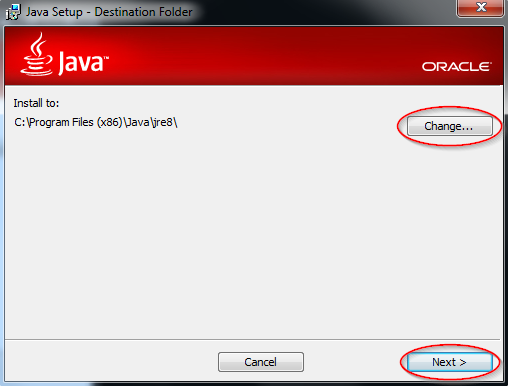
If you want to install JRE to some other folder than the default (C:\Program Files (x86)\Java\jre8 in the example) press Change button and select the folder. Otherwise press Next to continue JRE installation.
You will see JRE installation progress window.
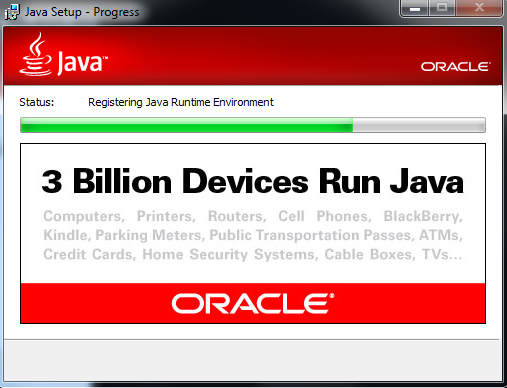
After JDK (and, possibly, JRE) installation is completed, you will see
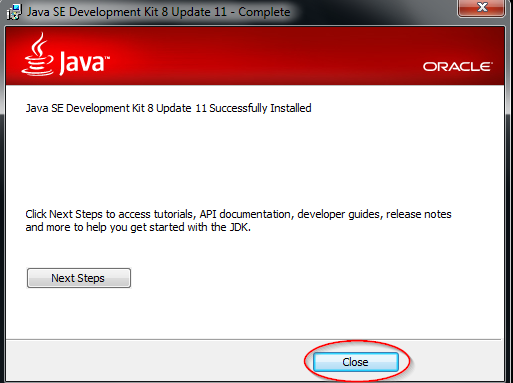
Press Continue button. The Java SE JDK is installed.
Java SE Development Kit Registration
At the end of the Java Development Kit (JDK) installation, the default browser may be launched and JDK Registration page may be opened.
You do not have to register. Register if you want, close the page, or just leave it as is.
If you selected Change destination folder initially and pressed Next button in the “Destination Folder” window after it or if you left Change destination folder unselected and pressed Install button right away, you will see the following window
The window is supposed to show Java installation progress.
When the installation is completed, you will see the following window
Press Close button. The Java SE runtime is installed.
As a side effect of the installation, a new browser window may be opened. You can safely close such a window.
Installing Java Packages Removed in Java SE 11
In Java SE 11, many Java packages were removed, for instance, javax.xml.* packages that are part of Jakarta EE.
If you need such packages, you may find many of them in Eclipse Orbit🌐 project. As an example, see below how to install javax.xml.bind package.
✔ If you are using Windows other than Windows XP and Eclipse is installed in a folder that the user cannot write to (for example, inside C:\Program Files), you have to run Eclipse as Administrator in order to be able to install and update Eclipse software. See When to Run Eclipse as Administrator (in Appendix 4 – Managing Eclipse Software) for more details.
✔ To be able to install and update software, Eclipse requires an Internet access. By default, Eclipse uses the same settings as Edge and Internet Explorer browsers, so, if you can browse the Internet via these browsers, you, very probably, will be able to use install and update features in Eclipse. See Appendix 3 – Configuring Eclipse for Internet Access if you are having Internet connectivity problems in Eclipse.
If needed, close Eclipse, start it again as Administrator, and select administrative workspace.
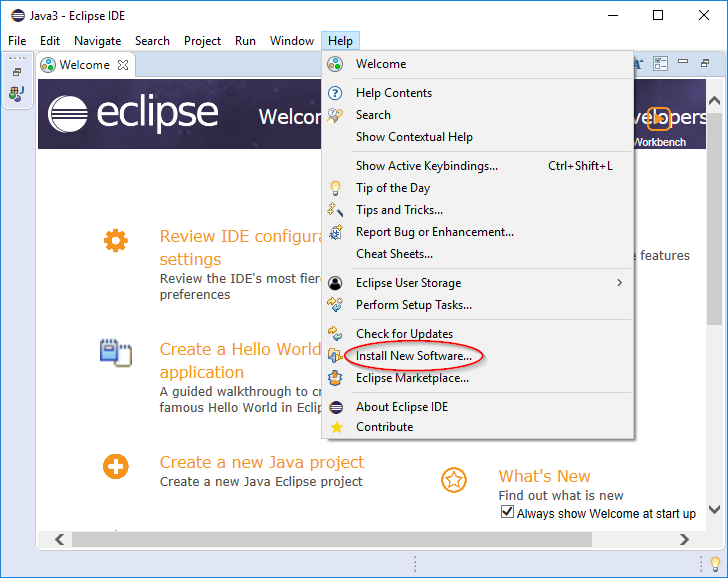
Open Help menu and select Install Additional Software option.
You will see Available Software window
On the Available Software page, press Manage button.
You will see Available Software Sites preferences.
Press Add button to add a new software site. It will open Edit Site pop-up window.

In the Name field ① enter
Orbit R20180905201904
In the Location field ② enter
http://download.eclipse.org/tools/orbit/downloads/drops/R20180905201904/repository
Press Add button ③ to add the site and to close the pop-up window.
You will see an updated list of software sites.
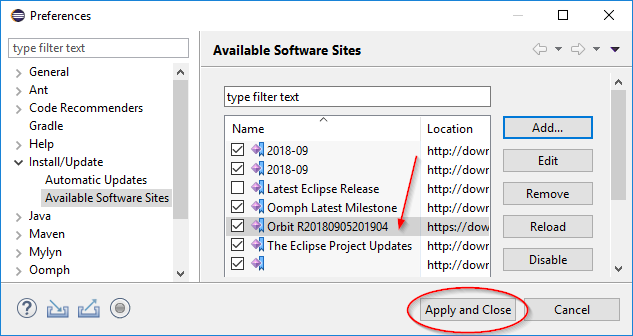
Press Apply and Close button to close the preferences.
You will be returned to the Available Software window.
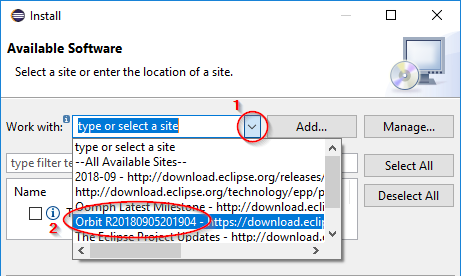
Open ① the drop-down list of software sites. Select Orbit R20180905201904 site ②.
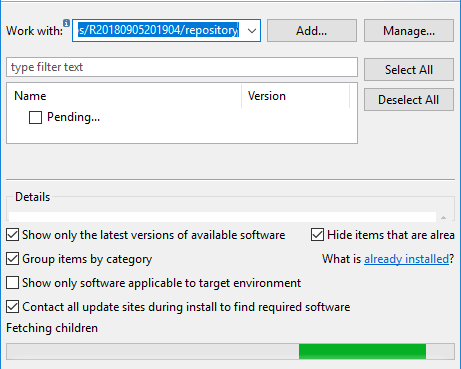
Wait until the software list is processed.
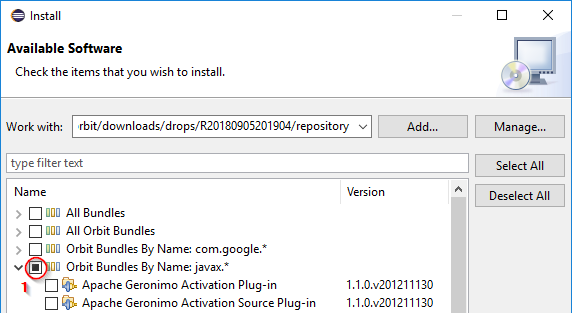


Click on white triangle (or angle ) left to Orbit Bundles By Name: javax.* ① to open a list of software items in the group.
Check XML Binding for Java item ②. Press Next button ③ to continue.
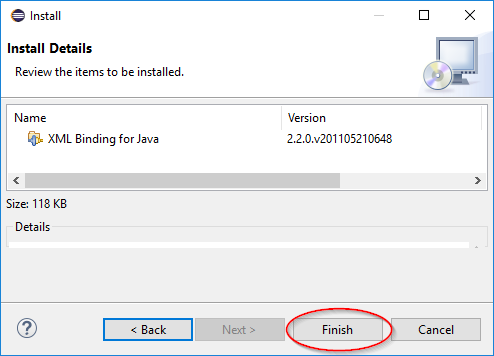
Press Finish button to proceed. The installation progress status will be displayed at the Eclipse main window bottom.
Wait until the software is installed.
Finally, after the software is installed, you will see a prompt asking to restart Eclipse. Press Restart Now button ① and wait until the Eclipse is restarted.
If Eclipse is running as Administrator - press No button ② instead, exit Eclipse, and start Eclipse again in regular way, if needed.
Appendix 10 – List of Software Items included in Eclipse CDT
Here is a list of all items included in CDT add-on.
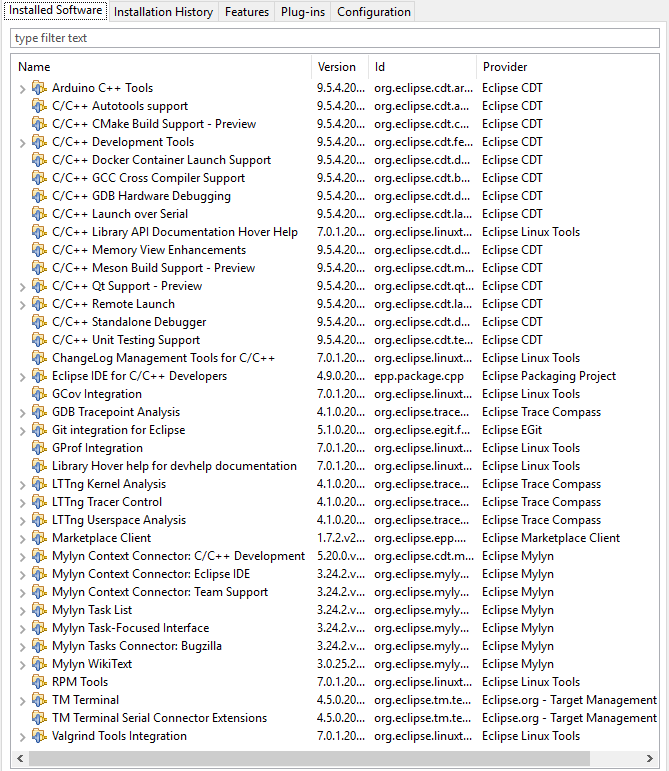
Unfortunately, there is no easy way to select these items when installing via Install New Software wizard. Look in the following software groups to find and select them one by one.
Collaboration
General Purpose Tools
Linux Tools
Mobile and Device Development
Performance, Profiling, and Tracing Tools
Programming Languages
Appendix 11 – Downloading and Running Files from the Internet
During the installation process you will need to download files from the Internet using a browser. In some cases, it will be necessary to run the downloaded files.
After clicking on a filename in the browser you will get “File Download” window that depends on the browser.
Downloading and Running Files in Internet Explorer 9
After clicking on a filename URL you will get “File Download” prompt at the bottom of the browser window.

If the file is supposed to be run press Run button (the file will be downloaded to a temporary folder and will be run immediately after it).
Save the file if you do not need to run it or if you expect to run it multiple times. To save the file click on small black triangle right to Save button to open a submenu and select Save As option. You will see the following window.

Browse to a desired folder and press Save button to start the downloading. If you see Open button but not the Save button, click on file name (jre-7u4-windows-i586.exe in the example screenshot).
After the download is completed you will see the following prompt.
 Press Run button to run the downloaded file. Otherwise press Open Folder button to see the folder containing the downloaded file.
Downloading and Running Files in Legacy Internet Explorer
After clicking on a filename in the browser you will get “File Download” pop-up window.
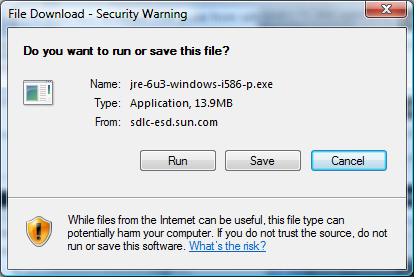
If the file is supposed to be run press Run button (the file will be downloaded to a temporary folder and will be run immediately after it). Press Save button otherwise or if you expect to run the file multiple times.
In the case of Save button you will see the following window.
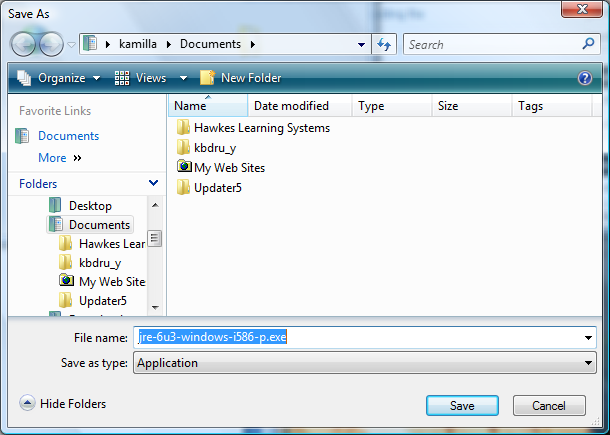
Browse to a desired folder and press Save button to start the downloading. After the download is completed, you will see the following window.
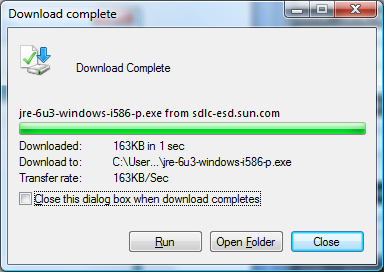
Press Run button to run the downloaded file. Otherwise press Open Folder button to see the folder containing the downloaded file.
Downloading and Running Files in Firefox
After clicking on a filename in the browser you will get “File Download” pop-up window. The specific window depends on Firefox version and installed browser add-ons. For example
If the file is supposed to be run press Run button (the file will be downloaded to a temporary folder and will be run immediately after it).
Save the file if you do not need to run it or if you expect to run it multiple times. To save the file press Save button or, if Save button is missing, select Save File and press OK button. You will see “Enter name of file to save to…” window. The specific window depends on Microsoft Windows version. For example, in the case of Windows 7
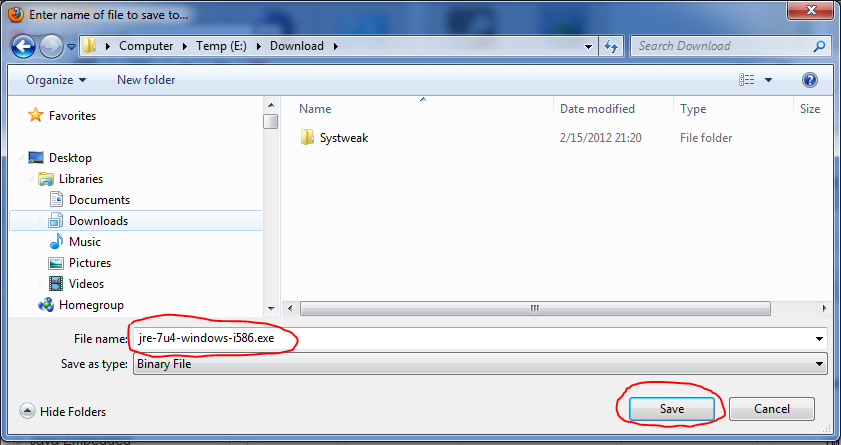
Browse to a desired folder and press Save button to start the downloading. If you see Open button but not the Save button, click on file name (jre-7u4-windows-i586.exe in the example screenshot).
You will see “Downloads” window showing the download progress.
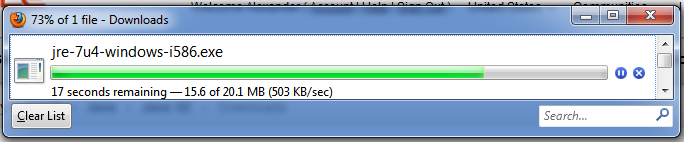
After the download is completed the “Downloads” window will change
To run the downloaded file, double click on the filename (jre-7u4-windows-i586.exe in the example screenshot). To see the folder containing the downloaded file right click on the filename to open a context menu and select “Open Containing Folder” option.
Appendix 12 – Extracting Eclipse Files to the Destination Folder
In the screenshot examples, substitute Photon for Luna, and kamilla for your username.
Open new File Explorer window (for example, double click on Computer icon on your desktop). Open the C: drive (or whatever drive supposed to contain the destination folder). Browse to Eclipse parent folder (where the Eclipse folder is supposed to be) and create the Eclipse folder.
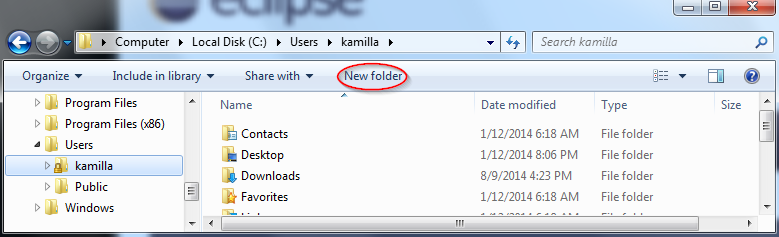
Depending on Windows version you create new folder by clicking on New Folder button or icon or via a context menu option (right click the mouse and select New->Folder)
You might see “Destination Folder Access Denied” popup window. Press Continue button in such a case. If you see “User Account Control” popup window with a warning message “A program needs your permission to continue” press Continue button again.
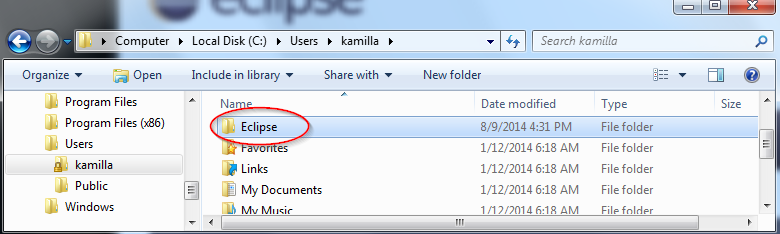
Go inside the newly created Eclipse folder and create Luna (or whatever destination you selected) subfolder. If asked, click through security pop-up windows.
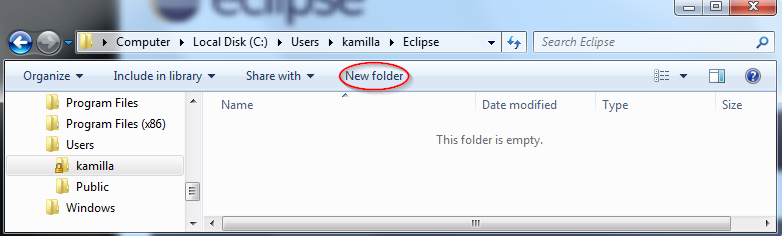
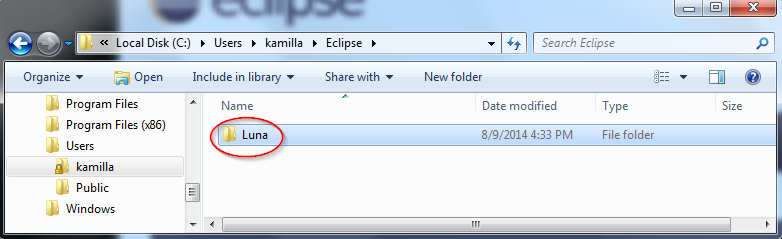
Go inside the newly created Luna folder. Note the folder path that has many small ► triangles
( ► Computer ► Local Disk (C:) ► Users ► Kamilla ► Eclipse ► Luna in the example screenshot)
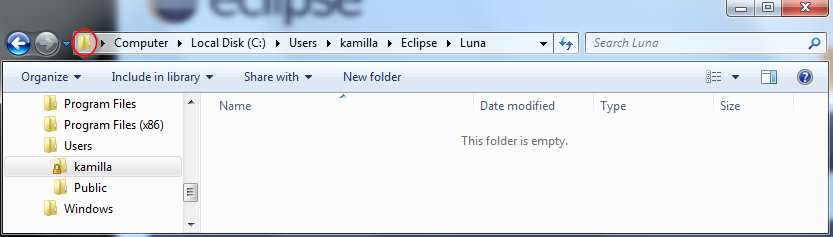
Click on the folder  icon left to the folder path (top left corner of the window).
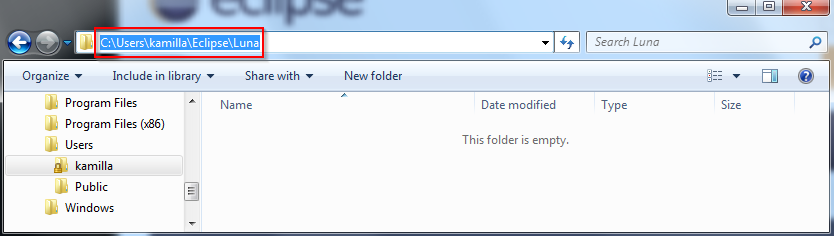
You are supposed to see the destination folder path displayed as highlighted text (C:\Users\kamilla\Eclipse\Luna in the example above). Press Ctrl-C to copy the destination folder path.
Now return to the Window Explorer window that has the downloaded Eclipse ZIP file.
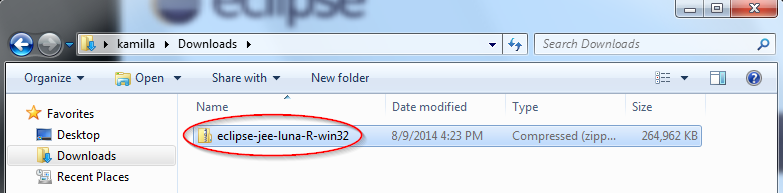
You have to extract the Eclipse ZIP file content to the destination folder. Depending on Windows version it can be done using native Windows decompression utility or via a third-party program (for example, 7-zip🌐). Below is an example for the native Windows 7 decompression utility.
Right click on the Eclipse ZIP file name to open a context menu.
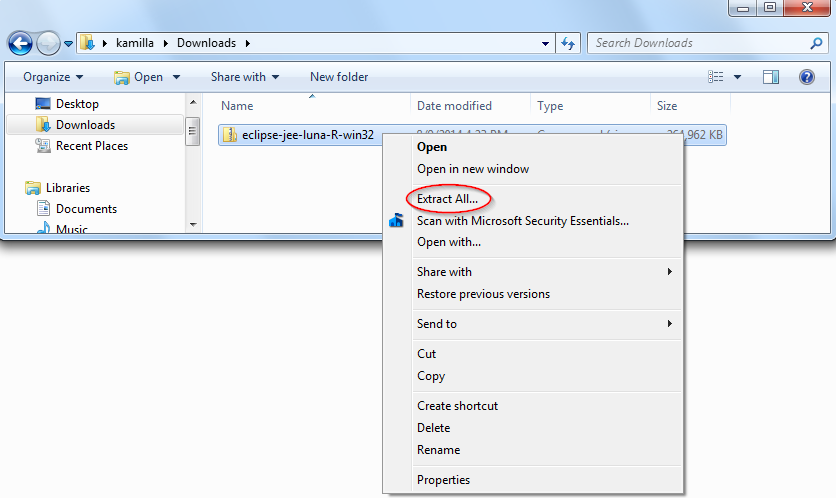
Select “Extract All …” option. You will see the following window

Select the text inside the field below “Files will be extracted to this folder” and press Ctrl-V. The destination folder path will be pasted into the field. You can also type the path manually or click Browse button and browse to the destination folder.

Confirm that the destination folder path is correct and press Extract button. You might see “Destination Folder Access Denied” popup window. Press Continue button in such a case.
While the files are being extracted you will see a progress window similar to the one below
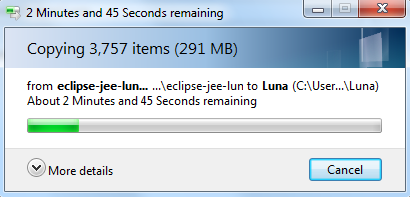
After all files are extracted, you will see a new File Explorer window opened
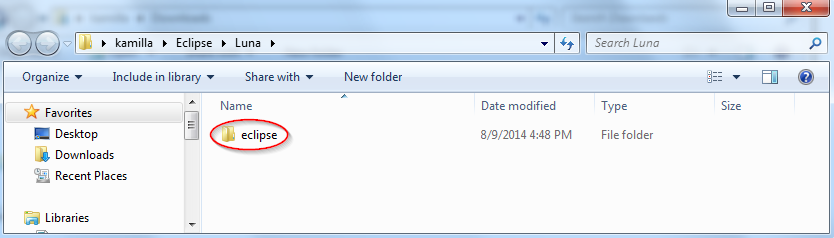
Appendix 13 – Eclipse Pop-ups and Prompts
You are installing software that contains unsigned content
During Eclipse software installation (or update), if the software is unsigned (by its developers), you will see a security prompt
Be sure that you want to install (update) such software. Press Details button to see more information about the unsigned software. Press Install Anyway button to continue (or Cancel otherwise).
Do you trust these certificates?
During Eclipse software installation (or update), if Eclipse does not know about the certificates that are used to sign the software, you will see a security prompt similar to one below
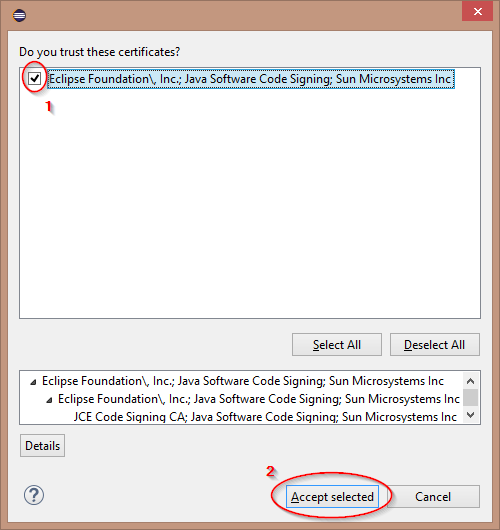
Review the certificate list (select a certificate and use Details button to see the certificate information). If you trust them, check appropriate box(es) ① and press Accept selected button ②.
Would you like to restart Eclipse IDE to apply the changes?
After Eclipse software is installed (or updated), you will see a prompt asking to restart Eclipse.
If Eclipse is running as regular user and the current workspace is to be used, press Restart Now button and wait until the Eclipse is restarted. Otherwise press No button instead, exit Eclipse, and start Eclipse again (and select or create an appropriate workspace, if so desired).
Older Workspace Version
If Eclipse software has been upgraded to a new release, you may see the following prompt when starting Eclipse
If you do not want to see such prompts in the future, check box “Do not warn me again about workspace versions” ①.
Press Continue button ② to proceed with the workspace update.
Note – If you are not sure about it, make a backup of your workspace before pressing Continue button.
Requirements Update
After Eclipse software is updated, you may see a prompt similar to one below
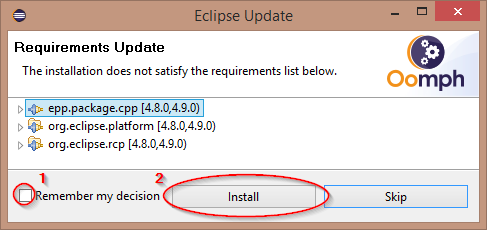
Check “Remember my decision” box ① if, in the future, you want Eclipse to update such requirements automatically. Press Install button ② to start the requirements update.
At the bottom of Eclipse main window, you will see the update progress indicator.

Wait until the update is completed.
Appendix 14 – Windows Security Pop-ups and Prompts
During the installation processes, you may see a lot of pop-up windows or prompts that contain security warnings. Review the warning text and, if everything is all right, press an appropriate button to continue.
Some of the security prompts that can happen are described below. Newer Microsoft Windows versions may have different and additional security prompts.
This page contains both secure and nonsecure items
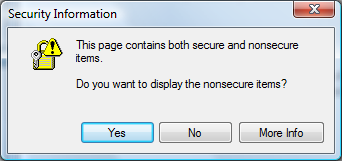
If you see such a pop-up window press Yes button
The publisher could not be verified
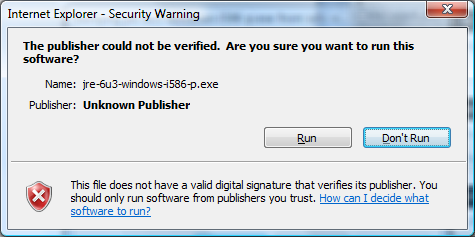
If you see such a pop-up window check the program name (in the example it is jre-6u3-windows-i596-p.exe). If it is the program that you have just started, press Run button.
Do you want to allow the following program to make changes to this computer?
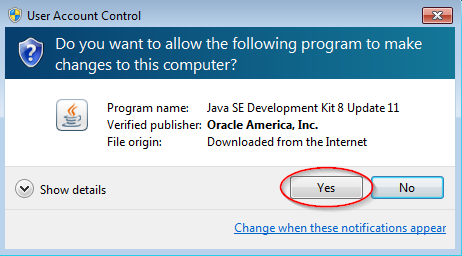
You may see “User Account Control” pop-up window with a warning message “Do you want to allow the following program to make changes to this computer?”. If you have just started the program press Allow button.
An unidentified program wants access to your computer
You may see “User Account Control” pop-up window with a warning message “An unidentified program wants access to your computer”. If you have just started the program press Allow button.
A program needs your permission to continue
You may see “User Account Control” pop-up window with a warning message “A program needs your permission to continue” and “Java (TM) SE Runtime…”. Press Continue button.
Windows needs your permission to continue
You may see “User Account Control” pop-up window with a warning message “Windows needs your permission to continue”. If you are creating a directory or copying files, press Continue button.
This page has an unspecified potential security risk
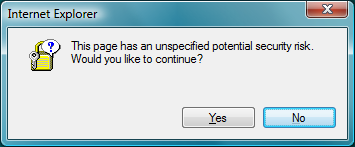
Sometimes you see such a pop-up window after you press right mouse button to open a context menu for a file that you have downloaded. In this case, press Yes button.
A website wants to open web content using this program on your computer
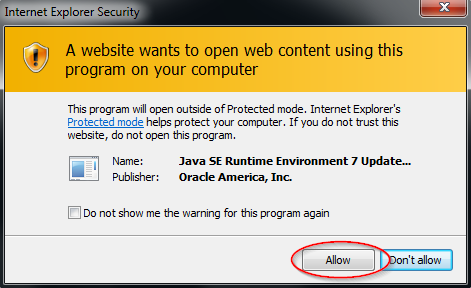
Press Allow button to proceed.
Destination Folder Access Denied
If you are creating a new folder you might see “Destination Folder Access Denied” pop-up window
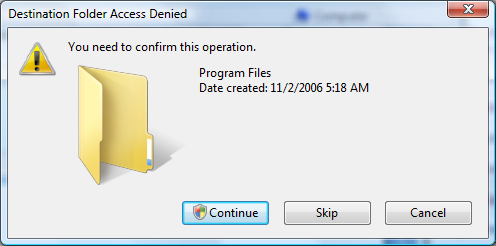
Press Continue button. If you see “User Account Control” pop-up window with a warning message “A program needs your permission to continue”, press Continue button.
You’ll need to provide administrator permission to copy to this folder
If you are extracting or copying files to some folder you might see “Destination Folder Access Denied” pop-up window
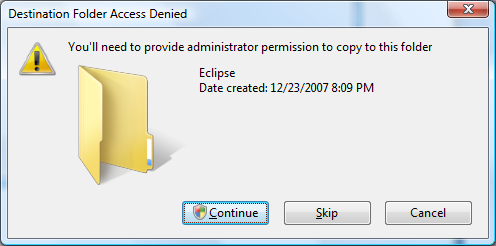
Press Continue button.
Windows Firewall has blocked some features of this program
During an Eclipse update, you might see a security pop-up window asking to confirm that you want to allow Eclipse an access to the Internet.
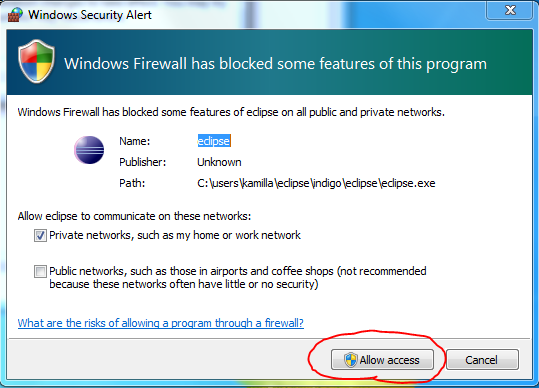
Click Allow access button.
Open File – Security Warning
If, while Eclipse is starting, you see “Open File – Security Warning” popup window
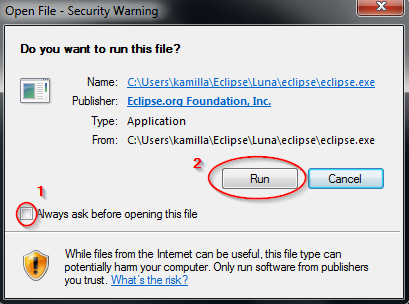
Uncheck Always ask before opening this file ①. Press Run button ②.
This program might not have installed correctly
While running Cygwin setup, in the case of Windows Vista, you might see “Program Compatibility Assistant” pop-up window.
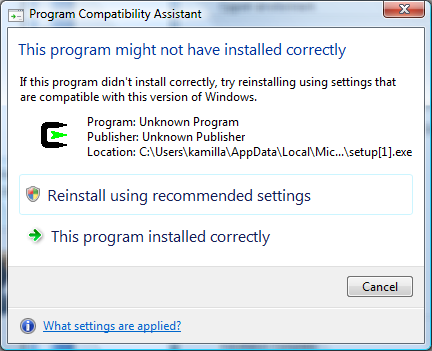
Click on “This program installed correctly” option.
Appendix 15 – Using 32-bit Software
Microsoft Window 32-bit
If you are running Microsoft Windows 32-bit, you have to install 32-bit Eclipse, 32-bit Java SE 8, and 32-bit Cygwin (in the case of C/C++).
Microsoft Window 64-bit
If you are running Microsoft Windows 64-bit, you can install 64-bit or 32-bit Eclipse.
64-bit Eclipse requires 64-bit Java (10 or 8) to run. 32-bit Eclipse requires 32-bit Java SE 8 to run. You can install both Eclipse and Java variants, the proper Java variant is selected automatically, depending on Eclipse variant.
If you develop Java programs, Eclipse allows to use multiple Java variants. So, while running 64-bit Eclipse, you can develop using 32-bit Java.
In the case of C/C++, either 64-bit or 32-bit Cygwin can be used to develop C/C++ programs.
Java Standard Edition 8 32-bit
If you want to use 32-bit Java, you have to install Java 8. Java 8 is the last release that has 32-bit version (Java 9 has reached end of support).
If you are running Microsoft Windows 32-bit, you have to install Java SE 32-bit. If you are running Microsoft Windows 64-bit, you may install Java SE 32-bit or Java SE 64-bit (or both).
See section Java Standard Edition 8 (32-bit and 64-bit) in Appendix 9 – Installing Legacy Versions of Java SE for more details.
Eclipse 32-bit
Downloading Eclipse 32-bit ZIP File
On the http://www.eclipse.org/downloads/packages🌐 webpage
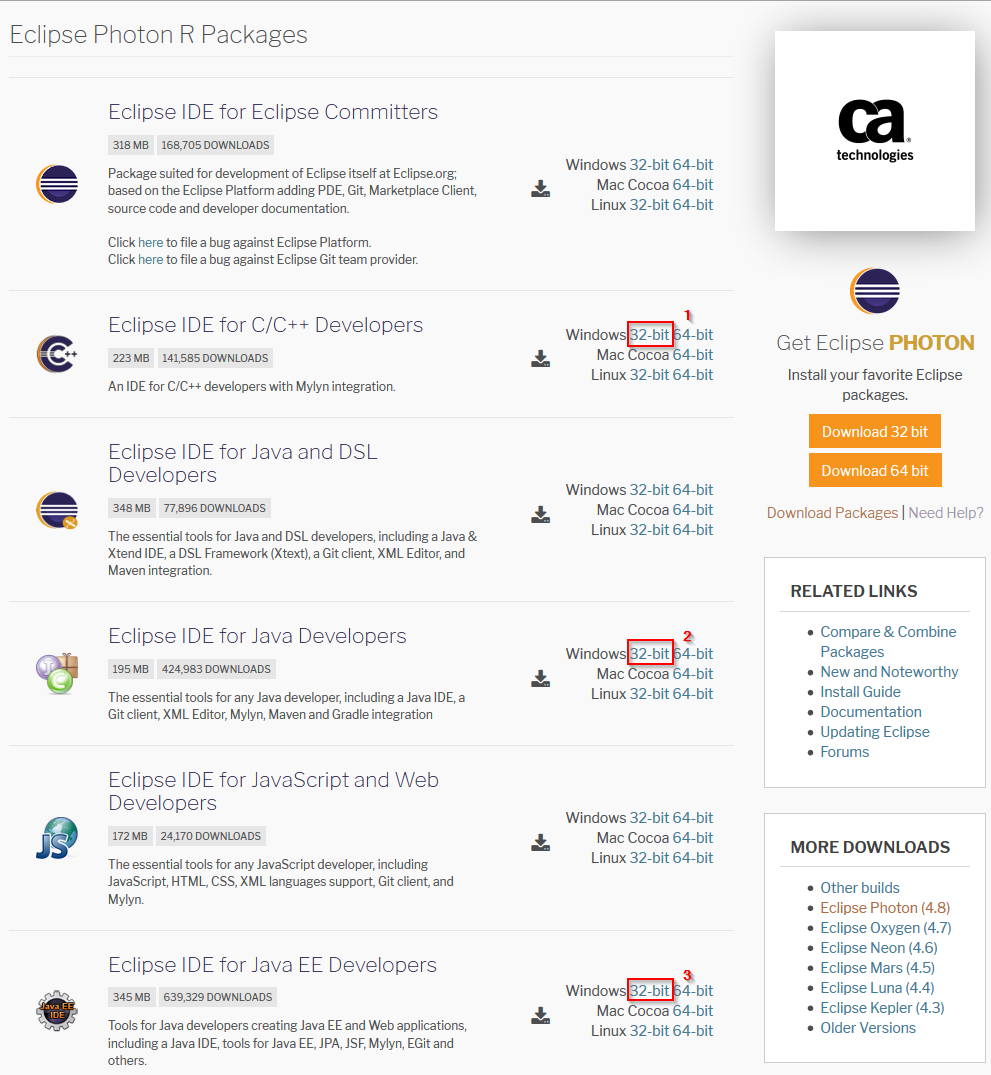
Select Eclipse variant that you want to download ①②③.
Eclipse 32-bit Installation Folder
Decide where you want Eclipse to be installed to (the installation folder). You have two choices
If you are going to use Eclipse and nobody else – install it in your data directory, for example,
C:\Users\Richard\Eclipse\Luna on Windows 8, 7 (and Vista). You will not need administrator access to manage Eclipse in this case.If other users are going to use Eclipse – install it in the program directory, for example, C:\Program Files (x86)\Eclipse\Luna on Windows 8, 7 32-bit (and Vista). In this case some Eclipse management will have to be performed using administrator access, specifically, (a) editing Eclipse .ini file, (b) initializing Eclipse data, (c) installing Eclipse add-ons, and (d) updating Eclipse.
The table below describes the destination folder selection. Substitute your actual username for username. If you downloaded different Eclipse version substitute its name for Luna.
| If you are going to use Eclipse and nobody else | If other users are going to use it | |
|---|---|---|
| Windows XP | C:\Documents and Settings\username\Eclipse\Luna | C:\Program Files\Eclipse\Luna |
| Windows 8, 7, and Vista 32-bit | C:\Users\username\Eclipse\Luna | C:\Program Files\Eclipse\Luna |
| Windows 64-bit & Eclipse 32-bit | C:\Users\username\Eclipse\Luna | C:\Program Files (x86)\Eclipse\Luna |
Initializing Shared Eclipse 32-bit Installation via Command Line
Using command line to initialize shared Eclipse installation is rarely needed. It is usually enough to run Eclipse as Administrator. Nevertheless, if you need it do the following.
Open shell window as administrator and enter the following commands (substitute real folder path for the example path)
cd \Program Files (x86)\Eclipse\Luna\eclipse
eclipse.exe -initialize
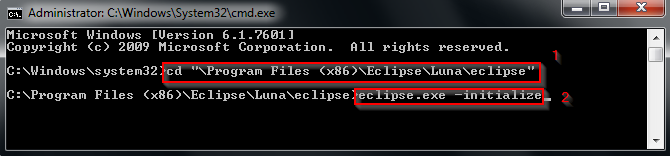
You will see Eclipse splash window.

Wait a minute until the window is closed (and Eclipse launcher exits).
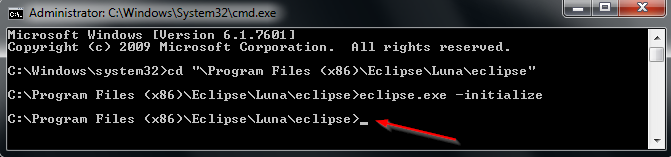
Cygwin 32-bit
Cygwin development packages are required in order to be able to compile, link, build, run, and debug C/C++ programs. You will need approximately 3.3 GB of disk space to install all Cygwin 32-bit development packages (you can reduce the disk space by not installing unnecessary development packages).
Downloading Cygwin 32-bit Setup Program
In a browser open www.cygwin.com🌐 website.

Click on setup-x86.exe🌐 URL ① if you are running 32-bit Windows or setup-x86_64.exe🌐 URL ② if you are running 64-bit Windows. Download and run the setup executable (Cygwin setup process is described in section Installing Cygwin).
By default, Cygwin is installed in C:\cygwin on 32-bit Windows.
Adding Cygwin 32-bit to Windows Path
While editing Path environment variable, note that the old path value is selected (has blue background).
Click somewhere in the Variable value field to deselect the old path value, move the cursor to the right, and add Cygwin bin subfolder.
✔ Be sure to deselect the old path value by clicking inside it. Otherwise, when you start typing, the old path value will be lost.
For example, add the following text
;C:\cygwin\bin
Note that you have to insert ; (semicolon) between the old path value and the folder pathname. Also, no spaces are allowed around the semicolon.
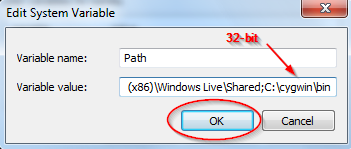
Press OK button.
Appendix 16 – Installing Eclipse via ZIP Archive
Downloading Eclipse ZIP File
In your browser open www.eclipse.org🌐
| Click on orange | | download button. |
You will see the following page
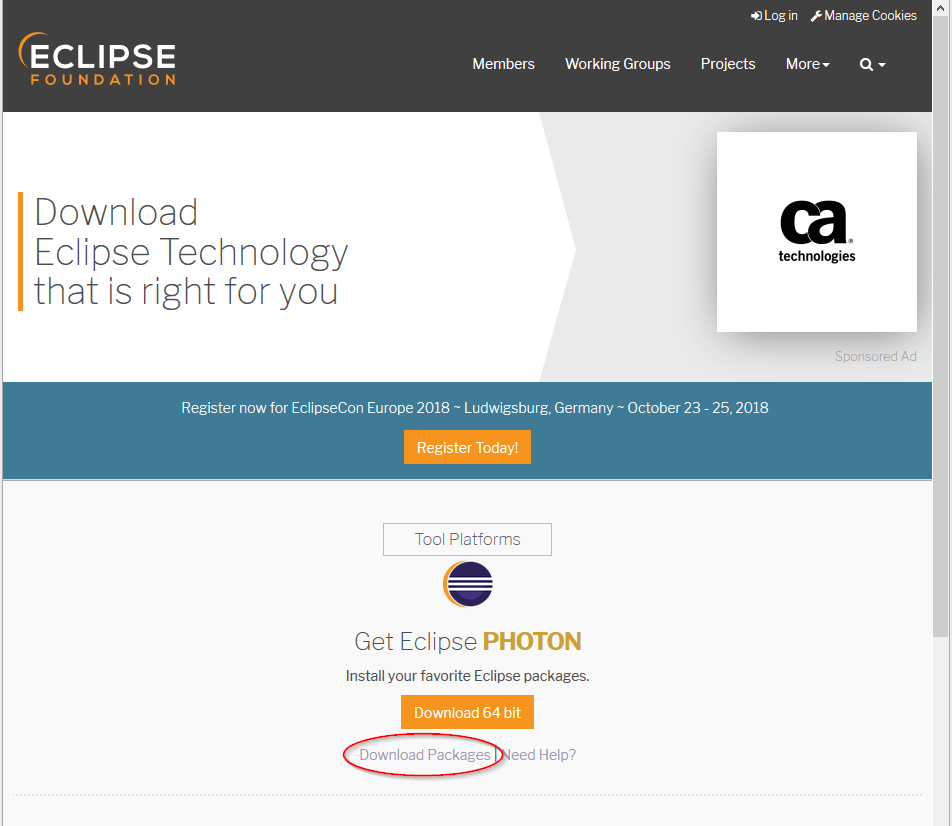
Click on Download Packages🌐 link.
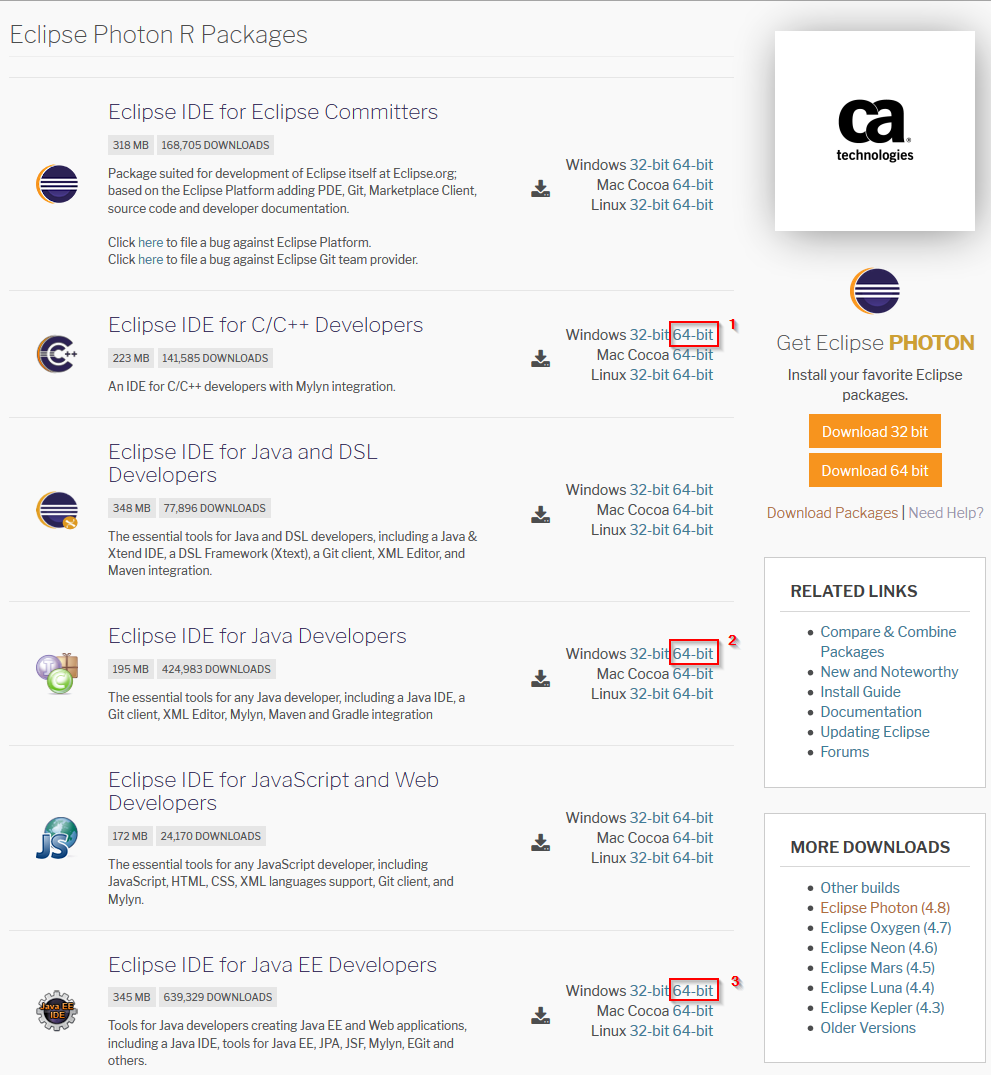
Select Eclipse variant that you want to download and click on correspondent Windows 64-bit link.
① If you want to use Eclipse for C/C++ development only, select “Eclipse IDE for C/C++ Developers”
② If you want to use Eclipse for Java standalone program development and, possibly, C/C++ development, select “Eclipse IDE for Java Developers”
③ If you want to use Eclipse for Java Enterprise development, possibly, for Java standalone program development, and, possibly, C/C++ development, select “Eclipse IDE for Java EE Developers”
Below it is assumed that “Eclipse IDE for Java EE Developers” 64-bit is selected. Find “Eclipse IDE for Java EE Developers” row and click on Windows 64 Bit hyperlink.
You will see the following page
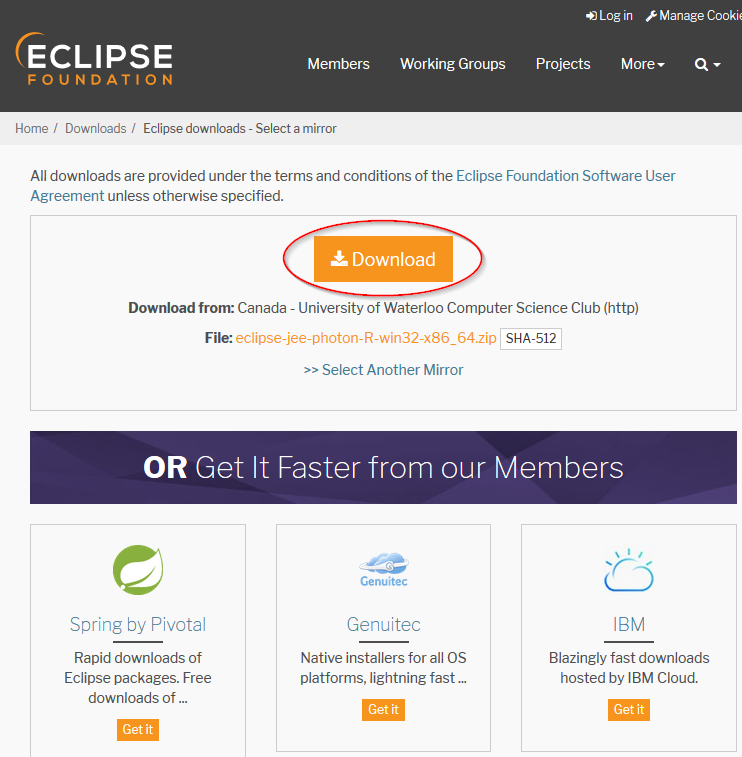
| Click on orange | | download button to download the ZIP file. |
WARNING - Do not click on Get It buttons unless you really want to install the third-party software.
Depending on your browser, you will get a download prompt. Download and save the ZIP file. See Appendix 11 – Downloading and Running files from the Internet for more information.
Open the folder containing the saved ZIP file. For example
Extracting Eclipse Files
Decide where you want Eclipse to be installed to (the installation folder). See Eclipse Installation Folder section for some hints.
Create the Eclipse installation folder and extract files from the downloaded ZIP archive there. If you need help with the ZIP files extraction, see Appendix 12 – Extracting Eclipse Files to the Destination Folder.
Return to the main text and continue from Setting Up Eclipse Shortcut section.